The best soil for Venus fly traps is nutrient-poor soil. Regular potting soil or enriched soil will burn the roots and quickly kill your Venus flytrap, so it’s crucial to choose the right mix for optimal growth and health, and Flyermedia.net delivers the essential guidelines. By understanding the specific soil needs, enthusiasts can ensure their carnivorous plants thrive, showcasing vibrant colors and active traps. Proper soil selection prevents root burn, promotes healthy growth, and supports the unique dietary needs of these fascinating plants, including ideal aeration and moisture retention techniques.
1. Why Nutrient-Poor Soil is Essential for Venus Flytraps
Venus flytraps thrive in nutrient-poor soil because their roots are highly sensitive to minerals and fertilizers. Regular potting soil contains nutrients that can burn their roots, leading to death. Using appropriate soil ensures healthy growth and longevity.
Venus flytraps, scientifically known as Dionaea muscipula, are carnivorous plants native to the wetlands of North and South Carolina. In their natural habitat, the soil is acidic and lacking in nutrients, a stark contrast to the rich, fertilized soils used for most other plants. This unique adaptation is why Venus flytraps require a specific type of soil to thrive in a domestic setting.
1.1. Understanding the Natural Habitat
The native soil of Venus flytraps is composed mainly of peat moss, silica sand, and a small amount of organic matter. This combination creates a low-nutrient environment that the plants have adapted to over centuries. The acidity of the soil, typically with a pH between 5.5 and 6.5, further supports their growth.
According to research from the University of North Carolina at Chapel Hill, Venus flytraps have developed specialized mechanisms to obtain nutrients from insects rather than relying on the soil. This is why using nutrient-rich soil can be detrimental, as it interferes with their natural nutrient absorption process and can lead to toxicity.
1.2. The Dangers of Regular Potting Soil
Regular potting soil is often enriched with fertilizers like nitrogen, phosphorus, and potassium, which are essential for the growth of most plants. However, these nutrients are toxic to Venus flytraps. When these plants are potted in regular soil, the high concentration of minerals can cause:
- Root Burn: The sensitive roots of Venus flytraps are quickly damaged by the excessive nutrients, leading to stunted growth and eventual death.
- Mineral Toxicity: Venus flytraps are not equipped to handle high levels of minerals, causing physiological stress and weakening the plant’s overall health.
- Inhibition of Carnivorous Behavior: When the soil provides an abundance of nutrients, the plant’s reliance on trapping insects diminishes, potentially weakening its carnivorous mechanisms over time.
1.3. Why Nutrient-Poor Soil Works
Nutrient-poor soil mimics the plant’s natural environment, allowing it to thrive by obtaining nutrients through its carnivorous behavior. This type of soil:
- Prevents Root Burn: Low nutrient levels ensure that the plant’s roots are not exposed to harmful concentrations of minerals.
- Promotes Healthy Root Development: The roots can grow freely without the risk of damage, leading to a stronger and more resilient plant.
- Encourages Carnivorous Activity: The plant remains dependent on trapping insects, keeping its carnivorous mechanisms active and efficient.
 Peat moss and Perlite
1.4. Key Components of Ideal Soil Mix
The ideal soil mix for Venus flytraps typically includes:
- Peat Moss: This forms the bulk of the soil, providing an acidic environment and excellent moisture retention. It should be pure peat moss without any added fertilizers.
- Perlite: This volcanic glass improves soil aeration and drainage, preventing the soil from becoming compacted.
- Silica Sand: This enhances aeration and supports the development of a healthy root system. It should be completely neutral and inert, without releasing any minerals into the soil.
The ratio of these components can vary, but a common mix is 1:1 peat moss and perlite, or 5:3:2 peat moss, silica sand, and perlite, respectively. These mixes provide the necessary conditions for Venus flytraps to thrive by maintaining low nutrient levels, proper aeration, and adequate moisture.
1.5. Practical Tips for Beginners
For novice growers, starting with a pre-mixed carnivorous plant soil can be a convenient option. However, it’s crucial to ensure that the mix is specifically designed for carnivorous plants and free of any added fertilizers. Always read the label carefully and avoid products that contain terms like “enriched” or “Miracle-Gro.”
- Regularly Flush the Soil: Over time, minerals can accumulate in the soil from tap water or decaying organic matter. Flushing the soil with distilled or reverse osmosis water can help remove these minerals and maintain the low-nutrient environment.
- Monitor Plant Health: Keep an eye on the plant’s overall health, including the color of the leaves, the vigor of the traps, and the growth rate. Any signs of distress, such as yellowing leaves or stunted growth, could indicate issues with the soil.
- Repot Annually: Repotting the Venus flytrap every year can help refresh the soil and prevent the buildup of harmful minerals. This also allows you to inspect the roots and ensure they are healthy.
By understanding the critical role of nutrient-poor soil, Venus flytrap enthusiasts can provide the optimal conditions for these fascinating plants to thrive, showcasing their unique carnivorous adaptations and vibrant health. This specialized care ensures that Venus flytraps remain a captivating and rewarding addition to any plant collection. Flyermedia.net can help you choose the right soil mixes for your plants.
2. Common Soil Mixtures for Venus Flytraps
Several soil mixtures can be used for Venus flytraps, each offering unique benefits. The most common mixtures include peat moss and perlite, long-fiber sphagnum moss, and silica sand combinations. Understanding these mixtures helps in creating an optimal growing environment.
The right soil mixture is critical for the health and vitality of Venus flytraps. These carnivorous plants have adapted to thrive in nutrient-poor environments, and selecting the proper soil ensures they receive the necessary support without the risk of nutrient toxicity. Each component of the soil mixture plays a specific role in maintaining the ideal conditions for growth.
2.1. Peat Moss and Perlite
A 1:1 mix of peat moss and perlite is widely regarded as the “standard” CP (carnivorous plant) mix. This combination offers several advantages:
- Peat Moss: Provides an acidic environment that Venus flytraps prefer. It also retains moisture well, keeping the soil consistently damp.
- Perlite: Enhances aeration, preventing the soil from becoming compacted and ensuring that the roots receive sufficient oxygen.
According to a study by the Carnivorous Plant Society, this mix is suitable for a wide range of carnivorous plants, including Venus flytraps, because it balances moisture retention with aeration, creating a favorable root environment.
Benefits:
- Easy to find and mix.
- Provides good moisture retention and aeration.
- Suitable for beginners.
Drawbacks:
- Perlite can float to the top with heavy watering.
- Peat moss can become compacted over time if not properly aerated.
2.2. Long-Fiber Sphagnum Moss
Long-fiber sphagnum moss is another excellent option for growing Venus flytraps. It offers unique benefits:
- Excellent Aeration: The fibrous structure of the moss allows for superior air circulation around the roots.
- High Moisture Retention: Sphagnum moss can hold several times its weight in water, ensuring the soil remains consistently moist.
- Natural Acidity: The moss naturally creates an acidic environment that Venus flytraps thrive in.
Research from the International Carnivorous Plant Society highlights that long-fiber sphagnum moss provides a natural and sustainable growing medium that closely mimics the plant’s native habitat.
Benefits:
- Provides excellent aeration and moisture retention.
- Naturally acidic and free of nutrients.
- Sustainable and long-lasting.
Drawbacks:
- Can be more expensive than peat moss and perlite.
- Requires careful watering to avoid over-saturation.
2.3. Silica Sand Combination
Some growers prefer to add silica sand to their soil mix for enhanced aeration and root support. A typical mix includes:
- 5 Parts Peat Moss: Provides the acidic base and moisture retention.
- 3 Parts Silica Sand: Enhances aeration and supports root development.
- 2 Parts Perlite: Further improves aeration and drainage.
Silica sand is inert and does not release minerals into the soil, making it safe for Venus flytraps. This combination is particularly beneficial for growers in warmer climates, as it helps prevent the soil from becoming waterlogged.
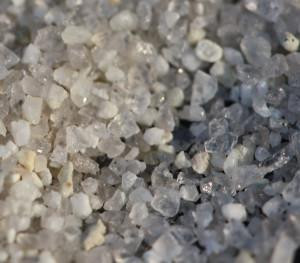 Silica Sand
Benefits:
- Excellent aeration and drainage.
- Supports a healthy root system.
- Inert and safe for carnivorous plants.
Drawbacks:
- Requires careful mixing to ensure proper ratios.
- May need more frequent watering due to increased drainage.
2.4. Mixing the Soil Components
Properly mixing the soil components is essential to create an effective growing medium. Here are some tips:
- Choose a Large Container: Use a five-gallon bucket or a similar container to mix the components without spilling.
- Add Peat Moss First: Place the peat moss in the container as the base layer.
- Add Perlite or Silica Sand: Add the perlite or silica sand on top of the peat moss.
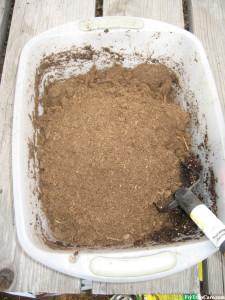
- Mix Thoroughly: Use your hands or a garden trowel to mix the components until they are evenly distributed.
- Moisten the Mix: Add distilled water gradually while mixing to ensure the peat moss is thoroughly soaked. Peat moss can repel water initially, so be patient and continue mixing until it absorbs the moisture.
- Check the Consistency: The final mix should be moist but not soggy, with a consistency that allows for good drainage.
2.5. Tips for Success
- Avoid Fertilizers: Always ensure that the soil components are free of fertilizers, as these can harm Venus flytraps.
- Use Distilled Water: Water the soil mix with distilled, reverse osmosis, or rainwater to avoid mineral buildup.
- Repot Annually: Repot the Venus flytrap annually to refresh the soil and prevent compaction.
- Monitor Plant Health: Regularly check the plant’s health and adjust the soil mix as needed to address any issues.
By understanding the different soil mixtures and their benefits, Venus flytrap enthusiasts can create the ideal growing environment for their plants. Whether using peat moss and perlite, long-fiber sphagnum moss, or a silica sand combination, proper soil selection and mixing techniques are crucial for the health and vitality of these fascinating carnivorous plants. For more information and resources, visit flyermedia.net, your go-to source for aviation and plant care insights.
3. Step-by-Step Guide to Mixing Venus Flytrap Soil
Mixing Venus flytrap soil requires careful attention to detail to ensure the right balance of aeration, moisture retention, and nutrient levels. This step-by-step guide will help you create the perfect soil mix for your carnivorous plant.
The process of mixing soil for Venus flytraps is critical to their health and growth. Unlike most plants, Venus flytraps thrive in nutrient-poor soil, which mimics their natural habitat. This guide provides a detailed, step-by-step approach to creating a soil mix that meets the unique needs of these fascinating plants.
3.1. Gathering the Necessary Materials
Before you begin, gather the following materials:
- Peat Moss: Use pure, unfertilized peat moss. Avoid brands like Miracle-Gro or Scott’s, which contain additives that can harm Venus flytraps.
- Perlite: Choose perlite to improve soil aeration and drainage.
- Silica Sand (Optional): If desired, use silica sand to further enhance aeration and root support.
- Distilled Water: Use distilled, reverse osmosis, or rainwater to moisten the soil mix.
- Mixing Container: A five-gallon bucket or similar container works well for mixing.
- Gloves: Protect your hands from the soil.
- Garden Trowel or Mixing Stick: Use this to mix the soil components thoroughly.
3.2. Step 1: Adding Peat Moss to the Mixing Container
Start by adding the peat moss to the mixing container. The amount of peat moss you use will depend on the quantity of soil mix you want to create. A common ratio is 1:1 peat moss and perlite, or 5:3:2 for peat moss, silica sand, and perlite, respectively.
 Add Peat Moss
Tip: Break up any large clumps of peat moss to ensure a more even mixture.
3.3. Step 2: Adding Perlite (and Silica Sand, if Using)
Next, add the perlite to the mixing container. If you are using silica sand, add it as well. Distribute the perlite and silica sand evenly over the peat moss.
 Add Perlite
Tip: Wear a dust mask when handling perlite and silica sand to avoid inhaling fine particles.
3.4. Step 3: Mixing the Soil Components
Use the garden trowel or mixing stick to thoroughly combine the peat moss, perlite, and silica sand (if used). Mix until the components are evenly distributed and the mixture appears uniform.
Tip: Ensure that there are no pockets of pure peat moss, perlite, or silica sand in the mix.
3.5. Step 4: Adding Distilled Water
Slowly add distilled water to the soil mix while continuing to stir. The peat moss will initially repel water, so add it gradually and mix continuously until the peat moss is thoroughly soaked.
 Add Distilled Water
Tip: The soil mix should be moist but not soggy. If you squeeze a handful of the mix, only a few drops of water should come out.
3.6. Step 5: Checking the Soil Consistency
Once the soil is thoroughly mixed and moistened, check the consistency. The ideal soil mix should be:
- Moist: Able to retain moisture without being waterlogged.
- Well-Aerated: Allowing for good air circulation around the roots.
- Uniform: With all components evenly distributed.
Tip: Adjust the mix as needed by adding more water if it is too dry or more peat moss, perlite, or silica sand if it is too wet.
3.7. Step 6: Storing the Soil Mix
If you are not using the soil mix immediately, store it in an airtight container to prevent it from drying out or becoming contaminated.
Tip: Label the container with the date and components of the soil mix for future reference.
3.8. Common Mistakes to Avoid
- Using Fertilized Soil: Never use soil that contains fertilizers or additives, as these can harm Venus flytraps.
- Overwatering: Avoid making the soil mix too wet, as this can lead to root rot.
- Underwatering: Ensure the soil mix remains consistently moist but not soggy.
- Poor Mixing: Thoroughly mix the components to ensure a uniform consistency.
By following these step-by-step instructions, you can create the perfect soil mix for your Venus flytrap, providing the optimal growing conditions for a healthy and thriving plant. Regular maintenance and monitoring of the soil’s moisture level will further contribute to the plant’s overall well-being. Explore more tips and resources on plant care at flyermedia.net.
4. Choosing the Right Pot for Your Venus Flytrap
Selecting the right pot for your Venus flytrap is crucial for its health and growth. The pot’s material, size, and drainage capabilities all play a significant role in creating an optimal environment for your carnivorous plant.
The pot in which a Venus flytrap is planted is as important as the soil it sits in. The right pot provides the necessary space for root growth, maintains stable temperatures, and ensures proper drainage. Understanding the characteristics of different pot types will help you make an informed decision and promote the overall health of your Venus flytrap.
4.1. Importance of Pot Depth
Venus flytraps develop deep root systems, so pot depth is a critical factor. A pot with sufficient vertical depth allows the roots to grow freely, promoting a stronger and healthier plant.
According to research from the Carnivorous Plant Resource, Venus flytraps thrive best in pots that are at least 4 to 5 inches deep. This depth provides ample space for the roots to expand without becoming constricted.
Benefits of Adequate Pot Depth:
- Promotes Root Growth: Allows roots to grow deep and strong.
- Enhances Stability: Prevents the plant from tipping over.
- Supports Hydration: Provides a larger soil volume for moisture retention.
4.2. Pot Material: Plastic vs. Insulated
The material of the pot can significantly impact the temperature of the soil, which in turn affects the health of the Venus flytrap. Common pot materials include plastic and insulated options.
Plastic Pots:
- Pros:
- Easy to find and inexpensive.
- Durable and lightweight.
- Cons:
- Can absorb heat, causing soil temperature fluctuations.
- Offer minimal insulation.
Insulated Pots (e.g., Styrofoam Cups):
- Pros:
- Provide excellent insulation, maintaining stable soil temperatures.
- Lightweight and inexpensive.
- Reflect sunlight, preventing overheating.
- Cons:
- Less durable than plastic pots.
- May not be aesthetically pleasing.
Choosing between plastic and insulated pots depends on your climate and growing conditions. In areas with extreme temperatures, insulated pots are preferable due to their ability to maintain stable soil temperatures.
4.3. Drainage Considerations
Proper drainage is essential to prevent root rot in Venus flytraps. The pot should have drainage holes to allow excess water to escape.
Key Drainage Factors:
- Number of Drainage Holes: Ensure the pot has multiple drainage holes to facilitate water flow.
- Hole Size: The holes should be large enough to allow water to drain freely without soil clogging them.
- Potting Mix: Use a well-draining potting mix, such as peat moss and perlite, to complement the pot’s drainage capabilities.
4.4. Pot Size and Shape
The size and shape of the pot should also be considered. While depth is crucial, the width of the pot should be sufficient to accommodate the plant’s growth.
General Guidelines:
- Small Plants: Start with a pot that is 4 to 5 inches in diameter.
- Mature Plants: Use a pot that is 6 inches or larger in diameter.
- Shape: Opt for a round or square pot with straight sides to maximize soil volume and root space.
4.5. Commonly Used Venus Flytrap Pots
- Plastic Pots: These are readily available at most garden centers. Choose a light-colored plastic pot to minimize heat absorption.
- Styrofoam Cups: These provide excellent insulation and are an inexpensive option. Select cups that are at least 16 ounces in size.
- Ceramic Pots: While aesthetically pleasing, ceramic pots can be heavy and may not provide adequate insulation. If using a ceramic pot, ensure it has sufficient drainage holes.
4.6. Additional Tips for Pot Selection
- Avoid Dark-Colored Pots: Dark-colored pots absorb more heat, which can be detrimental to Venus flytraps.
- Consider the Climate: In warmer climates, opt for insulated pots to maintain stable soil temperatures.
- Repot Annually: Repot your Venus flytrap annually to refresh the soil and provide more room for root growth.
By carefully considering the pot’s depth, material, drainage capabilities, size, and shape, you can create an optimal growing environment for your Venus flytrap. This attention to detail will promote healthy root development, stable soil temperatures, and overall plant vigor. For more expert advice and resources on carnivorous plant care, visit flyermedia.net.
5. Repotting Your Venus Flytrap: A Detailed Guide
Repotting is an essential part of Venus flytrap care, providing fresh soil and more room for growth. This detailed guide will walk you through the process, ensuring minimal stress to your plant.
Repotting a Venus flytrap is a critical task that should be performed annually to maintain the plant’s health. Over time, the soil can become depleted of essential qualities, and the roots may outgrow their current container. This detailed guide will provide you with a step-by-step process to repot your Venus flytrap effectively and safely.
5.1. When to Repot
The best time to repot a Venus flytrap is during its dormancy period, typically in late winter or early spring, before the plant begins to actively grow. Repotting during dormancy minimizes stress and allows the plant to recover more quickly.
Signs Your Venus Flytrap Needs Repotting:
- Slowed Growth: The plant exhibits reduced growth or smaller trap sizes.
- Soil Compaction: The soil becomes hard and compacted, hindering root growth.
- Root-Bound: Roots begin to circle the inside of the pot.
- Mineral Buildup: Visible mineral deposits on the soil surface.
5.2. Preparing for Repotting
Before you begin, gather the following supplies:
- New Pot: Choose a pot that is slightly larger than the current one, with adequate depth (at least 4-5 inches).
- Appropriate Soil Mix: Prepare a fresh batch of Venus flytrap soil mix (peat moss and perlite or long-fiber sphagnum moss).
- Distilled Water: Use distilled, reverse osmosis, or rainwater for watering.
- Clean Work Area: Select a clean, well-lit workspace.
- Tools: You may need a small trowel, scissors, or a gentle brush.
5.3. Step-by-Step Repotting Process
- Preparing the New Pot:
- Fill the new pot with the prepared soil mix, leaving about an inch of space at the top.
- Gently compress the soil to remove air pockets.
- Use a stick or your finger to create a hole in the center of the soil, deep enough to accommodate the Venus flytrap’s roots.
- Removing the Plant from the Old Pot:
- Gently squeeze the sides of the old pot to loosen the soil.
- Carefully turn the pot upside down, supporting the plant with your hand.
- If the plant does not come out easily, gently tap the bottom of the pot.
- Cleaning the Roots:
- Once the plant is removed, gently break away the old soil from the roots.
- Be careful not to damage the roots during this process.
- You can also rinse the roots in distilled water to remove stubborn soil particles.
- Inspecting the Rhizome:
- Examine the rhizome (the white bulb-like part below the soil) for any signs of rot or damage.
- Trim away any dead or decaying leaves or roots with clean scissors.
- Planting in the New Pot:
- Carefully place the Venus flytrap into the hole in the new pot.
- Ensure that the roots are spread out and not tangled.
- Adjust the depth so that the rhizome is just below the surface of the soil.
- Filling the Pot with Soil:
- Gently fill the pot with the remaining soil mix, pressing lightly around the rhizome to secure the plant.
- Avoid planting the Venus flytrap too deeply, as this can cause rot.
- Watering Thoroughly:
- Water the newly repotted Venus flytrap thoroughly with distilled water.
- Allow excess water to drain from the bottom of the pot.
- This helps settle the soil and remove any remaining air pockets.
5.4. Post-Repotting Care
- Location: Place the repotted Venus flytrap in a location with bright, indirect sunlight.
- Watering: Keep the soil consistently moist but not waterlogged.
- Humidity: Venus flytraps prefer high humidity, so consider placing the pot on a tray of pebbles filled with water.
- Monitoring: Monitor the plant for any signs of stress, such as wilting or yellowing leaves.
5.5. Common Mistakes to Avoid
- Damaging the Roots: Handle the roots with care to avoid breakage or injury.
- Using Contaminated Soil: Ensure that the soil mix is free of fertilizers and other contaminants.
- Overwatering: Avoid overwatering, as this can lead to root rot.
- Planting Too Deeply: Ensure that the rhizome is not buried too far below the soil surface.
By following this detailed guide, you can successfully repot your Venus flytrap, providing it with a fresh start and optimal growing conditions. Regular repotting, combined with proper care, will help your Venus flytrap thrive and remain a fascinating addition to your plant collection. Discover more essential plant care tips at flyermedia.net.
6. Understanding Rhizomes and Their Role in Repotting
The rhizome is a crucial part of a Venus flytrap, acting as its energy storage and growth center. Understanding the rhizome’s function is essential for successful repotting and overall plant health.
The rhizome is a modified stem that grows horizontally, typically underground, and serves as a vital organ for many plants, including the Venus flytrap. In the context of Venus flytrap care, the rhizome is the white, bulb-like structure located just below the soil surface, from which the leaves and roots emerge. This section will delve into the importance and the role of the rhizome in repotting.
6.1. What is a Rhizome?
A rhizome is essentially a storage unit for the plant. It stores energy in the form of carbohydrates, which the plant can use during periods of dormancy or when it needs to recover from stress. In Venus flytraps, the rhizome:
- Stores Nutrients: Provides the plant with the necessary resources to grow and thrive.
- Produces New Growth: Serves as the point from which new leaves and roots develop.
- Anchors the Plant: Helps to anchor the plant in the soil.
6.2. Why the Rhizome Matters in Repotting
During the repotting process, the rhizome is particularly vulnerable. Damage to the rhizome can severely impact the plant’s health, potentially leading to stunted growth or even death. Therefore, it’s crucial to handle the rhizome with care during repotting.
Key Considerations:
- Handling: Always handle the rhizome gently. Avoid squeezing or crushing it.
- Inspection: Examine the rhizome for any signs of rot or disease before repotting.
- Positioning: Ensure the rhizome is properly positioned in the new pot, just below the soil surface.
6.3. Step-by-Step Guide to Handling the Rhizome During Repotting
- Careful Extraction:
- When removing the Venus flytrap from its old pot, gently loosen the soil around the edges.
- Carefully lift the plant, supporting the rhizome to prevent any sudden stress or breakage.
- Cleaning and Inspection:
- Once the plant is removed, gently clean the soil from the rhizome and roots.
- Inspect the rhizome for any signs of rot, such as discoloration or a mushy texture.
- If rot is present, carefully trim away the affected areas with a clean, sterile knife or scissors.
- Proper Positioning:
- In the new pot, create a hole deep enough to accommodate the roots and the rhizome.
- Position the plant so that the rhizome is just below the surface of the soil.
- The top of the rhizome should be slightly visible or just covered with a thin layer of soil.
- Securing the Plant:
- Gently fill the pot with the appropriate soil mix, pressing lightly around the rhizome to secure the plant.
- Avoid compacting the soil too tightly, as this can restrict root growth.
6.4. Common Rhizome Issues and How to Address Them
- Rhizome Rot:
- Cause: Overwatering, poor drainage, or fungal infections.
- Symptoms: Discoloration, mushy texture, foul odor.
- Treatment: Remove affected areas, repot in fresh soil, and ensure proper drainage.
- Rhizome Damage:
- Cause: Rough handling during repotting or physical injury.
- Symptoms: Stunted growth, wilting leaves.
- Treatment: Provide optimal growing conditions and allow the plant to recover.
- Rhizome Exposure:
- Cause: Soil erosion or improper planting depth.
- Symptoms: Drying out of the rhizome, stunted growth.
- Treatment: Add more soil to cover the rhizome and maintain proper moisture levels.
6.5. Additional Tips for Rhizome Care
- Avoid Overwatering: Overwatering can lead to rhizome rot. Allow the soil to slightly dry out between waterings.
- Use Proper Soil: Always use a soil mix that is specifically designed for Venus flytraps to avoid nutrient toxicity.
- Provide Adequate Sunlight: Ensure the plant receives enough sunlight to support healthy growth.
- Monitor Plant Health: Regularly check the plant for any signs of stress or disease.
Understanding the rhizome and its role in the health of your Venus flytrap is essential for successful repotting and long-term care. By handling the rhizome with care and addressing any potential issues promptly, you can ensure that your Venus flytrap thrives. For more expert advice on plant care and aviation insights, visit flyermedia.net.
7. Watering Techniques for Healthy Venus Flytraps
Proper watering is crucial for Venus flytraps. Understanding the right type of water, frequency, and methods will help keep your plant healthy and thriving.
Watering is one of the most critical aspects of Venus flytrap care. These carnivorous plants have specific water requirements due to their sensitivity to minerals and chemicals commonly found in tap water. Using the correct watering techniques will help prevent mineral buildup, root rot, and other common issues. This section provides a comprehensive guide to watering techniques for healthy Venus flytraps.
7.1. The Importance of Water Quality
Venus flytraps are highly sensitive to the minerals and chemicals found in tap water. Using tap water can lead to mineral buildup in the soil, which can damage the roots and eventually kill the plant. Therefore, it is essential to use high-quality water that is free of harmful substances.
Acceptable Water Sources:
- Distilled Water: This is the most recommended option, as it is completely free of minerals and chemicals.
- Reverse Osmosis (RO) Water: RO water is also a good option, as it is purified using a membrane filtration process that removes most impurities.
- Rainwater: Rainwater is naturally soft and free of minerals, making it an excellent choice for watering Venus flytraps. However, be sure to collect rainwater from a clean source to avoid contamination.
Water Sources to Avoid:
- Tap Water: Tap water often contains high levels of minerals, chlorine, and other chemicals that are harmful to Venus flytraps.
- Softened Water: Water softeners add salt to the water, which is toxic to Venus flytraps.
- Bottled Water: Many types of bottled water contain minerals and additives that are not suitable for Venus flytraps.
7.2. Watering Frequency and Methods
The frequency and method of watering Venus flytraps depend on several factors, including the climate, the type of pot, and the soil mix. Generally, the goal is to keep the soil consistently moist but not waterlogged.
Watering Frequency:
- Growing Season (Spring and Summer): Water the Venus flytrap frequently enough to keep the soil consistently moist. This may mean watering every day or every other day, depending on the conditions.
- Dormancy Period (Fall and Winter): Reduce watering during the dormancy period, allowing the soil to dry out slightly between waterings. Water only when the top inch of soil feels dry to the touch.
Watering Methods:
- Top Watering: Pour water gently onto the surface of the soil until it is thoroughly saturated. Allow excess water to drain from the bottom of the pot.
- Tray Watering: Place the pot in a tray filled with water, allowing the soil to absorb moisture from the bottom. This method helps to keep the soil consistently moist and prevents mineral buildup. Remove the pot from the tray once the soil surface is moist.
- Misting: Misting the plant can help to increase humidity, but it should not be used as the primary watering method.
7.3. Recognizing Overwatering and Underwatering
It is essential to monitor the plant for signs of overwatering and underwatering to adjust watering practices accordingly.
Signs of Overwatering:
- Yellowing Leaves: Leaves may turn yellow or brown.
- Wilting: The plant may wilt despite the soil being wet.
- Root Rot: The roots may become brown and mushy.
- Foul Odor: A foul odor may come from the soil.
Signs of Underwatering:
- Dry Soil: The soil feels dry to the touch.
- Drooping Leaves: Leaves may droop or become limp.
- Browning Leaf Tips: The tips of the leaves may turn brown and crispy.
- Stunted Growth: The plant may exhibit slowed or stunted growth.
7.4. Tips for Proper Watering
- Use a Watering Can with a Long Spout: This allows you to water the plant gently and evenly without disturbing the soil.
- Water in the Morning: Watering in the morning allows the plant to dry out during the day, reducing the risk of fungal infections.
- Avoid Watering the Traps: Watering the traps directly can cause them to close unnecessarily, wasting energy.
- Flush the Soil Periodically: Periodically flush the soil with distilled water to remove mineral buildup.
7.5. Watering During Dormancy
During the dormancy period (typically from late fall to early spring), Venus flytraps require less water than during the growing season. Reduce watering frequency and allow the soil to dry out slightly between waterings.
Key Considerations:
- Reduce Frequency: Water only when the top inch of soil feels dry.
- Avoid Overwatering: Overwatering during dormancy can lead to root rot.
- Maintain Humidity: Ensure the plant is kept in a cool, humid environment.
By following these watering techniques, you can provide your Venus flytrap with the moisture it needs to thrive while avoiding the common pitfalls of overwatering and mineral buildup. Proper watering, combined with appropriate soil and sunlight, will help keep your Venus flytrap healthy and vibrant. For more essential tips and resources on plant care and aviation insights, visit flyermedia.net.
8. Dealing with Common Venus Flytrap Soil Issues
Even with the best care, Venus flytrap soil can encounter problems like mineral buildup, mold growth, and compaction. Knowing how to address these issues is vital for maintaining plant health.
Maintaining the health of Venus flytraps involves vigilant monitoring and prompt intervention when soil issues arise. Problems such as mineral buildup, mold growth, and soil compaction can hinder the plant’s growth and overall health. This section provides practical solutions and preventive measures to address these common soil issues.
8.1. Mineral Buildup
Mineral buildup is a frequent problem in Venus flytrap soil