Tying fishing flies is a rewarding skill that enhances your angling experience, offering a unique connection to the sport and an edge in catching fish. At flyermedia.net, we’ll guide you through essential techniques and patterns, enabling you to create effective flies tailored to your local waters. Mastering fly tying basics empowers you to craft flies that precisely mimic the insects fish feed on, increasing your success and enjoyment on the water, with fly tying materials and fly tying techniques.
1. Why Learn How to Tie Fishing Flies?
Why should you invest your time in learning How To Tie Fishing Flies? It goes beyond just saving money; it’s about enhancing your fishing experience on multiple levels.
1.1 Cost-Effectiveness
Let’s face it: buying flies can be expensive, especially if you’re an avid angler. Tying your own flies significantly reduces your fishing expenses. The initial investment in tools and materials pays off quickly as you replenish your fly box with custom creations at a fraction of the retail cost.
1.2 Customization
Tying your own flies gives you the freedom to customize patterns to match the specific hatches and conditions of your local waters. You can experiment with different materials, colors, and sizes to create flies that are irresistible to the fish in your area. This level of customization is simply not possible when relying solely on commercially available flies.
1.3 Deeper Connection
There’s an undeniable connection that forms when you catch a fish on a fly you tied yourself. It’s a testament to your skill, knowledge, and understanding of the sport. This personal connection adds a whole new dimension to your fishing experience, making each catch even more rewarding.
1.4 Versatility
Fly tying opens up a world of creative possibilities. You can tie flies for various species, techniques, and environments. Whether you’re targeting trout in mountain streams, bass in lakes, or saltwater species in the ocean, fly tying allows you to adapt and create the perfect fly for any situation.
1.5 Relaxation and Focus
Fly tying is a meditative and relaxing activity that can help you unwind and de-stress. The intricate process of working with small materials requires focus and concentration, allowing you to escape the pressures of daily life. Many anglers find fly tying to be a therapeutic and enjoyable pastime.
2. Essential Fly Tying Tools and Materials
Before you can start tying flies, you’ll need to gather the essential tools and materials. Here’s a breakdown of what you’ll need to get started.
2.1 Vise
The vise is the foundation of your fly tying setup. It securely holds the hook in place, allowing you to work with both hands. Look for a vise that is sturdy, adjustable, and capable of holding a variety of hook sizes. Rotary vises are a popular choice among experienced tiers, as they allow you to rotate the hook for easier access and better visibility.
2.2 Bobbin Holder
The bobbin holder is a small tool that holds the spool of thread and allows you to apply thread to the hook in a controlled manner. Choose a bobbin holder with a smooth, consistent tension to prevent thread breakage and ensure neat, even wraps.
2.3 Scissors
A good pair of scissors is essential for trimming materials and thread. Look for scissors with fine, sharp blades that can cut cleanly and precisely. Specialty fly tying scissors are available with features like curved blades or serrated edges for specific tasks.
2.4 Hackle Pliers
Hackle pliers are used to grip and wrap hackle feathers around the hook shank. Choose pliers with a comfortable grip and jaws that securely hold the hackle without damaging it.
2.5 Bodkin
A bodkin is a sharp, pointed tool used for applying head cement, picking out dubbing, and creating neat thread wraps. Look for a bodkin with a comfortable handle and a fine, durable point.
2.6 Whip Finisher
A whip finisher is a tool used to create a neat and secure knot at the head of the fly. While you can learn to tie a whip finish by hand, a whip finisher tool makes the process faster and easier.
2.7 Head Cement
Head cement is a type of adhesive used to secure the thread wraps at the head of the fly and protect it from unraveling. Choose a head cement that is waterproof, flexible, and dries quickly.
2.8 Hooks
Hooks are the foundation of any fly. Choose hooks that are appropriate for the size and style of fly you’re tying. Hooks are available in a variety of sizes, shapes, and materials to suit different applications.
2.9 Thread
Thread is used to bind the materials to the hook. Choose a thread that is strong, durable, and matches the color of your fly. Thread is available in a variety of materials, sizes, and colors.
2.10 Feathers
Feathers are used to create wings, tails, and bodies for flies. Choose feathers that are appropriate for the size, shape, and color of your fly. Common types of feathers used in fly tying include hackle, marabou, and pheasant.
2.11 Dubbing
Dubbing is a type of material used to create the bodies of flies. It consists of fine fibers that are twisted onto the thread to create a fuzzy, lifelike appearance. Dubbing is available in a variety of materials, colors, and textures.
2.12 Tying Materials
- Marabou: Soft, fluffy feathers used for tails and wings.
- Hackle: Stiff feathers used for dry fly hackle and wet fly collars.
- Flash: Synthetic materials used to add sparkle and attraction to flies.
- Lead Wire: Used to add weight to flies.
- Beads: Used to add weight and attraction to flies.
 Fly tying vice holding a hook
2.13 Organizing Your Materials
Keeping your fly tying materials organized is essential for efficiency and enjoyment. Invest in storage containers, boxes, and organizers to keep your tools and materials within easy reach.
3. Basic Fly Tying Techniques
Once you have your tools and materials, it’s time to learn the basic techniques of fly tying. Here are some essential skills to master.
3.1 Starting the Thread
The first step in any fly tying project is to attach the thread to the hook. Start by placing the hook in the vise, with the point and barb exposed. Hold the thread against the hook shank and make several wraps, working backward towards the bend of the hook. This creates a secure base for the rest of the fly.
3.2 Wrapping the Thread
Wrapping the thread is the fundamental technique used to attach materials to the hook. Hold the bobbin holder in your dominant hand and use your other hand to guide the thread. Make smooth, even wraps, overlapping each wrap slightly to create a secure hold.
3.3 Attaching Materials
Attaching materials involves securing feathers, dubbing, and other components to the hook using thread wraps. Position the material on the hook shank and make several tight wraps to hold it in place. Trim any excess material close to the thread wraps.
3.4 Dubbing the Body
Dubbing is used to create the body of the fly. Take a small amount of dubbing material and twist it onto the thread, creating a fuzzy strand. Wrap the dubbing-covered thread around the hook shank, overlapping each wrap slightly to create a uniform body.
3.5 Applying Hackle
Hackle is used to create the legs and collar of the fly. Select a hackle feather and prepare it by removing the fluffy barbs from the base of the stem. Attach the hackle to the hook shank and wrap it around the hook, creating a collar of barbs. Secure the hackle with thread wraps and trim any excess material.
3.6 Finishing the Fly
The final step in fly tying is to finish the fly by creating a neat and secure head. Use a whip finisher tool or learn to tie a whip finish by hand. Apply head cement to the thread wraps to protect them from unraveling.
4. Essential Fly Patterns for Beginners
Now that you’ve learned the basic techniques, it’s time to start tying some simple and effective fly patterns. Here are a few must-know patterns for beginners.
4.1 Mohair Leech
The Mohair Leech is a versatile pattern that imitates a variety of aquatic prey, from leeches to small baitfish. It’s easy to tie and highly effective for trout, bass, and other gamefish.
- Hook: 4X-long streamer hook, sizes 8 to 4
- Thread: Size 6/0 (140 denier)
- Tail: Marabou and a couple of strands of Krystal Flash
- Body: Mohair yarn (purchased at a crafts store) wrapped on the hook shank
Tying Instructions:
- Wrap the thread onto the hook shank to create a base.
- Tie in the marabou tail, followed by a couple of strands of Krystal Flash.
- Wrap the mohair yarn around the hook shank to create the body.
- Secure the mohair with thread wraps and trim any excess.
- Whip finish and apply head cement.
Fly tying vice holding a hook
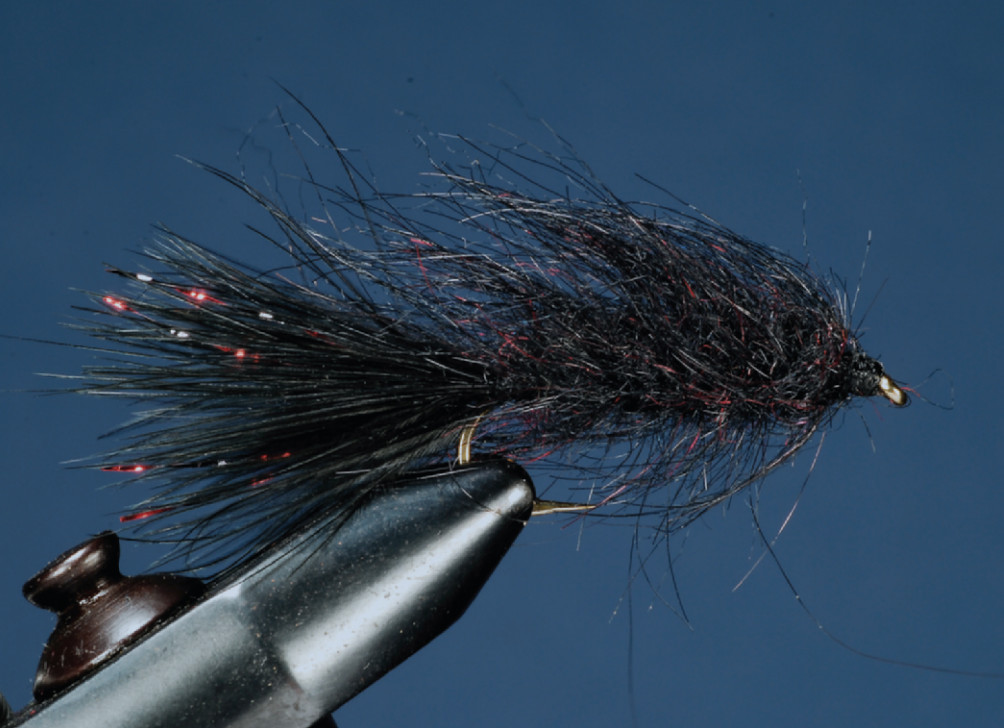
4.2 Woolly Bugger
The Woolly Bugger is a classic streamer pattern that imitates a wide range of aquatic insects and small fish. It’s a great fly for beginners because it’s easy to tie and highly effective in a variety of conditions.
Materials:
- Hook: Streamer hook, sizes 4-10
- Thread: 6/0 or 8/0
- Tail: Marabou
- Body: Chenille
- Hackle: Saddle hackle
Tying Instructions:
- Start the thread behind the eye and wrap back to the bend.
- Tie in a marabou tail. The length should be about the same as the hook shank.
- Tie in a piece of chenille at the bend.
- Wrap the chenille forward to create the body. Tie off behind the eye.
- Tie in a saddle hackle at the front of the body.
- Wrap the hackle forward through the body, creating a palmered hackle. Tie off behind the eye.
- Whip finish and apply head cement.
4.3 Elk Hair Caddis
The Elk Hair Caddis is a classic dry fly pattern that imitates an adult caddisfly. It’s a relatively simple fly to tie and highly effective for trout in a variety of streams and rivers.
Materials:
- Hook: Dry fly hook, sizes 12-16
- Thread: 6/0 or 8/0
- Body: Dubbing
- Wing: Elk hair
Tying Instructions:
- Start the thread behind the eye and wrap back to the bend.
- Dub a tapered body.
- Clean and stack a clump of elk hair.
- Tie the elk hair wing on top of the hook shank, with the tips extending over the eye.
- Trim the butts of the elk hair at an angle.
- Whip finish and apply head cement.
4.4 Bead Head Nymph
The Bead Head Nymph is a versatile nymph pattern that imitates a variety of aquatic insects. The bead head adds weight to the fly, allowing it to sink quickly and get down to where the fish are feeding.
Materials:
- Hook: Nymph hook, sizes 10-16
- Thread: 6/0 or 8/0
- Bead: Tungsten or brass bead
- Tail: Hackle fibers or goose biots
- Body: Dubbing
- Rib: Wire or tinsel
Tying Instructions:
- Slide the bead onto the hook, with the larger hole facing the eye.
- Start the thread behind the bead and wrap back to the bend.
- Tie in a tail.
- Dub a tapered body.
- Tie in a ribbing material at the bend.
- Wrap the ribbing forward through the body, creating a segmented appearance. Tie off behind the bead.
- Whip finish and apply head cement.
5. Tips for Improving Your Fly Tying Skills
As you continue to learn and practice fly tying, here are a few tips to help you improve your skills.
5.1 Start Simple
Don’t try to tie complicated patterns right away. Start with simple patterns and gradually work your way up to more complex designs.
5.2 Use Quality Materials
Using high-quality materials will make your flies more durable and effective.
5.3 Practice Regularly
The more you practice, the better you’ll become at fly tying. Set aside some time each week to tie flies, even if it’s just for a few minutes.
5.4 Watch Tutorials
There are many excellent fly tying tutorials available online. Watch videos and learn from experienced tiers to improve your technique.
5.5 Join a Fly Tying Club
Joining a fly tying club is a great way to learn from other tiers, share tips and techniques, and get feedback on your flies.
5.6 Experiment
Don’t be afraid to experiment with different materials, colors, and techniques. Fly tying is a creative process, so have fun and see what you can come up with.
6. The Art of Fly Selection: Matching the Hatch
One of the most critical aspects of fly fishing is selecting the right fly to match the hatch. “Matching the hatch” means choosing a fly that closely resembles the insects that fish are actively feeding on.
6.1 Understanding Aquatic Insects
To effectively match the hatch, you need to understand the life cycle and behavior of aquatic insects. The primary insects that trout feed on include:
- Mayflies: Known for their upright wings and delicate appearance.
- Caddisflies: Often have tent-like wings and are strong swimmers.
- Stoneflies: Larger insects with flat bodies and prominent antennae.
- Midges: Small, mosquito-like flies that can hatch in massive numbers.
6.2 Observing Insect Activity
Before casting your line, take some time to observe the water and identify the insects that are present. Look for insects hatching on the surface, nymphs drifting in the current, and adults flying nearby.
6.3 Matching Size and Shape
The size and shape of your fly are crucial for fooling fish. Use a fly that is similar in size and profile to the natural insects you observe.
6.4 Matching Color
While color is not always the most important factor, it can make a difference in certain situations. Pay attention to the color of the natural insects and choose a fly that is a close match.
6.5 Experimenting
If you’re not sure which fly to use, start with a pattern that is known to be effective in your area. If you’re not getting any strikes, experiment with different sizes, shapes, and colors until you find something that works.
7. Advanced Fly Tying Techniques
Once you’ve mastered the basics of fly tying, you can start to explore more advanced techniques. These techniques will allow you to create more realistic and effective flies.
7.1 Dubbing Loops
A dubbing loop is a technique used to create a fuller, more textured body on a fly. It involves creating a loop of thread and trapping dubbing material within the loop.
7.2 Palmering Hackle
Palemering hackle is a technique used to create a fuller, more mobile hackle on a fly. It involves wrapping hackle along the body of the fly, rather than just at the head.
7.3 Stacking Hair
Stacking hair is a technique used to create a uniform, even wing or tail on a fly. It involves using a hair stacker tool to align the tips of the hair before tying it onto the hook.
7.4 Using Synthetic Materials
Synthetic materials, such as flash, Mylar, and synthetic dubbing, can be used to add sparkle, movement, and durability to flies.
8. Fly Fishing Gear Recommendations
Choosing the right fly fishing gear can significantly enhance your angling experience. Here are some recommendations for essential gear.
8.1 Fly Rods
A good fly rod should be lightweight, sensitive, and capable of casting accurately. Consider the type of fish you’ll be targeting and the size of the water you’ll be fishing when choosing a fly rod.
8.2 Fly Reels
A fly reel should be durable, reliable, and have a smooth drag system. Choose a reel that is balanced with your fly rod and has enough capacity for your fly line and backing.
8.3 Fly Lines
Fly lines are available in a variety of weights, tapers, and materials. Choose a fly line that is appropriate for your fly rod and the type of fishing you’ll be doing.
8.4 Leaders and Tippets
Leaders and tippets are used to connect your fly line to your fly. Choose leaders and tippets that are appropriate for the size of your fly and the type of water you’ll be fishing.
8.5 Waders and Boots
Waders and boots are essential for staying dry and comfortable while wading in streams and rivers. Choose waders and boots that are durable, waterproof, and fit properly.
8.6 Fly Boxes
Fly boxes are used to store and organize your flies. Choose fly boxes that are durable, waterproof, and have enough compartments for your fly collection.
9. Maintaining Your Fly Tying Tools
Properly maintaining your fly tying tools will ensure that they last for years and perform optimally.
9.1 Cleaning
Clean your fly tying tools regularly with a soft cloth or brush. Remove any dirt, debris, or adhesive that may have accumulated on the tools.
9.2 Sharpening
Sharpen your scissors and bodkin regularly to ensure that they cut and pierce cleanly. Use a sharpening stone or honing steel to sharpen the blades.
9.3 Lubricating
Lubricate the moving parts of your vise, bobbin holder, and hackle pliers with a light oil. This will help to keep the tools working smoothly and prevent rust.
9.4 Storing
Store your fly tying tools in a dry, safe place when not in use. This will protect them from damage and extend their lifespan.
10. Staying Updated with Fly Fishing News and Events
Staying informed about the latest news and events in the fly fishing world can help you improve your skills and stay connected to the sport.
10.1 Fly Fishing Magazines
Subscribe to fly fishing magazines to stay up-to-date on the latest techniques, patterns, and gear.
10.2 Online Forums and Communities
Join online forums and communities to connect with other fly fishers, share tips and techniques, and ask questions.
10.3 Fly Fishing Shows and Events
Attend fly fishing shows and events to see the latest gear, learn from experts, and meet other fly fishers.
10.4 Local Fly Shops
Visit your local fly shop to get advice from experienced anglers and learn about the best fishing spots in your area.
FAQ: Mastering the Art of Tying Fishing Flies
1. What is fly tying?
Fly tying is the art of creating artificial lures, known as flies, by binding various materials to a hook.
2. What are the essential tools for fly tying?
Essential tools include a vise, bobbin holder, scissors, hackle pliers, and a whip finisher.
3. What materials are commonly used in fly tying?
Common materials include hooks, thread, feathers, dubbing, and various synthetic materials.
4. How do I choose the right hook for fly tying?
Select hooks based on the size and style of the fly you’re tying, considering the target species.
5. What is dubbing and how is it used?
Dubbing is fine fibers used to create fly bodies, twisted onto thread for a fuzzy, lifelike appearance.
6. How do I match the hatch when fly fishing?
Observe local insects and choose flies that mimic their size, shape, and color.
7. What are some beginner-friendly fly patterns?
Good starting patterns include the Woolly Bugger, Elk Hair Caddis, and Bead Head Nymph.
8. How can I improve my fly tying skills?
Practice regularly, watch tutorials, join a fly tying club, and experiment with different techniques.
9. How do I maintain my fly tying tools?
Clean tools regularly, sharpen blades, lubricate moving parts, and store them in a safe place.
10. Where can I find fly fishing news and events?
Subscribe to fly fishing magazines, join online communities, and visit local fly shops.
Ready to take your fly tying and fly-fishing skills to new heights? Visit flyermedia.net for in-depth articles, expert tips, and the latest news from the world of aviation and angling, all tailored to help you succeed in your passion. Discover the best training programs, career opportunities, and essential gear recommendations to make the most of your adventures!