Making Flying Geese blocks can seem daunting, but with the right techniques, it’s achievable. Flyermedia.net provides comprehensive insights into various aviation-related topics, and in this article, we’ll guide you through the best methods for creating these versatile quilt blocks. Whether you’re a seasoned quilter or just starting, mastering these techniques will open up a world of creative possibilities in your quilting projects. Ready to learn about precision piecing, fabric saving tips, and accuracy in quilting?
1. Understanding Flying Geese Blocks
Flying Geese blocks are fundamental quilting units that resemble a flock of geese in flight. They consist of one large triangle (the goose) and two smaller triangles (the sky). These blocks are highly versatile and can be used in various quilt patterns, adding movement and visual interest. They are essential for creating dynamic designs and intricate patterns, which is why mastering their construction is crucial for any quilter. The block’s sharp angles and precise lines contribute to its aesthetic appeal, making it a favorite among quilters of all skill levels.
1.1. Why Learn Different Methods?
Different quilters have different preferences and skill levels. Some methods might be easier for beginners, while others are more suitable for experienced quilters looking for precision and efficiency. Knowing multiple techniques allows you to choose the one that best suits your project, fabric, and personal style. Each method offers unique advantages and disadvantages, making it beneficial to understand them all. For example, some methods minimize fabric waste, while others prioritize accuracy.
1.2. Essential Tools and Materials
Before diving into the methods, gather your tools and materials. Here’s a basic checklist:
- Fabric: Choose high-quality quilting cotton in contrasting colors to make your geese stand out.
- Rotary Cutter, Mat, and Ruler: Essential for accurate fabric cutting.
- Sewing Machine: A reliable machine with a quarter-inch foot is ideal.
- Iron and Ironing Board: Pressing each step is crucial for accuracy.
- Pins: Use fine quilting pins to hold fabric layers together.
- Marking Tools: Fabric pencils or markers for marking cutting lines.
- Seam Ripper: Just in case you need to correct any mistakes.
- Scissors: Small scissors for trimming threads.
1.3. Common Mistakes to Avoid
- Inaccurate Cutting: Precision is key; double-check your measurements before cutting.
- Stretching Bias Edges: Handle bias edges carefully to prevent distortion.
- Inconsistent Seam Allowance: A consistent quarter-inch seam allowance is crucial for block accuracy.
- Skipping Pressing: Pressing each seam flat ensures your blocks lie correctly.
- Ignoring Grain Direction: Pay attention to the grain direction of your fabric to prevent stretching.
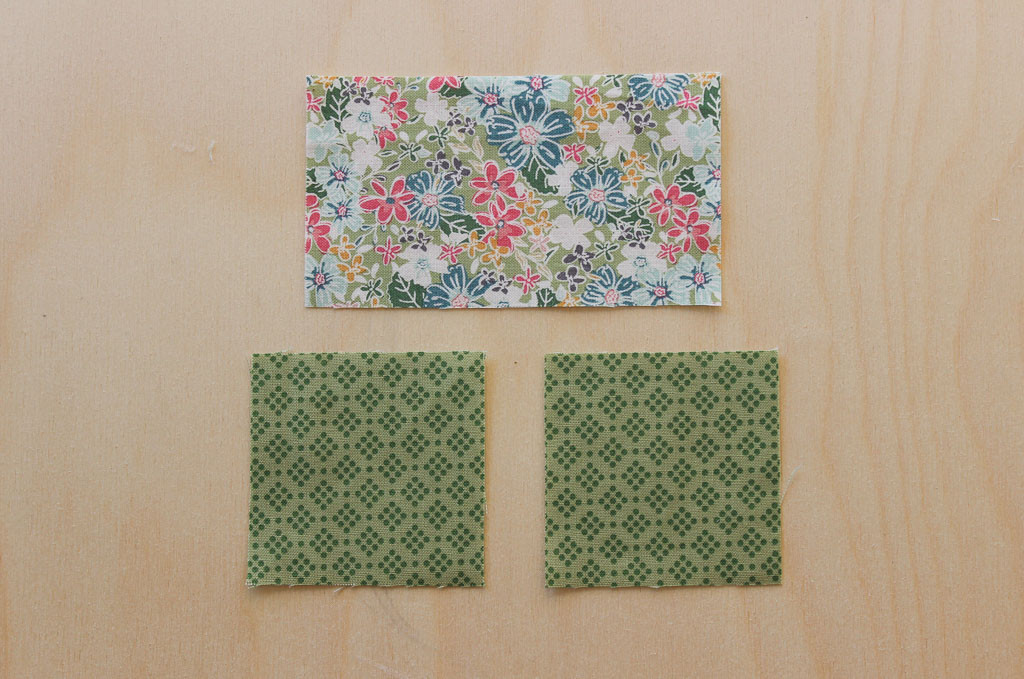
2. Method 1: The Classic Stitch and Flip
The Stitch and Flip method is a popular technique for creating Flying Geese blocks. It involves sewing triangles onto a rectangle and then flipping them to form the geese. This method is straightforward and easy to learn, making it a great starting point for beginners.
 Stitch and Flip Method for Flying Geese Blocks
2.1. Step-by-Step Instructions
- Cut Fabric: For a 4″ x 2″ finished unit, cut one rectangle measuring 4.5″ x 2.5″ and two squares measuring 2.5″ x 2.5″.
- Mark Diagonal Lines: On the wrong side of each square, draw a diagonal line from corner to corner.
- Place and Sew: Place one square on top of the rectangle, right sides together, aligning one corner. Sew along the marked line.
- Trim Excess: Trim away the excess corner fabric, leaving a quarter-inch seam allowance.
- Press Open: Press the triangle open, revealing the right side of the fabric.
- Repeat: Repeat the process on the opposite side of the rectangle with the second square.
- Final Press: Press the completed Flying Geese block.
2.2. Pros of the Stitch and Flip Method
- Simplicity: This method is easy to understand and execute, making it ideal for beginners.
- Accessibility: Requires basic quilting tools and minimal fabric.
- Quick Results: You can create Flying Geese blocks relatively quickly once you get the hang of it.
2.3. Cons of the Stitch and Flip Method
- Fabric Waste: Trimming excess fabric results in waste.
- Accuracy Issues: Inaccurate sewing or cutting can lead to imperfect blocks.
- Bias Edges: Working with bias edges can cause stretching and distortion.
- Marking Required: Drawing diagonal lines can be time-consuming.
2.4. Tips for Accuracy
- Use a Quarter-Inch Foot: Ensure your sewing machine has a quarter-inch foot for consistent seam allowances.
- Accurate Marking: Use a fine-point fabric marker and a precise ruler for marking diagonal lines.
- Handle Bias Edges Carefully: Avoid stretching bias edges by using starch or fabric stabilizer.
- Press After Each Step: Pressing ensures the fabric lies flat and helps maintain accuracy.
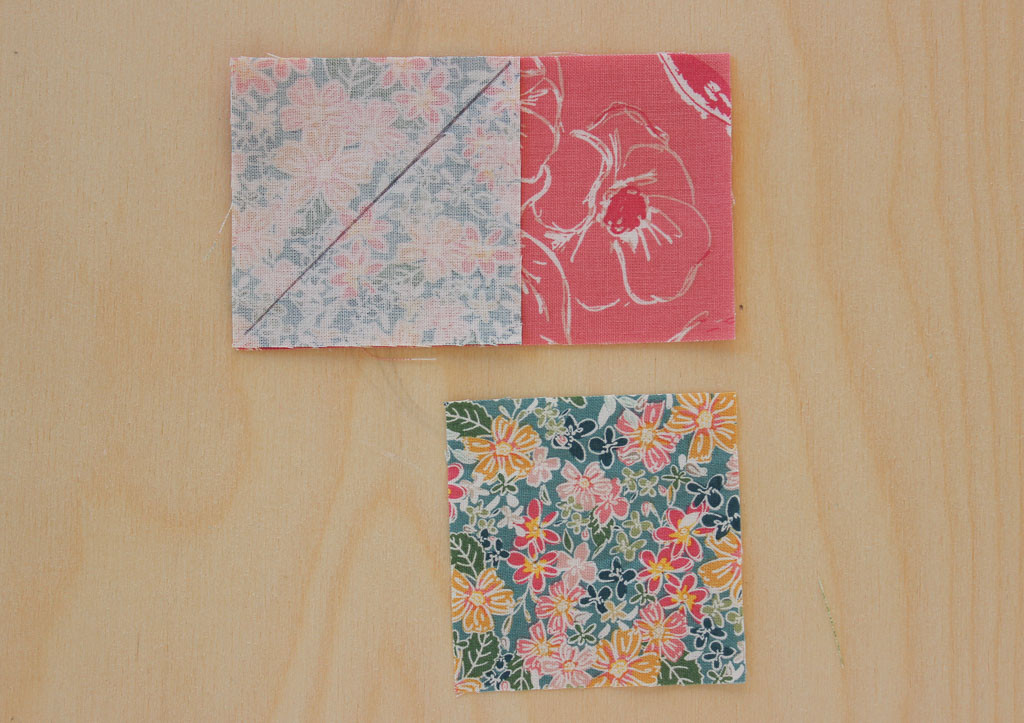
3. Method 2: Oversized Stitch and Flip with Trimming
To address the accuracy issues of the classic Stitch and Flip method, you can use an oversized approach. By cutting the fabric pieces slightly larger and trimming the block to the correct size, you can achieve more precise results.
 Oversized Stitch and Flip Method for Flying Geese Blocks
3.1. Step-by-Step Instructions
- Cut Oversized Fabric: For a 4″ x 2″ finished unit, cut one rectangle measuring 4.75″ x 2.75″ and two squares measuring 2.75″ x 2.75″.
- Mark Diagonal Lines: On the wrong side of each square, draw a diagonal line from corner to corner.
- Place and Sew: Place one square on top of the rectangle, right sides together, aligning one corner. Sew along the marked line.
- Trim Excess: Trim away the excess corner fabric, leaving a quarter-inch seam allowance.
- Press Open: Press the triangle open, revealing the right side of the fabric.
- Repeat: Repeat the process on the opposite side of the rectangle with the second square.
- Trim to Size: Use a quilting ruler or a specialized ruler like the Bloc Loc to trim the block to the correct size (4.5″ x 2.5″).
3.2. Pros of the Oversized Stitch and Flip Method
- Improved Accuracy: Trimming ensures the block is perfectly sized.
- Easier Handling: Larger pieces are easier to manipulate.
- Corrects Imperfections: Allows for minor sewing inaccuracies.
3.3. Cons of the Oversized Stitch and Flip Method
- More Fabric Waste: Trimming results in more fabric waste compared to the classic method.
- Additional Step: Requires an extra step for trimming.
- Specialized Tools: A specialized trimming ruler may be necessary.
3.4. Choosing the Right Trimming Ruler
- Bloc Loc Ruler: This ruler has a channel that locks onto the seams, ensuring accurate trimming.
- Standard Quilting Ruler: A standard quilting ruler with clear markings can also be used, but requires more precision.
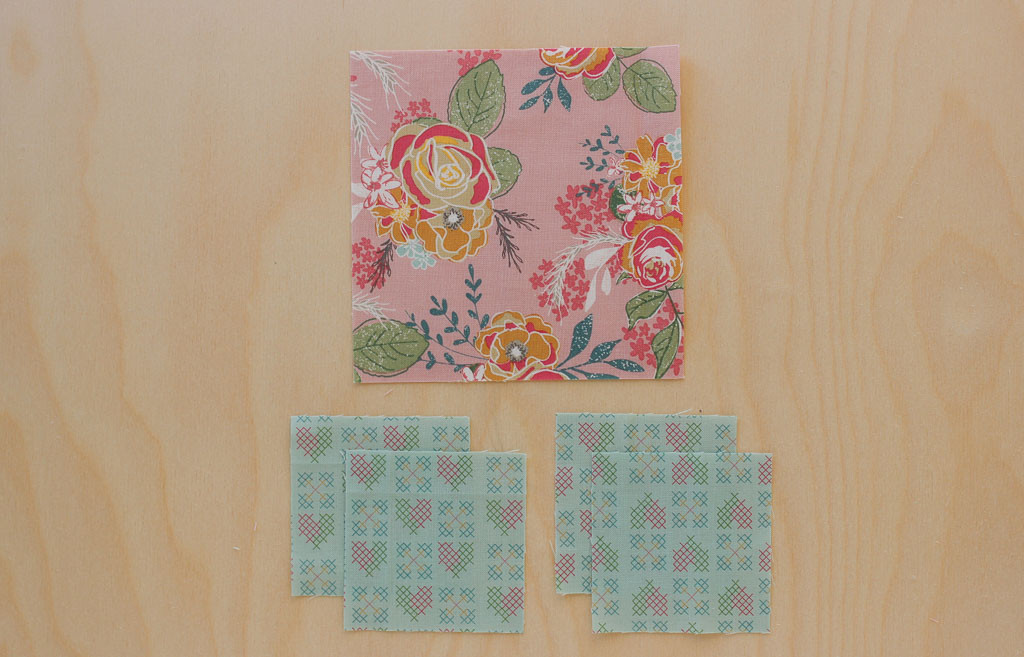
4. Method 3: The No-Waste Flying Geese Technique
The No-Waste Flying Geese method is designed to create four identical Flying Geese blocks from a single set of fabric pieces. This technique is perfect for quilters looking to maximize fabric usage and minimize waste.
 No-Waste Flying Geese Method
4.1. Step-by-Step Instructions
- Cut Fabric: For 4″ x 2″ finished units, cut one 5.5″ square and four 3″ squares.
- Place Squares: Place two 3″ squares on the 5.5″ square, right sides together, in opposite corners. Draw a diagonal line across each small square.
- Sew Lines: Sew a quarter-inch seam on both sides of each marked line.
- Cut Apart: Cut along the marked lines to create two halves.
- Press Open: Press each half open, revealing the right side of the fabric.
- Add Remaining Squares: Place a 3″ square on each half, right sides together, aligning one corner. Draw a diagonal line across each small square.
- Sew Lines: Sew a quarter-inch seam on both sides of each marked line.
- Cut Apart: Cut along the marked lines to create four Flying Geese blocks.
- Press Open: Press each block open.
4.2. Pros of the No-Waste Method
- Minimal Waste: This method uses almost all the fabric.
- Efficient: Creates four blocks at once.
- Cost-Effective: Saves money by reducing fabric consumption.
4.3. Cons of the No-Waste Method
- Complexity: Requires careful attention to detail.
- Accuracy Issues: Inaccurate sewing can affect the final block size.
- Marking Required: Involves marking multiple diagonal lines.
4.4. Tips for Success
- Precise Cutting: Accurate cutting is essential for this method.
- Consistent Seam Allowance: Maintain a consistent quarter-inch seam allowance.
- Pressing: Press each step to ensure accuracy and flatness.
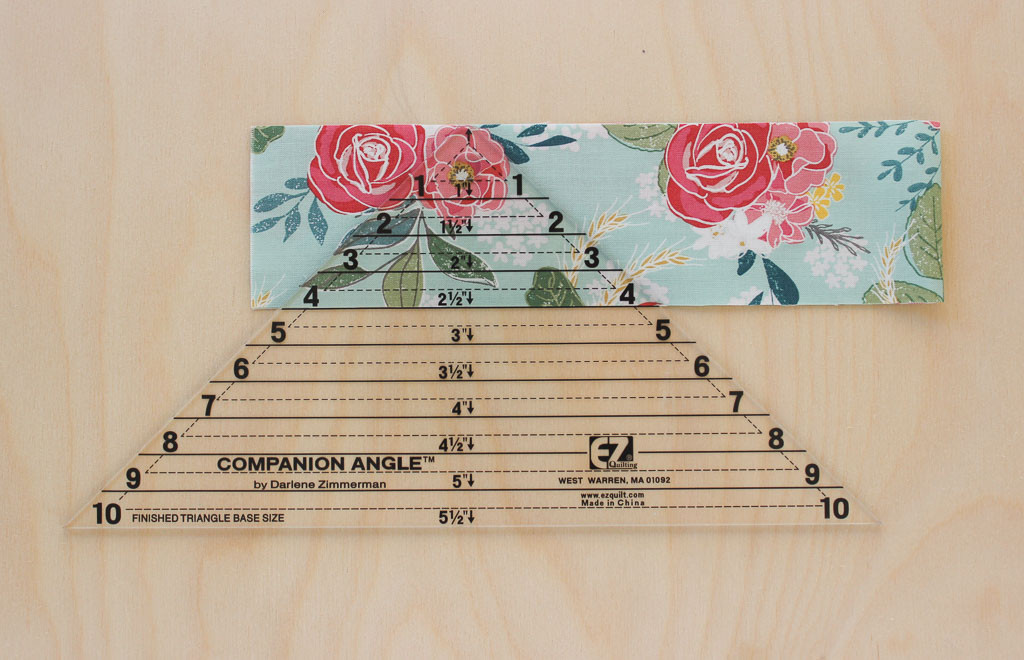
5. Method 4: Using Specialty Rulers for Precision
Specialty rulers can simplify the process of cutting Flying Geese blocks and improve accuracy. Rulers like the Companion Angle and EZ Angle are designed to cut the triangles needed for Flying Geese with precision and ease.
 Flying Geese Using Specialty Rulers
5.1. Step-by-Step Instructions
- Cut Large Triangle: Use the Companion Angle ruler to cut the large triangle. Follow the ruler’s markings for the desired size.
- Cut Small Triangles: Use the EZ Angle ruler to cut the two smaller triangles. Again, follow the ruler’s markings for accurate cutting.
- Assemble Block: Place one small triangle on the left side of the large triangle, right sides together, matching corners. Sew a quarter-inch seam.
- Press Open: Press the seam open.
- Repeat: Repeat the process on the right side with the remaining small triangle.
- Final Press: Press the completed Flying Geese block.
5.2. Pros of Using Specialty Rulers
- Accuracy: Rulers ensure precise cutting.
- Efficiency: Saves time by eliminating the need for marking.
- Minimal Waste: Rulers are designed to minimize fabric waste.
5.3. Cons of Using Specialty Rulers
- Cost: Rulers can be expensive.
- Learning Curve: Requires understanding how to use each ruler correctly.
- Storage: Rulers take up storage space.
5.4. Popular Specialty Rulers
- Companion Angle Ruler: Designed for cutting the large triangle.
- EZ Angle Ruler: Designed for cutting the smaller triangles.
6. Method 5: Triangles on a Roll (Foundation Paper Piecing)
Triangles on a Roll is a foundation paper piecing method that uses pre-printed paper strips to create Flying Geese blocks. This technique is highly accurate and allows you to sew multiple blocks together in a row.
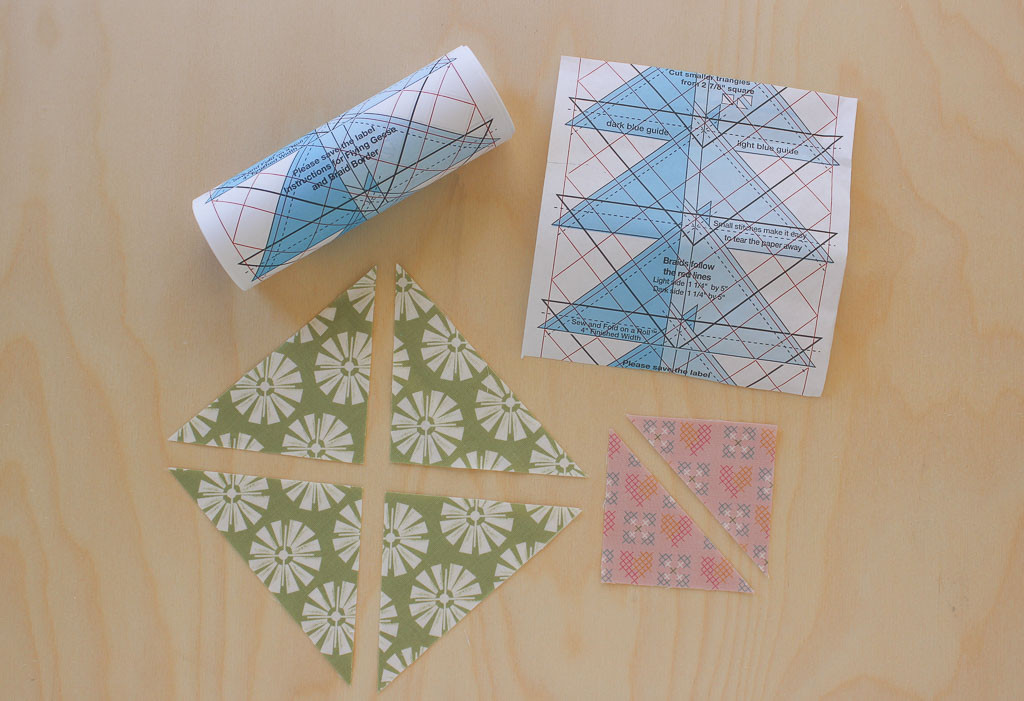 Triangles on a Roll Method
6.1. Step-by-Step Instructions
- Cut Triangles: Cut the fabric triangles according to the measurements provided on the Triangles on a Roll paper.
- Place Large Triangle: Place the large triangle on the paper, aligning it with the guidelines.
- Add Small Triangle: Place one small triangle on top, right sides together, matching the corners on the paper. Sew a quarter-inch seam.
- Press Open: Press the seam open.
- Repeat: Repeat the process on the opposite side with the remaining small triangle.
- Continue: If you need multiple Flying Geese blocks, continue down the paper, placing the next large triangle and repeating the process.
- Trim and Remove Paper: Once you have completed the desired number of blocks, trim the excess fabric and remove the paper.
6.2. Pros of the Triangles on a Roll Method
- High Accuracy: Paper piecing ensures precise block construction.
- Minimal Waste: This method minimizes fabric waste.
- Efficient: Allows you to sew multiple blocks together in a row.
6.3. Cons of the Triangles on a Roll Method
- Learning Curve: Requires practice to master paper piecing.
- Cost: Requires purchasing Triangles on a Roll paper.
- Time-Consuming: Can be more time-consuming than other methods.
6.4. Tips for Paper Piecing
- Use a Short Stitch Length: A shorter stitch length makes it easier to remove the paper.
- Press After Each Seam: Pressing ensures accuracy and flatness.
- Remove Paper Carefully: Gently tear away the paper after completing the blocks.
7. Advanced Tips and Techniques
Once you’ve mastered the basic methods, consider these advanced tips and techniques to enhance your Flying Geese blocks.
7.1. Using Scraps
Flying Geese blocks are a great way to use up fabric scraps. Mix and match different fabrics for a scrappy, eclectic look.
7.2. Combining Methods
Don’t be afraid to combine different methods. For example, you might use the No-Waste method to create the blocks and then trim them using the oversized Stitch and Flip method for added accuracy.
7.3. Creating Variations
Experiment with different sizes and orientations of Flying Geese blocks to create unique quilt designs.
7.4. Adding Embellishments
Consider adding embellishments such as embroidery, beads, or buttons to your Flying Geese blocks for a personalized touch.
8. Common Quilt Patterns Using Flying Geese Blocks
Flying Geese blocks are versatile and can be used in many quilt patterns. Here are a few popular examples:
- Flying Geese Border: Use Flying Geese blocks to create a dynamic border for your quilt.
- Flying Geese in Rows: Arrange Flying Geese blocks in rows to create a simple yet striking quilt pattern.
- Hunter’s Star Quilt: Incorporate Flying Geese blocks into a Hunter’s Star quilt for added visual interest.
- Diamond Quilt: Use Flying Geese blocks to create diamond shapes in your quilt.
9. Troubleshooting Common Issues
Even with careful planning and execution, you may encounter issues while making Flying Geese blocks. Here are some common problems and their solutions:
- Blocks are Too Small: Check your cutting accuracy and seam allowance.
- Blocks are Distorted: Avoid stretching bias edges and press carefully.
- Points are Cut Off: Use a quarter-inch foot and trim carefully.
- Fabric is Puckering: Adjust your sewing machine tension and use a walking foot.
10. Inspiration and Resources
Looking for more inspiration and resources? Check out these websites and books:
- Flyermedia.net: For insights into aviation-related topics, connecting the precision and artistry of flight with quilting.
- Quilting Blogs: Many quilting blogs offer tutorials and inspiration for using Flying Geese blocks.
- Quilting Books: Look for books that focus on Flying Geese techniques and patterns.
- Online Forums: Join online quilting forums to connect with other quilters and share tips and ideas.
11. Expert Insights on Precision in Aviation and Quilting
The aviation industry emphasizes precision and accuracy, principles that resonate deeply within the art of quilting. According to research from Embry-Riddle Aeronautical University, meticulous attention to detail is paramount in both fields.
11.1 The Importance of Precision
In aviation, precise measurements and calculations ensure safety and efficiency. Similarly, in quilting, accurate cutting and sewing are crucial for creating flawless blocks.
11.2 Parallels Between Aviation and Quilting
- Measurement: Both pilots and quilters rely on precise measurements to achieve their goals.
- Accuracy: Just as pilots must maintain accurate flight paths, quilters must ensure accurate seam allowances.
- Attention to Detail: Both fields require meticulous attention to detail to avoid costly mistakes.
11.3 Applying Aviation Principles to Quilting
By applying the principles of precision and accuracy used in aviation, quilters can improve the quality and consistency of their work.
12. The Role of Technology in Modern Quilting
Advancements in technology have revolutionized the quilting world, making it easier than ever to create accurate and complex designs.
12.1 Computerized Cutting Machines
Computerized cutting machines, such as the Cricut Maker and Silhouette Cameo, allow quilters to cut fabric with unparalleled precision.
12.2 Quilting Software
Quilting software programs, such as Electric Quilt and Quilt-Pro, help quilters design patterns, calculate fabric requirements, and preview finished quilts.
12.3 Online Tutorials and Resources
The internet is a treasure trove of quilting tutorials, patterns, and resources. Websites like Flyermedia.net provide valuable information and inspiration for quilters of all skill levels.
13. Understanding Fabric Grain and Bias
Understanding fabric grain and bias is essential for creating Flying Geese blocks that lie flat and don’t distort over time.
13.1 What is Fabric Grain?
Fabric grain refers to the direction in which the threads run in a woven fabric. There are two main types of grain:
- Lengthwise Grain: Runs parallel to the selvage edge of the fabric.
- Crosswise Grain: Runs perpendicular to the selvage edge of the fabric.
13.2 What is Bias?
The bias is the diagonal direction of the fabric, which has the most stretch. Bias edges are more prone to distortion and must be handled with care.
13.3 How to Handle Bias Edges
- Use Starch: Starching the fabric helps stabilize bias edges and prevent stretching.
- Handle Gently: Avoid pulling or stretching bias edges while cutting and sewing.
- Use a Walking Foot: A walking foot helps feed the fabric evenly, preventing distortion.
14. The Importance of Pressing
Pressing is a crucial step in quilting that can significantly impact the final result. Pressing each seam flat ensures that the fabric lies correctly and helps maintain accuracy.
14.1 Pressing vs. Ironing
- Pressing: Involves lifting and lowering the iron onto the fabric.
- Ironing: Involves sliding the iron back and forth across the fabric.
Pressing is the preferred method for quilting because it prevents distortion.
14.2 Tips for Pressing
- Use a Hot Iron: Set your iron to the appropriate temperature for the fabric you are using.
- Use Steam: Steam helps relax the fabric and remove wrinkles.
- Press Each Seam: Press each seam open or to the side, depending on your preference.
- Use a Pressing Cloth: A pressing cloth protects delicate fabrics from scorching.
15. Choosing the Right Fabric
The type of fabric you choose can impact the look and feel of your Flying Geese blocks.
15.1 Quilting Cotton
Quilting cotton is the most popular choice for quilting because it is easy to work with, comes in a wide variety of colors and patterns, and is relatively inexpensive.
15.2 Other Fabric Options
- Linen: Linen has a lovely texture and drapes well, but it can be more challenging to work with than cotton.
- Silk: Silk adds a luxurious touch to quilts, but it is delicate and requires special care.
- Wool: Wool is warm and cozy, but it can be itchy and may require special cleaning.
15.3 Tips for Choosing Fabric
- Consider the Color and Pattern: Choose colors and patterns that complement each other and create the desired effect.
- Check the Fabric Quality: Look for high-quality fabric that is tightly woven and doesn’t fray easily.
- Pre-Wash the Fabric: Pre-washing the fabric prevents shrinking and bleeding after the quilt is finished.
16. Mastering Color Theory for Stunning Quilts
Understanding color theory can elevate your quilt designs from simple to stunning.
16.1 Basic Color Terms
- Hue: The pure color, such as red, blue, or green.
- Value: The lightness or darkness of a color.
- Saturation: The intensity or purity of a color.
16.2 Color Schemes
- Monochromatic: Uses different values of a single hue.
- Analogous: Uses colors that are next to each other on the color wheel.
- Complementary: Uses colors that are opposite each other on the color wheel.
- Triadic: Uses three colors that are evenly spaced on the color wheel.
16.3 Tips for Using Color
- Create Contrast: Use contrasting colors to create visual interest.
- Use a Focal Point: Choose one color to be the focal point of your quilt.
- Consider the Mood: Use warm colors to create a cozy feeling and cool colors to create a calming effect.
17. The Art of Fabric Selection
Selecting the right fabrics is essential for creating a quilt that is both visually appealing and durable.
17.1 Coordinating Prints and Solids
Combining prints and solids can create a balanced and visually interesting quilt.
17.2 Scale and Proportion
Consider the scale and proportion of the prints you choose. Large-scale prints can be overwhelming if used too frequently, while small-scale prints can add subtle texture.
17.3 Fabric Placement
Think about where you will place each fabric in your quilt. Use darker fabrics to create depth and lighter fabrics to highlight certain areas.
18. Adding Borders to Your Quilt
Borders can enhance the overall design of your quilt and provide a finished look.
18.1 Types of Borders
- Straight Borders: Simple strips of fabric that frame the quilt.
- Pieced Borders: Borders made from smaller pieces of fabric, such as Flying Geese blocks.
- Scalloped Borders: Borders with a decorative scalloped edge.
18.2 Tips for Adding Borders
- Measure Accurately: Measure the quilt before cutting the border fabric to ensure a perfect fit.
- Use Matching Fabric: Use fabric that complements the quilt’s design.
- Consider the Width: Choose a border width that is proportionate to the size of the quilt.
19. Quilting Techniques
The quilting process involves stitching through all the layers of the quilt to hold them together.
19.1 Types of Quilting
- Hand Quilting: Quilting by hand using a needle and thread.
- Machine Quilting: Quilting using a sewing machine.
- Longarm Quilting: Quilting using a specialized longarm quilting machine.
19.2 Quilting Patterns
- Straight Lines: Simple and modern.
- Curves: Soft and flowing.
- Geometric Designs: Precise and structured.
- Custom Designs: Unique and personalized.
19.3 Tips for Quilting
- Use a Walking Foot: A walking foot helps feed the fabric evenly and prevents distortion.
- Choose the Right Thread: Use quilting thread that is strong and durable.
- Maintain Even Tension: Adjust your sewing machine tension to ensure even stitches.
20. Finishing Your Quilt
The final step in the quilting process is finishing, which involves adding binding to the edges of the quilt.
20.1 Binding Techniques
- Machine Binding: Sewing the binding to the quilt using a sewing machine.
- Hand Binding: Sewing the binding to the quilt by hand.
20.2 Tips for Binding
- Cut the Binding Fabric on the Bias: Cutting the binding fabric on the bias allows it to stretch around curves and corners.
- Use a Consistent Seam Allowance: Maintain a consistent seam allowance for a professional finish.
- Miter the Corners: Miter the corners of the binding to create a neat and tidy finish.
21. Caring for Your Quilt
Proper care will ensure that your quilt lasts for generations.
21.1 Washing Your Quilt
- Use a Gentle Detergent: Use a mild detergent that is designed for delicate fabrics.
- Wash in Cold Water: Wash the quilt in cold water to prevent shrinking and bleeding.
- Tumble Dry on Low: Tumble dry the quilt on low heat or hang it to dry.
21.2 Storing Your Quilt
- Store in a Cool, Dry Place: Store the quilt in a cool, dry place away from direct sunlight.
- Use a Cotton Bag: Store the quilt in a cotton bag to protect it from dust and pests.
- Fold Loosely: Fold the quilt loosely to prevent creases.
22. The Future of Quilting
The quilting world is constantly evolving, with new techniques, tools, and technologies emerging all the time.
22.1 Sustainable Quilting
More and more quilters are embracing sustainable practices, such as using recycled fabrics and eco-friendly batting.
22.2 Modern Quilting
Modern quilting emphasizes clean lines, bold colors, and minimalist designs.
22.3 Community and Collaboration
Quilting is a social activity, and many quilters enjoy connecting with others through online forums, guilds, and workshops.
23. Integrating Aviation Themes into Quilting Projects
For aviation enthusiasts, incorporating aviation themes into quilting projects can add a personal and unique touch.
23.1 Flying Geese as Symbolic Representation
The Flying Geese block itself can be seen as a symbolic representation of flight, making it a natural choice for aviation-themed quilts.
23.2 Incorporating Aviation Fabrics
Fabrics with aviation-themed prints, such as airplanes, maps, and compasses, can be used to create a quilt that celebrates the world of flight.
23.3 Designing Aviation-Themed Patterns
Consider designing your own aviation-themed patterns, such as quilts featuring airplane silhouettes or runway designs.
24. Resources at Flyermedia.net for Aviation Enthusiasts
Flyermedia.net offers a wealth of information for aviation enthusiasts, connecting the precision and artistry of flight with the creativity of quilting.
24.1 Exploring Aviation Careers
Discover various career paths in the aviation industry, from pilots to engineers to air traffic controllers.
24.2 Staying Updated on Aviation News
Stay informed about the latest aviation news, including advancements in technology, safety regulations, and industry trends.
24.3 Learning About Aircraft Technology
Explore the fascinating world of aircraft technology, including aerodynamics, engines, and navigation systems.
25. Call to Action: Discover More at Flyermedia.net
Ready to explore the world of aviation and quilting? Visit Flyermedia.net to discover a wealth of information, inspiration, and resources. Whether you’re looking for information on flight training, aviation careers, or quilting techniques, Flyermedia.net has something for everyone. Dive into our resources and let your creativity take flight!
Address: 600 S Clyde Morris Blvd, Daytona Beach, FL 32114, United States
Phone: +1 (386) 226-6000
Website: Flyermedia.net
FAQ: Mastering Flying Geese Blocks
1. What is a Flying Geese block?
A Flying Geese block is a quilting unit consisting of one large triangle (the goose) and two smaller triangles (the sky), often used to create dynamic patterns.
2. Why are Flying Geese blocks so popular in quilting?
They’re versatile, adding movement and visual interest to quilts, and are essential for creating intricate designs and patterns.
3. What are the basic methods for making Flying Geese blocks?
The classic Stitch and Flip, Oversized Stitch and Flip with Trimming, No-Waste Flying Geese, Specialty Rulers, and Triangles on a Roll.
4. Which method is best for beginners?
The Stitch and Flip method is easiest due to its simplicity and use of basic tools.
5. How can I improve accuracy when making Flying Geese blocks?
Use a quarter-inch foot, mark accurately, handle bias edges carefully, and press after each step.
6. What is the No-Waste Flying Geese method?
A technique that creates four identical blocks from a single set of fabric pieces, minimizing fabric waste.
7. Are specialty rulers worth the investment?
Yes, they ensure precise cutting and save time, but they can be costly and require a learning curve.
8. What is Triangles on a Roll, and how does it work?
It’s a foundation paper piecing method using pre-printed strips for high accuracy and sewing multiple blocks together.
9. How can I incorporate aviation themes into my quilting projects?
Use aviation-themed fabrics, design patterns with airplane silhouettes, or integrate the Flying Geese block symbolically.
10. Where can I find more resources and inspiration for quilting and aviation?
Visit flyermedia.net for a wealth of information, tutorials, and resources, connecting the precision of aviation with the creativity of quilting.