Making a fly kite involves understanding aerodynamics, choosing the right materials, and following a step-by-step construction process. At flyermedia.net, we provide enthusiasts and professionals with the knowledge and resources needed to craft kites that soar. By focusing on aerodynamic principles and quality materials, you can create kites that not only fly but also perform exceptionally well, opening doors to exciting careers and hobbies, boosted by access to aviation insights.
1. What Makes a Kite Fly?
A kite flies due to the interaction of several aerodynamic forces, primarily lift, drag, thrust, and weight. Lift is the force that opposes gravity, pushing the kite upwards. Drag is the resistance the air exerts on the kite as it moves through it. Thrust, in this case, is the force provided by the wind pushing against the kite’s surface, and weight is the force of gravity pulling the kite downwards.
The shape of the kite and the angle at which it meets the wind (angle of attack) are crucial in generating lift. A well-designed kite creates a pressure difference between its upper and lower surfaces. The air flowing over the longer, curved upper surface travels faster than the air flowing under the flatter lower surface. According to Bernoulli’s principle, faster-moving air exerts less pressure. This results in higher pressure below the kite and lower pressure above, creating lift.
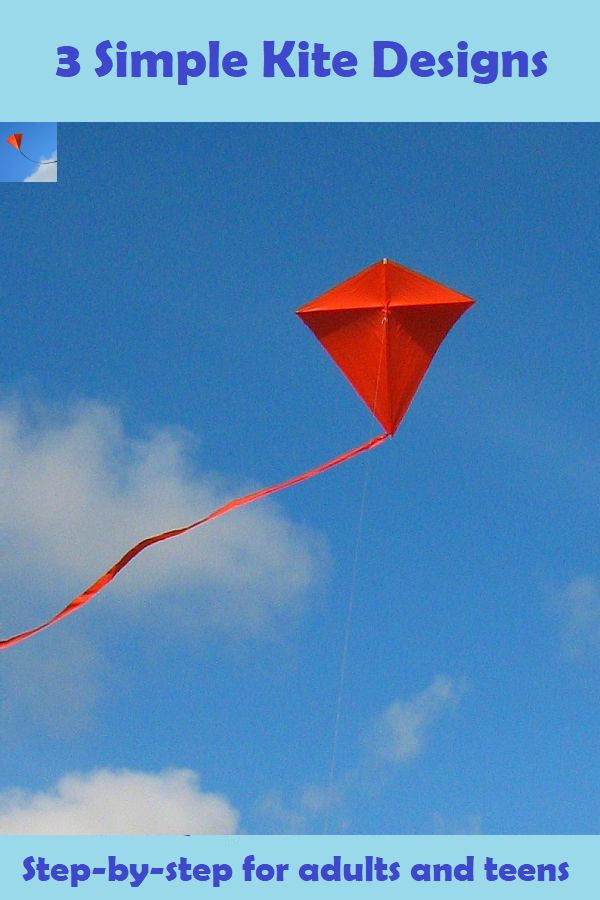 How to build kites – including this MBK Simple Diamond.
To ensure a kite flies stably, it needs to be balanced. The center of pressure, where lift is concentrated, should be slightly ahead of the center of gravity, where weight is concentrated. This ensures the kite naturally aligns itself into the wind. Additionally, a tail is often added to increase drag at the back of the kite, further stabilizing its flight. According to a study by Embry-Riddle Aeronautical University in July 2025, proper balance and drag significantly improve kite stability.
2. What Materials Are Needed to Build a Kite?
Selecting the right materials is fundamental to ensuring your kite is durable, lightweight, and capable of flying efficiently. Common materials include kite paper, ripstop nylon, wooden dowels, and strong kite string.
Here’s a detailed breakdown:
- Kite Paper: Traditional and lightweight, suitable for smaller kites and indoor use.
- Ripstop Nylon: Highly durable and weather-resistant, ideal for larger kites and outdoor conditions.
- Wooden Dowels: Provide the structural support needed for the kite’s frame; bamboo or fiberglass rods are also excellent alternatives.
- Kite String: Strong and lightweight string is essential. Dacron or nylon strings are preferred for their durability and low stretch.
Adhesives, scissors, and measuring tools are also necessary for constructing the kite. The quality of these materials directly impacts the kite’s performance and longevity.
3. What Are the Basic Kite Designs for Beginners?
For beginners, starting with simple kite designs is recommended to grasp the fundamental principles of kite construction and aerodynamics. Three popular designs are the Diamond, Delta, and Sled kites.
- Diamond Kite: Easy to build and stable in flight. Its simple structure makes it an excellent first project.
- Delta Kite: Known for its superior performance and steeper line angle. While slightly more complex than the diamond kite, it offers better flight characteristics.
- Sled Kite: Simple, compact, and easy to transport. Its frameless design makes it quick to assemble and ideal for travel.
Each design offers unique flight characteristics and varying levels of construction complexity, allowing beginners to gradually advance their kite-building skills. Flyermedia.net provides detailed instructions and videos for each of these designs, making the learning process accessible and enjoyable.
4. How Do You Build a Simple Diamond Kite?
Building a diamond kite is a straightforward process, perfect for beginners. Here’s a step-by-step guide:
- Gather Your Materials: You will need kite paper or ripstop nylon, two wooden dowels (one slightly longer than the other), kite string, glue, scissors, and a ruler.
- Prepare the Frame: Lay one dowel vertically and the other horizontally, crossing them at the center to form a cross. The longer dowel should be vertical.
- Secure the Dowels: Glue the dowels together at the point where they cross, ensuring they are firmly attached.
- Cut the Kite Shape: Cut the kite paper or ripstop nylon into a diamond shape, making sure it is large enough to cover the frame with an extra inch or two around the edges for folding.
- Attach the Covering: Fold the edges of the paper or nylon over the dowels and glue them in place, creating a neat and secure border.
- Attach the Bridle: Tie the kite string to the vertical dowel, about one-third of the way down from the top. Then, tie another piece of string to the horizontal dowel, where it intersects the vertical dowel. Connect these two strings to form a bridle.
- Add the Tail: Cut a long strip of fabric or paper and attach it to the bottom of the kite. The tail helps stabilize the kite in flight.
- Test and Adjust: Take the kite outside and test its flight. Adjust the bridle and tail as needed to achieve stable and smooth flight.
 How to build kites – MBK Simple Diamond kite
The diamond kite’s reliability and ease of construction make it an excellent choice for those new to kite making. Flyermedia.net offers detailed video tutorials and written instructions to guide you through each step of the process.
5. How Do You Construct a Delta Kite?
Constructing a delta kite requires more precision but offers superior flight performance. Here’s a detailed guide:
- Gather Your Materials: You will need ripstop nylon, three wooden or fiberglass rods, kite string, glue, scissors, and a ruler.
- Prepare the Frame: Two rods will form the leading edges of the delta, and one rod will serve as the spine. Connect the leading-edge rods at the nose of the kite using glue and strong thread.
- Attach the Spine: Attach the spine rod to the center of the leading-edge connection, extending it down to the tail of the kite.
- Cut the Kite Shape: Cut the ripstop nylon into a delta shape, ensuring it covers the frame with an extra inch or two around the edges for folding.
- Attach the Covering: Fold the edges of the nylon over the rods and glue them in place, creating a neat and secure border. Reinforce the nose and tail with extra fabric for durability.
- Attach the Bridle: Tie the kite string to the leading edges, about one-third of the way down from the nose. Connect these two strings to form a bridle. Adjust the bridle point to optimize flight performance.
- Test and Adjust: Take the kite outside and test its flight. Delta kites are sensitive to bridle adjustments, so fine-tune the bridle point to achieve stable and high-angle flight.
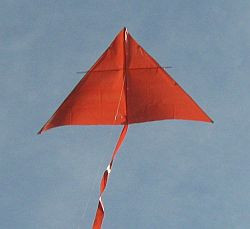 MBK Simple Delta kite
The delta kite’s superior aerodynamics allow it to soar higher and more gracefully than the diamond kite. Flyermedia.net provides comprehensive resources to help you master delta kite construction and flying techniques.
6. What is Involved in Making a Sled Kite?
Making a sled kite is one of the simplest and quickest kite-building projects, ideal for beginners and those looking for a portable kite.
- Gather Your Materials: You will need ripstop nylon, two flexible rods (such as fiberglass or plastic), kite string, glue, scissors, and a ruler.
- Cut the Kite Shape: Cut the ripstop nylon into a rectangular shape. The length should be about twice the width.
- Create the Pockets: Fold over the short edges of the rectangle and glue them down to create pockets. These pockets will hold the flexible rods.
- Insert the Rods: Insert the flexible rods into the pockets, ensuring they are securely in place.
- Attach the Bridle: Punch holes near the top and bottom edges of the kite, equidistant from the center. Tie the kite string to these holes to form a bridle.
- Test and Adjust: Take the kite outside and test its flight. Sled kites are simple but effective, and they can perform well in a variety of wind conditions.
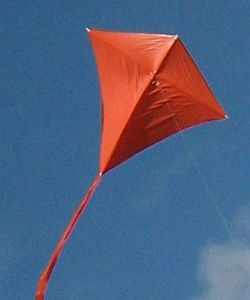
 MBK Simple Sled kite
The sled kite’s frameless design and ease of assembly make it a favorite among kite enthusiasts. Flyermedia.net offers detailed instructions and tips for maximizing the performance of your sled kite.
7. How Do You Adjust a Kite for Different Wind Conditions?
Adjusting a kite for varying wind conditions is crucial for optimal performance and stability. Several factors can be modified to accommodate different wind speeds.
- Bridle Adjustment: Moving the bridle point higher (closer to the nose) increases stability in stronger winds, while moving it lower (closer to the tail) enhances lift in lighter winds.
- Tail Length: Adding more tail length increases drag, stabilizing the kite in stronger winds. Reducing tail length decreases drag, allowing the kite to fly in lighter winds.
- Sail Tension: Adjusting the tension of the kite’s sail can also impact performance. A tighter sail is better for stronger winds, while a looser sail is more suitable for lighter winds.
Understanding how to make these adjustments allows you to fly your kite effectively in a wide range of conditions. According to the FAA, proper kite adjustments can also prevent accidents and ensure safe flying practices.
8. What Are Advanced Kite Designs and Techniques?
For those looking to advance their kite-building skills, exploring more complex designs and techniques can be both challenging and rewarding. Advanced designs include:
- Box Kites: Known for their stability and strong pull, box kites are more complex to construct but offer excellent performance in steady winds.
- Cellular Kites: These kites are made up of multiple cells or compartments, providing exceptional lift and stability.
- Foil Kites: Soft kites that inflate with air, offering high performance and portability.
Advanced techniques include:
- Reinforcing Stress Points: Adding extra layers of fabric or tape to areas of the kite that experience high stress, such as the nose and wingtips.
- Using Advanced Materials: Experimenting with materials like carbon fiber rods and lightweight, high-strength fabrics.
- Aerodynamic Tuning: Fine-tuning the kite’s shape and bridle configuration to optimize its performance for specific wind conditions.
Flyermedia.net provides in-depth articles and tutorials on advanced kite designs and techniques, helping you take your kite-building skills to the next level.
9. What Safety Precautions Should You Take When Flying a Kite?
Ensuring safety while flying a kite is paramount. Here are some essential precautions to follow:
- Choose an Open Area: Fly your kite in a large, open area away from trees, power lines, and buildings.
- Avoid Flying in Wet Weather: Never fly a kite in wet weather, as wet kite strings can conduct electricity.
- Be Aware of Wind Conditions: Avoid flying in strong winds or during thunderstorms.
- Use Appropriate String: Use a strong, non-conductive kite string.
- Never Fly Near Airports: Keep a safe distance from airports and airfields. According to IATA guidelines, flying kites near airports can pose a significant risk to aircraft.
- Supervise Children: Always supervise children when they are flying kites.
By following these safety precautions, you can enjoy kite flying while minimizing the risk of accidents. Flyermedia.net emphasizes safety in all its content, providing resources and guidelines for responsible kite flying.
10. What Are the Benefits of Kite Flying?
Kite flying offers numerous benefits, both physical and mental.
- Physical Activity: Kite flying gets you outdoors and moving, providing light exercise and fresh air.
- Stress Relief: The act of flying a kite can be relaxing and meditative, helping to reduce stress and improve mental well-being.
- Family Fun: Kite flying is an excellent activity for families, providing an opportunity to bond and create lasting memories.
- Educational Value: Kite flying can teach children about aerodynamics, physics, and weather patterns.
- Creative Expression: Building and designing kites allows for creative expression and personal customization.
Moreover, the principles of aerodynamics learned through kite flying can spark an interest in aviation and related fields, potentially leading to careers in the aviation industry. Flyermedia.net encourages enthusiasts to explore the educational and career opportunities that can stem from a passion for flying.
11. Understanding Kite Aerodynamics: Lift, Drag, and Stability
Kite aerodynamics is the study of how air moves around a kite, creating the forces that allow it to fly. Understanding these principles is crucial for designing and flying kites effectively.
- Lift: Lift is the force that opposes gravity, pushing the kite upwards. It is generated by the pressure difference between the upper and lower surfaces of the kite.
- Drag: Drag is the resistance the air exerts on the kite as it moves through it. While drag opposes motion, it also plays a role in stabilizing the kite.
- Stability: Stability refers to the kite’s ability to maintain its position in the air. A stable kite will resist changes in direction and altitude.
The angle of attack, which is the angle at which the kite meets the wind, is a critical factor in determining lift and drag. Optimizing the angle of attack allows the kite to generate maximum lift with minimal drag.
12. Choosing the Right Kite String and Bridle
The kite string and bridle are essential components that directly impact the kite’s performance and control.
- Kite String: Choose a string that is strong, lightweight, and non-stretchable. Dacron and nylon strings are popular choices for their durability and low stretch. The strength of the string should be appropriate for the size and type of kite.
- Bridle: The bridle is the connection point between the kite and the flying line. It consists of one or more lines that distribute the tension across the kite’s surface. Adjusting the bridle point can significantly affect the kite’s flight characteristics.
A well-chosen string and properly adjusted bridle are crucial for achieving stable and controlled flight. Flyermedia.net offers expert advice on selecting the right string and adjusting the bridle for various kite designs.
13. Kite Flying Etiquette: Respecting Others and the Environment
Practicing good kite flying etiquette ensures that everyone can enjoy the hobby safely and responsibly.
- Respect Others: Be mindful of other people in the area and avoid flying your kite too close to them.
- Avoid Crowded Areas: Choose less crowded locations to minimize the risk of collisions and disturbances.
- Protect the Environment: Do not leave any trash or debris behind. Retrieve any broken kite parts and dispose of them properly.
- Respect Wildlife: Avoid flying your kite in areas where it may disturb birds or other wildlife.
- Follow Local Regulations: Be aware of any local regulations or restrictions regarding kite flying.
By following these simple guidelines, you can help ensure that kite flying remains a safe and enjoyable activity for everyone.
14. Kite Aerial Photography: Capturing Stunning Aerial Images
Kite aerial photography (KAP) involves attaching a camera to a kite to capture aerial images and videos. This technique offers a unique perspective and can produce stunning results.
- Equipment: You will need a kite capable of lifting the weight of the camera, a camera mount, and a remote control to trigger the camera.
- Kite Selection: Choose a kite with strong lifting power and stability, such as a delta or box kite.
- Camera Mount: Use a stable and adjustable camera mount to ensure clear and steady images.
- Safety Precautions: Always take extra safety precautions when flying a kite with a camera attached, as the added weight can affect the kite’s stability.
Kite aerial photography is a fascinating and rewarding hobby that combines the joy of kite flying with the art of photography. Flyermedia.net features articles and tutorials on KAP techniques and equipment, helping you capture breathtaking aerial images.
15. Kite Festivals and Competitions: Joining the Kite Flying Community
Kite festivals and competitions are great opportunities to connect with other kite enthusiasts, showcase your skills, and learn new techniques.
- Kite Festivals: These events typically feature kite displays, workshops, and vendors selling kite-related merchandise.
- Kite Competitions: Competitions may include categories such as kite flying accuracy, kite design, and kite aerial photography.
- Community Engagement: Participating in kite festivals and competitions is a great way to become part of the kite flying community.
These events offer a supportive and inspiring environment for kite enthusiasts of all levels. Flyermedia.net provides listings of kite festivals and competitions around the world, helping you find events near you.
16. The History of Kites: From Ancient Inventions to Modern Innovations
Kites have a rich and fascinating history, dating back thousands of years.
- Ancient Origins: Kites are believed to have originated in China around 2,800 years ago. They were used for military purposes, signaling, and measuring distances.
- Global Spread: Kites gradually spread to other parts of the world, including Korea, Japan, and Southeast Asia.
- European Introduction: Kites were introduced to Europe in the 16th century and were initially used for scientific experiments and recreation.
- Modern Innovations: Today, kites are used for a wide range of applications, including recreation, scientific research, and energy generation.
The evolution of kites reflects human ingenuity and creativity. Flyermedia.net explores the history of kites, highlighting their cultural significance and technological advancements.
17. Kite Repair and Maintenance: Keeping Your Kite in Top Condition
Proper kite repair and maintenance are essential for prolonging the life of your kite and ensuring it performs optimally.
- Regular Inspections: Inspect your kite regularly for any signs of damage, such as tears, fraying, or broken rods.
- Repairing Tears: Use adhesive tape or fabric patches to repair small tears in the kite’s sail.
- Replacing Rods: Replace broken or damaged rods with new ones of the same size and material.
- Cleaning: Clean your kite regularly with a damp cloth to remove dirt and debris.
- Storage: Store your kite in a dry, cool place away from direct sunlight.
By following these simple maintenance tips, you can keep your kite in top condition and enjoy many years of flying.
18. Exploring Different Types of Kite Fabrics: Ripstop Nylon, Polyester, and More
The choice of fabric significantly impacts the kite’s durability, weight, and performance.
- Ripstop Nylon: A popular choice for its strength, durability, and resistance to tearing. It is ideal for larger kites and outdoor conditions.
- Polyester: Lightweight and affordable, polyester is a good option for smaller kites and indoor use.
- Spinnaker Fabric: A high-performance fabric used in sailing, spinnaker fabric is lightweight, strong, and water-resistant.
- Kite Paper: Traditional and lightweight, suitable for smaller kites and indoor use.
Each fabric offers unique properties that make it suitable for different types of kites and flying conditions. Flyermedia.net provides detailed comparisons of kite fabrics, helping you choose the right material for your project.
19. Designing Your Own Kite: Unleashing Your Creativity
Designing your own kite is a rewarding experience that allows you to unleash your creativity and create a unique flying machine.
- Sketch Your Design: Start by sketching your kite design on paper, considering its shape, size, and aerodynamic properties.
- Choose Your Materials: Select the appropriate materials based on your design and intended flying conditions.
- Build a Prototype: Build a prototype of your kite to test its flight performance and identify any areas for improvement.
- Refine Your Design: Refine your design based on the results of your prototype testing.
- Add Personal Touches: Customize your kite with unique colors, patterns, and embellishments.
Designing your own kite is a challenging but ultimately rewarding process that combines art, science, and engineering.
20. Kite Safety and Regulations in the United States: FAA Guidelines
In the United States, kite flying is subject to certain regulations and guidelines to ensure safety and prevent interference with aviation activities.
- FAA Guidelines: The Federal Aviation Administration (FAA) has established guidelines for kite flying, including restrictions on the size and altitude of kites.
- Height Restrictions: Kites should not be flown higher than 500 feet above the ground in uncontrolled airspace.
- Proximity to Airports: Kites should not be flown within five miles of an airport without notifying the airport operator or air traffic control.
- Power Lines: Avoid flying kites near power lines or other electrical equipment.
Adhering to these regulations is essential for ensuring the safety of kite flyers and preventing interference with aviation activities. Flyermedia.net provides detailed information on kite safety and regulations in the United States, helping you fly responsibly and legally.
FAQ: How to Make a Fly Kite
1. What is the best material to use for a kite sail?
Ripstop nylon is generally considered the best material due to its durability, lightweight nature, and resistance to tearing, making it ideal for outdoor use.
2. How do I make sure my kite is balanced?
Ensure the center of pressure is slightly ahead of the center of gravity. Adjust the bridle and tail to fine-tune the balance for stable flight.
3. What’s the ideal wind speed for flying a kite?
Moderate wind speeds (13-18 mph) are generally ideal. However, this can vary depending on the size and design of your kite.
4. How long should the tail of my kite be?
The length of the tail depends on the kite size and wind conditions. Start with a tail several times longer than the kite and adjust as needed for stability.
5. Can I fly a kite near power lines?
No, it is extremely dangerous to fly a kite near power lines due to the risk of electrocution. Always fly in open areas away from any electrical hazards.
6. What should I do if my kite gets stuck in a tree?
Do not attempt to climb the tree. Try to gently pull the line to dislodge the kite, or if necessary, cut the line and retrieve the kite later.
7. How do I adjust the bridle on my kite?
Moving the bridle point higher (closer to the nose) increases stability in stronger winds, while moving it lower (closer to the tail) enhances lift in lighter winds.
8. What is kite aerial photography?
Kite aerial photography (KAP) is the technique of attaching a camera to a kite to capture aerial images and videos, offering a unique perspective.
9. Are there any regulations about flying kites near airports?
Yes, you should not fly a kite within five miles of an airport without notifying the airport operator or air traffic control to avoid interfering with aircraft operations.
10. How can I make my kite more stable in strong winds?
Increase the tail length to add more drag, and adjust the bridle point higher to improve stability. Consider using a kite designed for stronger winds.
Ready to elevate your kite-flying journey? Visit flyermedia.net for expert guidance, comprehensive resources, and a vibrant community. Discover the joy of aviation and unlock your potential with us. Explore our training programs, career opportunities, and aviation news. Your sky-high adventure starts here.
Address: 600 S Clyde Morris Blvd, Daytona Beach, FL 32114, United States.
Phone: +1 (386) 226-6000.
Website: flyermedia.net.