Making a paper flying bird is an engaging activity that combines the fun of origami with the excitement of aviation; Flyermedia.net provides comprehensive instructions to guide you. This detailed guide will show you how to craft a paper flying bird that’s not only aesthetically pleasing but also aerodynamically sound. With these techniques, you can create fantastic paper airplanes with impressive flight capabilities, while exploring simple aviation.
1. Gather Your Materials for a Paper Flying Bird
Before you start, make sure you have everything you need. The most important thing is a standard rectangular sheet of paper. Regular printer paper works just fine, but you can also use origami paper for a cleaner look. Additionally, having a ruler, pencil, and a pair of scissors can be handy for making precise folds and adjustments. A paper clip can also be used to adjust the plane’s center of gravity and improve its flight, if desired.
2. Initial Folds for the Paper Flying Bird Base
The first few folds are crucial for establishing the base of your paper flying bird.
2.1. Folding Diagonally
Step 1: Begin by folding the top right corner of the paper diagonally down to the opposite side. Ensure the edges align perfectly to create a sharp crease. This fold will form one of the primary guidelines for the bird’s wings.
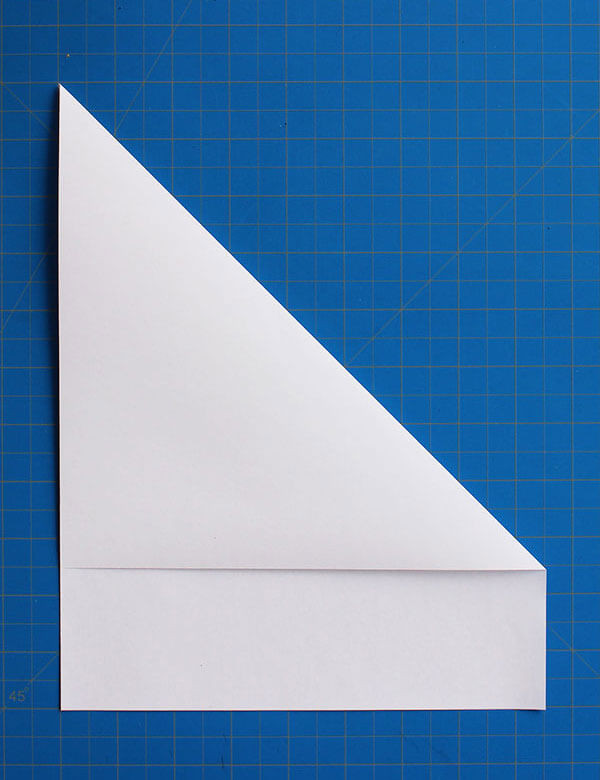 Step 1: Folding the top right corner diagonally to create a sharp crease for the initial wing guideline
2.2. Repeating on the Other Side
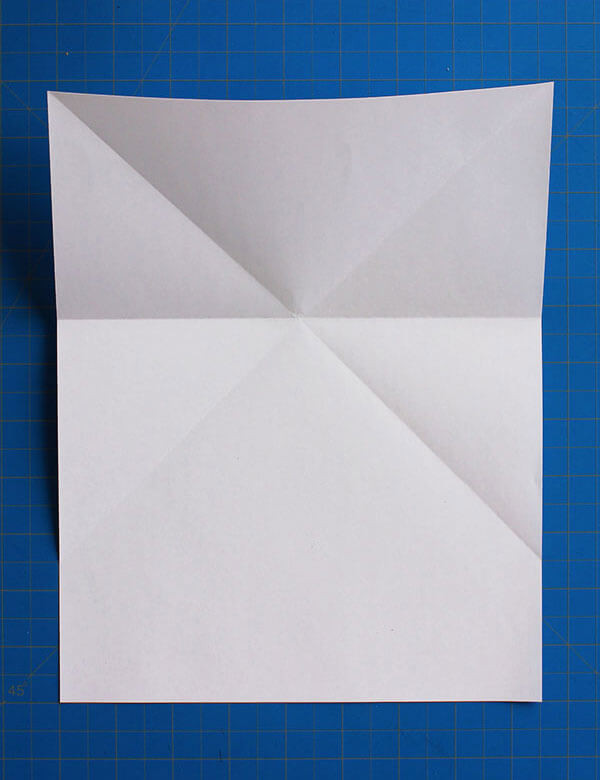
Step 2: Open the paper back up and repeat the same fold with the top left corner, bringing it down diagonally to the opposite side. Now, you should have an “X” shape formed by the two diagonal creases. These creases are essential for creating a balanced and symmetrical bird.
 Step 2: Repeating the diagonal fold on the opposite side to form an 'X' shape as the primary guidelines
3. Creating the Central Folds
The next set of folds will define the central structure of the paper flying bird.
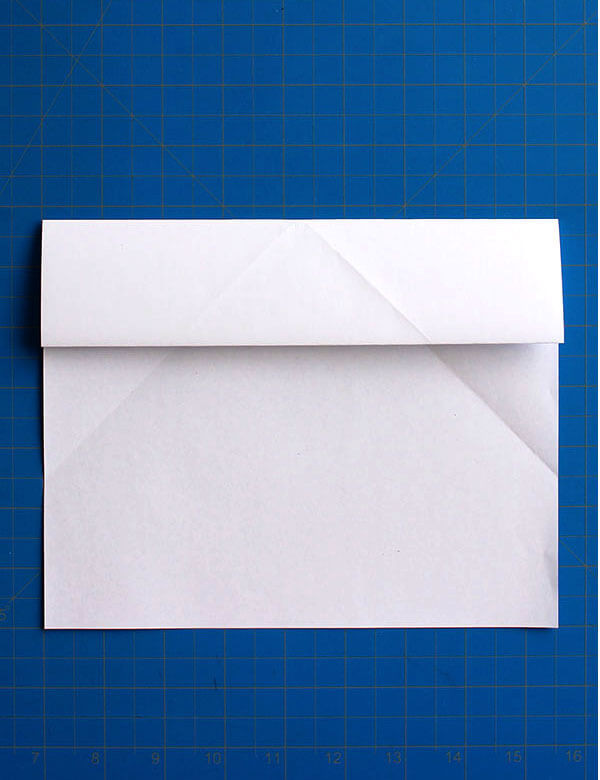
3.1. Folding the Top Down
Step 3: Fold the top edge of the paper down, aligning the crease with the center point of the “X” you created earlier. This fold will help form the main body of the bird.
 Step 3: Folding the top edge down to align with the center of the 'X' to create the bird's body
3.2. Flattening the Paper
Step 4: Unfold the paper and flatten it out. This step ensures that the previous folds are well-defined and will guide the subsequent folds.
 Step 4: Unfolding and flattening the paper to ensure well-defined creases for guiding the next steps
4. Shaping the Wings of Your Paper Flying Bird
Now, you’ll start shaping the wings of your paper bird to give it aerodynamic properties.
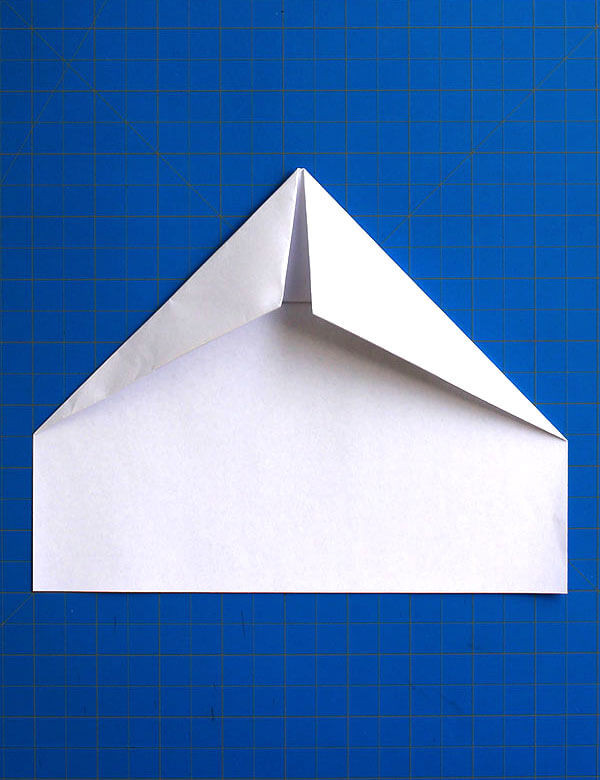
4.1. Folding to the Horizontal Crease
Step 5: Fold the top edge down again, this time aligning it with the first horizontal crease you made in Step 3. This fold will create the first layer of the wings.
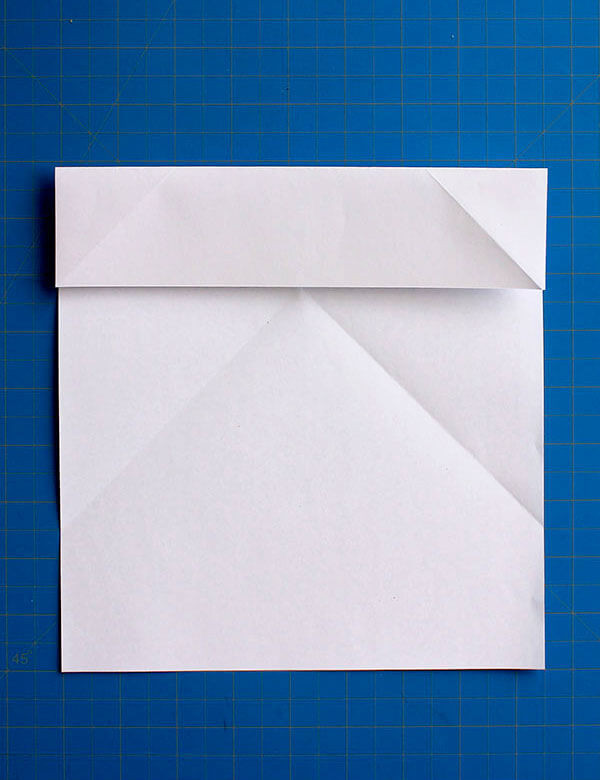 Step 5: Folding the top edge down to meet the first horizontal crease, forming the initial layer of the wings
4.2. Folding Again Along the Horizontal Crease
Step 6: Fold the top section down once more along the same horizontal crease. This will create a thicker, more defined edge for the wings, contributing to better stability during flight.
 Step 6: Folding the top section down again along the horizontal crease to define the wing edge
5. Forming the Wingtips
The wingtips are crucial for controlling the bird’s flight direction and stability.
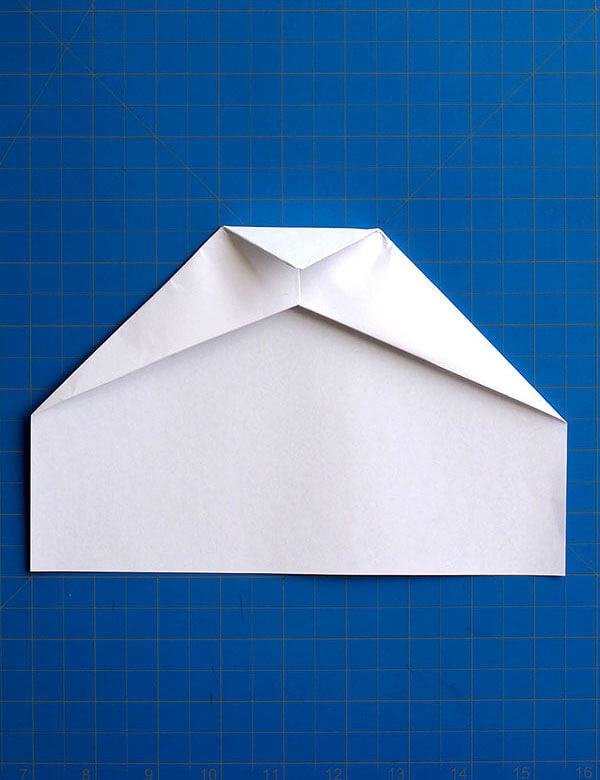
5.1. Folding to the Diagonal Crease
Step 7: Fold the top outer edge inward, aligning it with the diagonal crease you made in Step 1 and Step 2. Repeat this fold on the other side. These folds will shape the wingtips, allowing for better control during flight.
 Step 7: Folding the top outer edge to meet the diagonal crease, shaping the wingtips for control
5.2. Refining the Wing Shape
Step 8: Fold the top edges along the diagonal lines to refine the point of the plane. This step ensures that the wings are symmetrical and aerodynamically efficient.
 Step 8: Folding the top edges along diagonal lines to refine the wing shape for aerodynamic efficiency
6. Creating the Nose of the Paper Flying Bird
The nose of the paper flying bird affects its stability and flight distance.
6.1. Folding the Point Down
Step 9: Fold the point (nose) of the plane down as shown. This fold creates a more aerodynamic nose, reducing air resistance and improving flight distance.
 Step 9: Folding the nose down to create an aerodynamic shape, reducing air resistance
7. Adding the Control Surfaces
The control surfaces, like flaps, allow you to adjust the bird’s flight characteristics.
7.1. Measuring and Marking
Step 10: At the top edge of the plane, measure 1.6 cm from the center to the left and right. Then, measure 2.5 cm (1 inch) from the bottom center. Connect these points to create lines for the control surfaces.
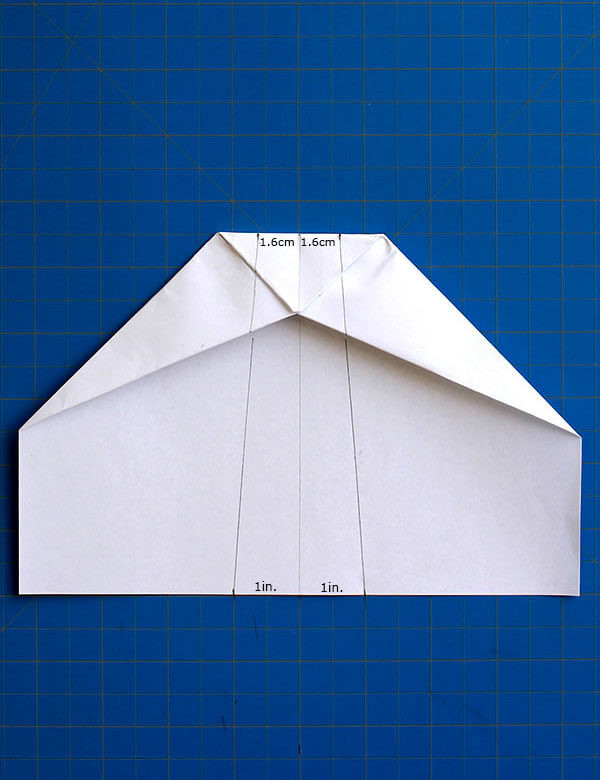 Step 10: Measuring and marking points to create lines for the control surfaces, enabling flight adjustments
7.2. Folding Along the Measured Lines
Step 11: Fold the airplane in half and then fold along the measured lines. Use printable instructions if you prefer not to measure. These folds will create the flaps, which help control the bird’s flight direction.
 Step 11: Folding along measured lines to create flaps for flight direction control
8. Creating the Accordion Folds
Accordion folds add stability and improve the bird’s ability to glide.
8.1. Measuring and Marking Again
Step 12: Measure 3.1 cm from the top outer corner and then 3.1 cm again from that point. Measure 2.5 cm (1 inch) from the bottom of the vertical line and again from that point.
 Step 12: Measuring and marking for accordion folds to enhance stability and glide
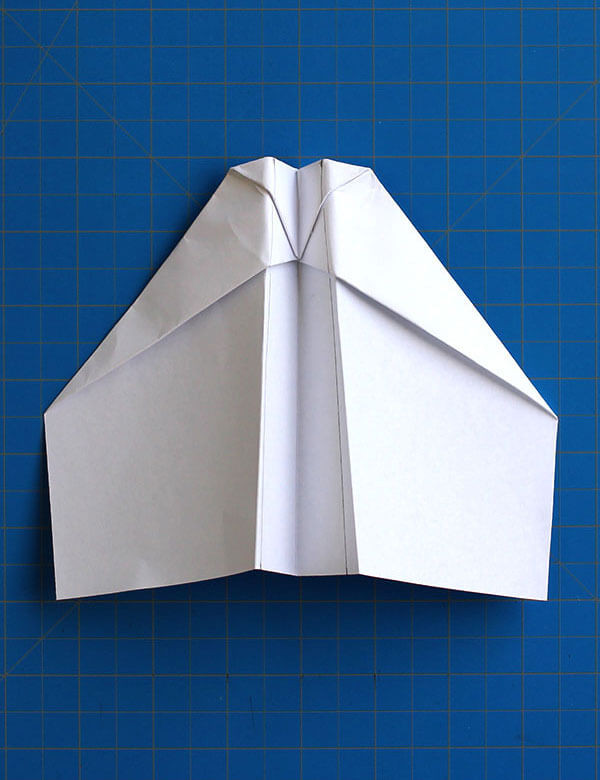
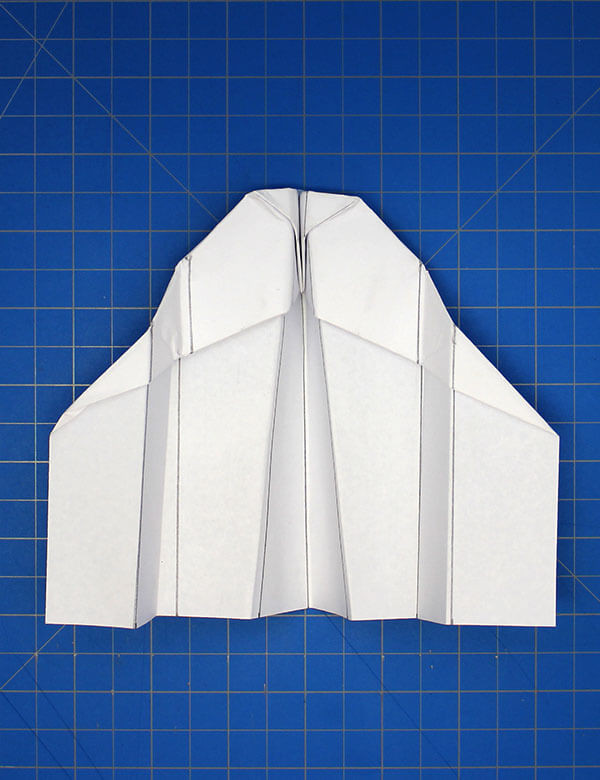
8.2. Folding the Accordion Shape
Step 13: Fold along the lines, alternating the direction of each fold to get an accordion shape. This technique adds rigidity to the wings, allowing for a more stable and prolonged flight.
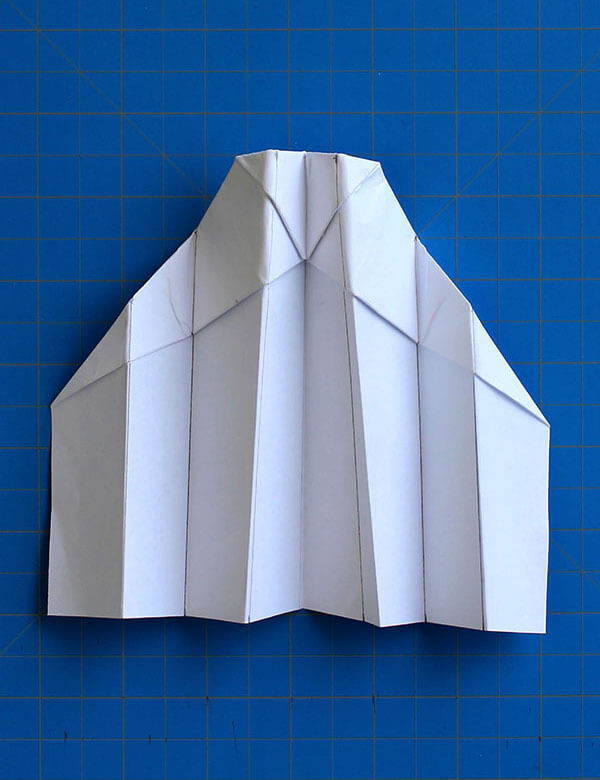 Step 13: Folding along lines in alternating directions to create an accordion shape
9. Final Touches for Your Paper Flying Bird
The final touches ensure your paper flying bird is ready for optimal flight.
9.1. Taping the Nose
Step 14: Tape the nose of the paper plane together. This prevents the nose from unfolding during flight and maintains the aerodynamic shape.
 Step 14: Taping the nose of the paper plane to maintain its aerodynamic shape during flight
10. Adjusting and Flying Your Paper Flying Bird
With your paper flying bird complete, it’s time to make some final adjustments and take it for a test flight.
10.1. Final Adjustments
Inspect the wings to ensure they are symmetrical. Uneven wings can cause the bird to veer to one side. Adjust the flaps to control the bird’s turning behavior. Bending the flaps up will cause the bird to climb, while bending them down will cause it to descend.
10.2. Test Flight
Find an open space and throw the paper flying bird with a firm, smooth motion at a slight upward angle. Observe its flight pattern and make adjustments as necessary. If the bird nosedives, try shifting the center of gravity by adding a small paper clip to the nose. If it stalls, try increasing the wing area by unfolding the flaps slightly.
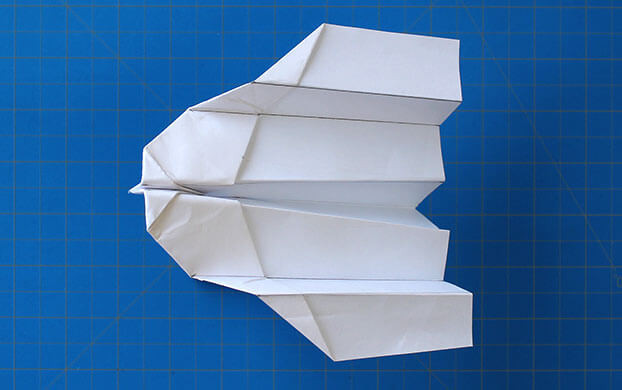 The final paper airplane design, ready for flight
11. Understanding the Aerodynamics of Paper Flying Birds
The flight of a paper flying bird is governed by the same principles of aerodynamics that apply to real aircraft. Understanding these principles can help you design and build better paper airplanes.
11.1. Lift
Lift is the force that opposes gravity and keeps the paper flying bird in the air. It is generated by the wings as they move through the air. The curved shape of the wings causes the air to flow faster over the top surface than the bottom surface, creating a pressure difference. This pressure difference results in an upward force, or lift.
11.2. Drag
Drag is the force that opposes the motion of the paper flying bird through the air. It is caused by air resistance and friction. Minimizing drag is essential for achieving longer flight distances. Aerodynamic designs, such as a pointed nose and smooth surfaces, can help reduce drag.
11.3. Thrust
Thrust is the force that propels the paper flying bird forward. In the case of a paper airplane, thrust is provided by the throw. The harder you throw the plane, the more thrust it has, and the farther it will fly.
11.4. Gravity
Gravity is the force that pulls the paper flying bird downwards. To keep the plane in the air, the lift force must be greater than or equal to the force of gravity.
11.5. Stability
Stability refers to the paper flying bird’s ability to maintain its flight path. A stable plane will fly straight and level, while an unstable plane will wobble or veer off course. Stability can be improved by carefully balancing the plane’s weight and adjusting the control surfaces.
12. Advanced Techniques for Paper Flying Bird Design
Once you’ve mastered the basic techniques, you can experiment with advanced design features to improve your paper flying bird’s performance.
12.1. Wing Shape
The shape of the wings has a significant impact on the paper flying bird’s flight characteristics. Delta wings, for example, provide excellent stability, while swept wings can improve speed. Experiment with different wing shapes to see how they affect the plane’s flight.
12.2. Dihedral
Dihedral refers to the upward angle of the wings. Adding dihedral can improve the paper flying bird’s stability by making it more resistant to rolling.
12.3. Control Surfaces
Experiment with different types of control surfaces, such as ailerons, elevators, and rudders, to control the paper flying bird’s movement in the air. Ailerons, located on the trailing edge of the wings, control roll. Elevators, located on the tail, control pitch. Rudders, also located on the tail, control yaw.
12.4. Weight Distribution
The way weight is distributed throughout the paper flying bird can affect its stability and flight characteristics. Adding weight to the nose can improve stability, while adding weight to the tail can make the plane more maneuverable.
12.5. Materials
Experiment with different types of paper to see how they affect the paper flying bird’s flight. Thicker paper will generally result in a more durable plane, while lighter paper may improve flight distance.
13. The Science Behind Paper Airplane Flight
Paper airplane flight is a fascinating demonstration of basic aerodynamic principles. By understanding the forces that act on a paper airplane, you can design and build planes that fly farther, faster, and more accurately.
13.1. Bernoulli’s Principle
Bernoulli’s principle states that as the speed of a fluid (such as air) increases, its pressure decreases. This principle is essential for understanding how wings generate lift. The curved upper surface of a wing causes air to flow faster over the top than the bottom, resulting in lower pressure on top and higher pressure on the bottom. This pressure difference creates lift, which is the force that keeps the paper flying bird in the air. According to research from Embry-Riddle Aeronautical University, Bernoulli’s principle explains approximately 70% of the lift generated by an airplane wing.
13.2. Angle of Attack
The angle of attack is the angle between the wing and the oncoming airflow. Increasing the angle of attack increases lift, but only up to a certain point. If the angle of attack is too high, the airflow will separate from the wing, causing a stall and a loss of lift.
13.3. Wing Loading
Wing loading is the ratio of the paper flying bird’s weight to its wing area. Lower wing loading generally results in better glide performance, while higher wing loading can improve stability.
13.4. Aspect Ratio
Aspect ratio is the ratio of the wingspan to the wing chord (the distance from the leading edge to the trailing edge). Higher aspect ratios generally result in better glide performance, while lower aspect ratios can improve maneuverability.
13.5. Reynolds Number
The Reynolds number is a dimensionless quantity that describes the ratio of inertial forces to viscous forces in a fluid. It affects the airflow over the paper flying bird’s wings and can influence its flight characteristics. Paper airplanes typically operate at low Reynolds numbers, where viscous forces are more dominant.
14. Troubleshooting Common Paper Flying Bird Problems
Even with careful construction, paper flying birds can sometimes exhibit problems during flight. Here are some common issues and how to fix them:
14.1. Nosediving
If your paper flying bird consistently nosedives, it may be too nose-heavy. Try shifting the center of gravity back by adding a small piece of tape or a paper clip to the tail. Alternatively, you can increase the wing area by unfolding the flaps slightly.
14.2. Stalling
If your paper flying bird stalls and falls straight to the ground, it may not have enough lift. Try increasing the angle of attack by bending the flaps up slightly. You can also try increasing the wing area by making the wings larger.
14.3. Veering to One Side
If your paper flying bird consistently veers to one side, the wings may be uneven. Check the wings to ensure they are symmetrical and adjust them as necessary. You can also try bending the flap on the opposite side to correct the veer.
14.4. Unstable Flight
If your paper flying bird wobbles or oscillates during flight, it may be unstable. Try adding dihedral to the wings by bending them up slightly. You can also try adding weight to the nose to improve stability.
14.5. Short Flight Distance
If your paper flying bird doesn’t fly very far, it may have too much drag. Try streamlining the design by making the nose more pointed and smoothing out any rough edges. You can also try throwing the plane harder to increase its initial velocity.
15. Paper Flying Birds in Education and Recreation
Paper flying birds are not just fun to play with; they can also be valuable educational tools. They can be used to teach basic principles of aerodynamics, engineering, and physics.
15.1. Educational Applications
In the classroom, paper flying birds can be used to demonstrate concepts such as lift, drag, thrust, and gravity. Students can experiment with different designs and materials to see how they affect the paper flying bird’s flight characteristics. This hands-on approach can make learning more engaging and effective. According to a study by the National Science Foundation, hands-on activities can improve students’ understanding of scientific concepts by up to 20%.
15.2. Recreational Activities
Paper flying birds are also a great source of recreation. They can be flown indoors or outdoors, and they can be enjoyed by people of all ages. Paper airplane contests are a popular activity, where participants compete to see who can design the paper flying bird that flies the farthest, the longest, or the most accurately.
15.3. Therapeutic Benefits
Paper flying birds can also have therapeutic benefits. The act of folding and flying paper airplanes can be relaxing and stress-relieving. It can also improve hand-eye coordination and fine motor skills. According to the American Occupational Therapy Association, activities that involve fine motor skills can help improve cognitive function and overall well-being.
16. Famous Paper Airplane Designs and Their Creators
Over the years, many innovative paper airplane designs have been created, each with its unique flight characteristics. Here are some of the most famous designs and their creators:
16.1. The Dart
The Dart is a classic paper airplane design known for its speed and accuracy. It is simple to fold and flies well with a strong throw. The creator of the Dart is unknown, but it has been around for many years and remains a popular choice among paper airplane enthusiasts.
16.2. The Eagle
The Eagle is another popular design, known for its stability and long glide times. It has a distinctive wing shape and a sturdy construction. The Eagle was created by Edmond Hui, who is also known for his other paper airplane designs.
16.3. The Space Shuttle
The Space Shuttle is a more complex design that resembles the real Space Shuttle. It has a delta wing shape and a distinctive tail. The Space Shuttle was created by John Collins, who is known for his innovative and high-performance paper airplane designs.
16.4. The World Record Paper Airplane
The world record for the longest paper airplane flight is held by a design created by Joe Ayoob and John Collins. Their paper airplane flew for an incredible 226 feet and 10 inches, setting a new world record in 2012. The design is a closely guarded secret, but it is known to incorporate advanced aerodynamic principles.
17. Exploring the History of Paper Airplanes
The history of paper airplanes dates back centuries, with evidence suggesting that they were being flown as early as 200 BC in China. However, the modern paper airplane is believed to have originated in the early 20th century.
17.1. Early Origins
The earliest known paper airplanes were simple gliders made by folding paper into a wing shape. These early paper airplanes were used for both recreation and experimentation.
17.2. The Wright Brothers
The Wright brothers, famous for inventing the first successful airplane, also experimented with paper airplanes. They used paper airplanes to test different wing designs and aerodynamic principles.
17.3. Modern Developments
In the mid-20th century, paper airplanes became increasingly popular as a recreational activity. Many different designs were developed, and paper airplane contests became a common pastime.
17.4. Contemporary Innovations
Today, paper airplanes continue to evolve with new designs and techniques being developed. Computer-aided design (CAD) software is now being used to create highly sophisticated paper airplane models.
18. The Future of Paper Airplane Design
The future of paper airplane design is bright, with ongoing research and development leading to new and innovative designs.
18.1. Advanced Materials
Researchers are experimenting with advanced materials, such as carbon fiber and graphene, to create paper airplanes that are stronger, lighter, and more durable.
18.2. Computer-Aided Design
CAD software is being used to optimize paper airplane designs for maximum performance. This allows designers to create complex and highly efficient paper airplane models.
18.3. 3D Printing
3D printing technology is being used to create paper airplane prototypes and models. This allows designers to quickly and easily test different designs and materials.
18.4. Artificial Intelligence
Artificial intelligence (AI) is being used to analyze paper airplane flight data and identify patterns that can be used to improve designs. AI can also be used to automate the design process, creating paper airplanes that are optimized for specific flight conditions.
19. Community and Resources for Paper Airplane Enthusiasts
If you’re passionate about paper airplanes, there are many communities and resources available to help you connect with other enthusiasts and learn more about the hobby.
19.1. Online Forums and Communities
There are many online forums and communities dedicated to paper airplanes. These communities provide a place for enthusiasts to share designs, ask questions, and discuss paper airplane-related topics. Some popular online forums include the Paper Airplane Designs Forum and the Paper Airplane Hangar.
19.2. Books and Publications
There are many books and publications available on paper airplanes. These resources provide detailed instructions on how to fold different paper airplane designs, as well as information on the history and science of paper airplane flight. Some popular books include “The World Record Paper Airplane Book” by John Collins and “Paper Airplane Science” by Arthur Weiss.
19.3. Paper Airplane Contests and Events
Paper airplane contests and events are held around the world, providing a fun and competitive environment for paper airplane enthusiasts. These events typically include competitions for distance, duration, accuracy, and artistic design.
19.4. Educational Workshops and Programs
Educational workshops and programs on paper airplanes are offered by museums, schools, and community centers. These programs provide hands-on instruction on how to fold and fly paper airplanes, as well as information on the science and engineering principles involved.
20. Conclusion: Soaring High with Paper Flying Birds
Creating and flying paper flying birds is a rewarding activity that combines creativity, engineering, and fun. Whether you’re a beginner or an experienced enthusiast, there’s always something new to learn and explore in the world of paper airplanes. So, grab a sheet of paper, follow these instructions, and start soaring high with your own paper flying bird.
For more information on aviation, flight training, and career opportunities in the aviation industry, visit flyermedia.net. Discover a wide range of resources, including school directories, news articles, and job listings. Flyermedia.net is your go-to source for all things aviation, providing up-to-date and accurate information to help you achieve your aviation dreams.
FAQ: Frequently Asked Questions About How to Make a Paper Flying Bird
1. What kind of paper is best for making a paper flying bird?
The best kind of paper is standard printer paper (20 lb or 75 gsm) because it is lightweight and easy to fold. However, you can also use origami paper for a cleaner look or experiment with different types of paper to see how they affect the paper flying bird’s flight.
2. How can I make my paper flying bird fly farther?
To make your paper flying bird fly farther, ensure that the wings are symmetrical, the nose is pointed, and the design is streamlined to reduce drag. You can also add a small paper clip to the nose to improve stability and throw the plane with a firm, smooth motion.
3. How do I adjust the flight of my paper flying bird?
You can adjust the flight by bending the flaps (control surfaces) on the wings. Bending the flaps up will cause the paper flying bird to climb, while bending them down will cause it to descend. Bending the flaps on one side will cause it to turn in that direction.
4. Why is my paper flying bird nosediving?
If your paper flying bird is nosediving, it is likely too nose-heavy. Try shifting the center of gravity back by adding a small piece of tape or a paper clip to the tail. Alternatively, you can increase the wing area by unfolding the flaps slightly.
5. What is the science behind paper airplane flight?
The science behind paper airplane flight involves the principles of aerodynamics, including lift, drag, thrust, and gravity. Lift is generated by the wings as they move through the air, drag is the force that opposes the motion, thrust is provided by the throw, and gravity pulls the paper flying bird downwards.
6. Can I use scissors to make a paper flying bird?
Yes, you can use scissors to trim the wings or adjust the shape of the paper flying bird. However, most designs can be made without scissors by simply folding the paper.
7. How do I make a paper flying bird that flies straight?
To make a paper flying bird that flies straight, ensure that the wings are symmetrical and the weight is evenly distributed. Adjust the flaps to correct any veering and throw the plane with a straight, smooth motion.
8. What are some advanced techniques for paper airplane design?
Some advanced techniques include experimenting with different wing shapes, adding dihedral to the wings, using ailerons, elevators, and rudders to control movement, and optimizing weight distribution.
9. Where can I find more paper airplane designs?
You can find more paper airplane designs online through websites like flyermedia.net and Fold ‘N Fly, in books and publications, and in online forums and communities dedicated to paper airplanes.
10. How can I participate in paper airplane contests?
To participate in paper airplane contests, check local schools, community centers, and aviation museums for upcoming events. You can also search online for regional and national paper airplane competitions.
By following these steps and tips, you’ll be well on your way to creating amazing paper flying birds that soar through the air. Remember to visit flyermedia.net for more aviation-related information and resources. Whether you are interested in flight school, aviation news, or job opportunities, flyermedia.net has you covered. So why wait, start creating your own paper flying bird today?