Making a lantern fly trap is a practical and eco-friendly solution to manage these invasive pests and protect your trees, and flyermedia.net can help you understand the best methods. Constructing your own trap is not only cost-effective but also minimizes the use of insecticides, ensuring a safer environment for other wildlife. Dive into our guide for detailed instructions, expert tips, and the latest research to effectively combat the spotted lanternfly menace using these DIY insect catchers, promoting sustainable pest control and preserving the beauty of your landscape.
1. What is a Spotted Lanternfly and Why Should You Trap It?
The spotted lanternfly (SLF), Lycorma delicatula, is an invasive insect from Asia that poses a significant threat to various plants and trees in the United States. Spotted lanternflies are detrimental because they feed on the sap of host plants, weakening them and making them vulnerable to disease and other pests. Trapping SLFs is crucial to controlling their spread, protecting valuable agricultural and ornamental plants, and preserving the health of ecosystems.
1.1. Identifying the Spotted Lanternfly
The spotted lanternfly undergoes several nymphal stages before reaching adulthood. According to the Pennsylvania Department of Agriculture, early-stage nymphs are black with white spots, while later-stage nymphs develop red patches. Adults are about 1 inch long and have distinctive wings: forewings are grayish with black spots, and hindwings have patches of red, black, and white.
1.2. Understanding the Threat
SLFs feed on over 70 plant species, including grapevines, fruit trees, and hardwoods. Their feeding can cause significant damage, reducing crop yields and even killing plants. In areas heavily infested with SLF, trees may ooze sap, attracting other insects and creating a sooty mold that further harms the plant. According to research from Penn State Extension, grape growers in Pennsylvania have experienced significant losses due to SLF infestations, with some vineyards reporting yield reductions of up to 90% in severely affected areas.
1.3. Why Trapping is Important
Trapping is an effective method to manage SLF populations without relying solely on insecticides. Traps can capture and kill large numbers of SLFs, particularly nymphs, as they climb tree trunks to feed. This reduces the overall population, minimizes damage to plants, and helps prevent the spread of SLF to new areas. Trapping is also environmentally friendly, as it avoids the potential harm that insecticides can pose to beneficial insects, birds, and other wildlife.
2. What are the Different Types of Lantern Fly Traps?
There are several types of lantern fly traps available, each with its own advantages and disadvantages. The most common types include sticky band traps and circle traps, each employing different mechanisms to capture and kill SLFs.
2.1. Sticky Band Traps
Sticky band traps involve wrapping a sticky material around the trunk of a tree to capture SLFs as they climb. These traps are simple to install and can be effective at catching large numbers of nymphs. However, they also pose a risk to other animals, such as birds and squirrels, which can get stuck on the adhesive.
Pros:
- Easy to install
- Effective at capturing nymphs
- Relatively inexpensive
Cons:
- Can trap non-target species
- May require frequent replacement due to debris and saturation
- Effectiveness decreases in wet or dusty conditions
According to Penn State Extension, sticky bands should be monitored regularly and protected with a wire or screening guard to prevent accidental capture of birds and other wildlife.
2.2. Circle Traps
Circle traps, also known as funnel traps or walking traps, are designed to guide SLFs into a collection container from which they cannot escape. These traps typically consist of a screen or mesh funnel attached to a bag or jar. SLFs are directed upward into the trap as they attempt to climb the tree.
Pros:
- More selective than sticky bands
- Less likely to capture non-target species
- Can be made from readily available materials
Cons:
- More complex to construct
- May require more maintenance
- Can be less effective in heavily infested areas
Recent research has demonstrated that circle traps are highly effective and significantly reduce the risk of capturing other creatures. The design of these traps allows for continuous capture without the need for sticky substances.
2.3. Other Trap Designs
Besides sticky bands and circle traps, other trap designs include modified insect traps and homemade solutions using various materials. Some people have adapted traps designed for other insects, such as pecan weevils, to capture SLFs. Creative individuals have also devised unique traps using materials they have on hand, such as plastic bottles, netting, and duct tape.
Each type of trap has its own set of advantages and disadvantages, and the best choice will depend on factors such as the level of infestation, the type of trees being protected, and personal preferences.
 Insect screening and milk jug top (Steps 5 and 6)
Alt: Insect screen secured to a milk jug top demonstrates a step in constructing a homemade lantern fly trap.
3. What Materials Do You Need to Make a Lantern Fly Trap?
Creating your own lantern fly trap can be a cost-effective and rewarding project. The materials needed are readily available and can often be found around the house. Here’s a comprehensive list of the items you’ll need:
3.1. Basic Materials
- Insect Screening: Plastic-coated insect screening is preferable to wire screen because it is more durable and easier to work with. A piece approximately 30″ x 23″ is a good starting size, but you can adjust it to fit your tree.
- Wooden Strips: You’ll need two pieces of wood for support. One piece should be about 11″ x 1″ x 0.5″, and the other about 18″ x 1″ x 0.5″. Wooden lath, yardsticks, or even paint stirrers duct-taped together can work.
- Bendable Wire: Approximately 32″ of sturdy but bendable wire, such as from a thin coat hanger, will help keep the trap’s entrance open.
- Plastic Milk Jug Tops: Two plastic milk jug tops will form the top of the trap, creating a funnel-like entrance.
- Zip-Type Bags: One-gallon zip-type bags will serve as the collection container. Have extras on hand to replace them as they fill up.
3.2. Fasteners and Adhesives
- Weather-Proof Duct Tape: Essential for securing various parts of the trap and ensuring it can withstand outdoor conditions.
- Staple Gun: Use a staple gun with short staples to attach the screening to the wooden strips.
- Office Stapler: An office stapler is useful for tacking the screening together and closing any gaps.
- Hot Glue Gun: A hot glue gun will provide a strong bond for attaching the plastic jug tops and securing the screening.
- Zip Tie: A zip tie will secure the zip-type bag to the top of the trap.
- Twine: Twine will be used to tie the top of the trap to the tree.
- Push Pins or Staple Gun: These will attach the bottom of the screening to the tree.
3.3. Tools
- Scissors or a utility knife for cutting the screening and plastic.
- Measuring tape for accurate measurements.
- Pencil or marker for marking cutting lines.
By gathering these materials and tools, you’ll be well-prepared to construct an effective lantern fly trap that will help protect your trees from these invasive pests. Remember, flyermedia.net offers additional resources and guidance to help you succeed in your pest management efforts.
4. Step-by-Step Guide: How to Build a Lantern Fly Trap
Follow these detailed instructions to construct a highly effective lantern fly trap using readily available materials. This step-by-step guide will walk you through the process, ensuring you create a trap that helps protect your trees from spotted lanternflies.
4.1. Preparing the Milk Jug Tops
- Cut the Tops: Begin by cutting the tops off two plastic milk jugs. Make sure to leave enough of the top portion to create a stable structure.
- Attach the Tops: Use hot glue to attach the two milk jug tops together. The hot glue provides an initial strong bond. Reinforce the connection with weather-proof duct tape for added durability.
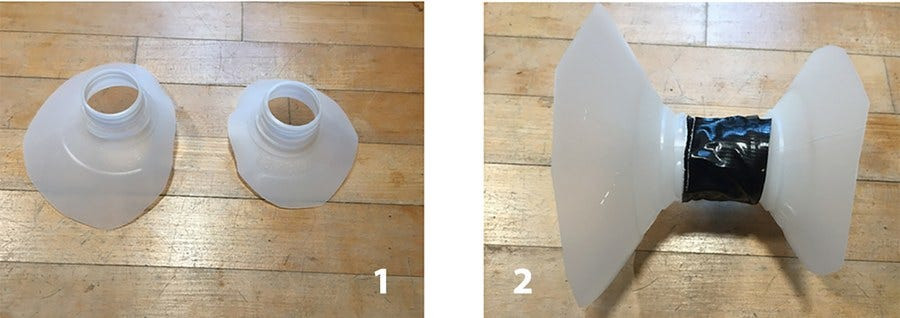 Tops of two plastic milk jugs, connected (Steps 1 and 2)
Alt: Two plastic milk jug tops connected with hot glue and duct tape, showing the initial assembly of the lantern fly trap.
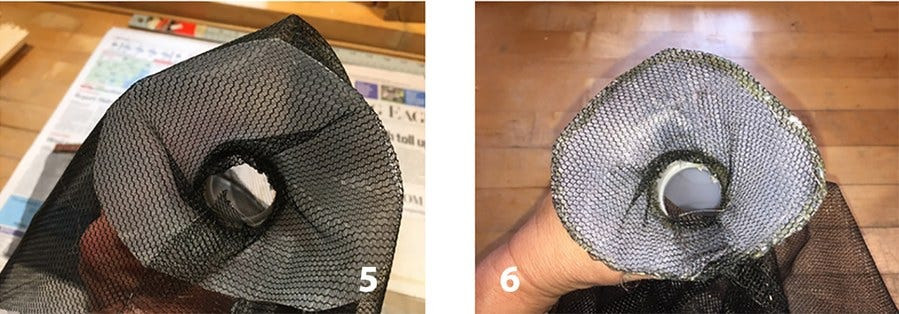
4.2. Attaching the Insect Screening
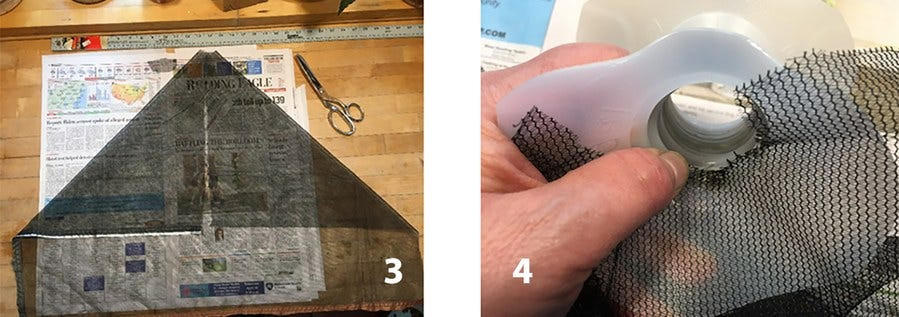
- Fold and Cut: Fold the insect screening in half and cut a small half-circle out at the top. This will create an opening for the milk jug tops.
- Attach the Screening: Use hot glue to attach the top of the cut half-circle of the insect netting to the milk jug top. This can be the trickiest part, so tack it in place and wait for the glue to dry before tacking it again, working slowly all the way around.
- Overlap the Screening: Ensure that a section of the screening overlaps to prevent the insects from escaping. If you’re using flexible screening that can’t support itself, use hot glue to attach the screening to the plastic top for added stability.
 Insect screening and milk jug top (Steps 3 and 4)
Alt: Insect screening attached to a milk jug top with hot glue, forming the entry funnel for the lantern fly trap.
4.3. Adding Wooden Supports
- Attach the Longer Wood Piece: Staple the longer piece of wood (approximately 18″ x 1″ x 0.5″) to the netting and to the plastic top. This will provide structural support to the trap.
- Fold the Plastic Top: Fold the plastic top piece to direct the top of the tunnel more horizontally. Crease the plastic of the other top to make the top of the tunnel sturdy.
4.4. Completing the Trap Structure
- Attach the Shorter Wood Piece: Staple the shorter piece of wood (approximately 11″ x 1″ x 0.5″) to the netting.
- Tack the Seam: Tack the top part of the seam with an office stapler to prevent SLFs from escaping through the seam.
- Attach the Wire: Use an office stapler to attach the wire to the side of the netting that has the shorter piece of wood. This wire will hold the outer part of the skirt away from the tree trunk, keeping the entrance to the trap open. Adjust the wire to fit the tree’s circumference.
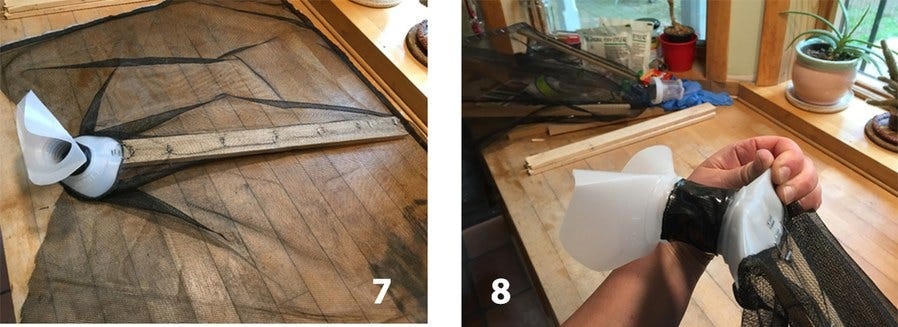 Wood and insect screening (Steps 7 and 8)
Alt: Longer piece of wood stapled to the netting and plastic top, providing structural support to the lantern fly trap.
4.5. Installing the Trap
- Tie to the Tree: Tie the top of the trap to the tree trunk using twine.
- Secure the Bottom Edge: Use push pins or a staple gun to securely attach the bottom edge of the netting against the tree bark.
4.6. Attaching the Collection Bag
- Prepare the Bag: Cut along the edges of the zip-type bag just enough to slip it over the plastic top.
- Secure the Bag: Secure the bag with a zip tie to ensure it stays in place.
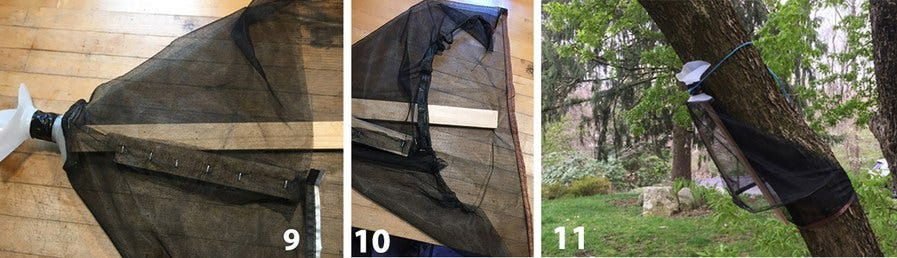 Wood and insect screening (Steps 9 and 10) and installing on tree (Step 11)
Alt: Short piece of wood stapled to the netting, wire attached to hold the skirt open, and the trap being installed on a tree trunk.
4.7. Final Adjustments
- Ensure Tight Fit: Make sure the back of the screening is tight against the bark of the tree.
- Check for Blockages: Ensure the tunnel you’ve built is not blocked anywhere, allowing SLFs to enter freely.
With these steps, you’ll have a fully functional lantern fly trap ready to protect your trees. For more tips and resources, visit flyermedia.net to stay informed and effective in your pest management efforts.
5. Where Should You Place Your Lantern Fly Trap?
The effectiveness of a lantern fly trap largely depends on its placement. Choosing the right location can significantly increase the number of spotted lanternflies captured.
5.1. Host Trees
SLFs are often found on specific host trees, making these ideal locations for traps.
- Ailanthus altissima: Commonly known as the tree of heaven, this is a favorite of SLFs.
- Walnut and Willow Trees: These are also popular hosts and good candidates for trap placement.
5.2. Smooth-Barked Trees
Traps work best on trees with smooth bark. Trees with deep grooves may allow the SLF to crawl underneath the trap, bypassing the capture mechanism.
5.3. Spring and Early Summer
The traps will likely be most effective at catching nymphs in the spring and early summer, as these are the times when nymphs are actively climbing trees to feed.
5.4. Property Considerations
- Your Property: Only set up traps on trees on your property or where you have explicit permission to do so.
- Avoid Wounding Trees: To preserve the health of the tree, avoid using nails or anything that wounds the green, living tissue underneath the bark.
- Removal at Season’s End: Remember to remove all parts of the trap at the end of the season to prevent any unintended environmental impact.
By carefully considering these factors, you can strategically place your lantern fly traps to maximize their effectiveness and protect your trees from SLF infestations. For more expert advice, visit flyermedia.net, your trusted source for pest management and aviation insights.
6. Tips for Maximizing Trap Effectiveness
To get the most out of your lantern fly traps, consider these tips to enhance their performance and longevity.
6.1. Regular Monitoring and Maintenance
- Empty Traps Regularly: Check and empty the collection bags frequently, especially during peak SLF activity. A full bag can deter other SLFs from entering.
- Replace Bags: Replace old, dirty bags with clean ones. Clean bags transmit daylight, which attracts SLFs.
- Inspect for Damage: Regularly inspect the trap for any damage or wear. Repair or replace damaged parts to maintain its effectiveness.
6.2. Adjusting Trap Height
- Nymph Behavior: Nymphs tend to climb up tree trunks, so place the trap at a height that targets this behavior.
- Optimal Height: A height of 3-4 feet from the ground is generally effective, but you may need to adjust based on the size and age of the tree.
6.3. Using Lures and Attractants
- Tree of Heaven Scent: Since SLFs are attracted to the tree of heaven, consider using a lure that mimics its scent.
- Sticky Trap Enhancements: For sticky traps, consider adding a pheromone attractant to increase their appeal to SLFs.
6.4. Protecting Non-Target Species
- Wire or Screening Guard: If using sticky bands, build a raised guard of wire or screening around the band to prevent other creatures from getting stuck.
- Selective Traps: Opt for circle traps or other designs that are less likely to capture non-target species.
6.5. Strategic Timing
- Early Season Deployment: Deploy traps early in the season to capture nymphs before they mature into adults.
- Peak Activity Periods: Focus trapping efforts during periods of peak SLF activity, typically in the spring and early summer.
By following these tips, you can significantly improve the effectiveness of your lantern fly traps and better protect your trees from these invasive pests. For more expert advice and resources, visit flyermedia.net.
7. What are the Potential Issues with Lantern Fly Traps and How to Solve Them?
While lantern fly traps are an effective method for managing SLF populations, there can be some challenges. Understanding these issues and knowing how to address them is crucial for maximizing the benefits of trapping.
7.1. Non-Target Species Capture
- Problem: Sticky traps can inadvertently capture birds, squirrels, and other beneficial insects.
- Solution: Use a wire or screening guard around sticky bands to prevent other animals from getting stuck. Alternatively, switch to circle traps, which are less likely to capture non-target species.
7.2. Trap Saturation
- Problem: Traps can become full of dead SLFs and debris, reducing their effectiveness.
- Solution: Regularly empty and clean the traps. Replace collection bags frequently to maintain their attractiveness to SLFs.
7.3. Weather Damage
- Problem: Traps can be damaged by rain, wind, and other weather conditions.
- Solution: Use weather-resistant materials and ensure the trap is securely attached to the tree. Regularly inspect and repair any damage.
7.4. Trap Avoidance
- Problem: SLFs may learn to avoid traps over time.
- Solution: Vary the type and placement of traps. Use lures and attractants to make traps more appealing. Regularly move traps to new locations to prevent SLFs from becoming accustomed to them.
7.5. Bark Issues
- Problem: Rough or deeply grooved bark can allow SLFs to crawl under the trap.
- Solution: Choose trees with smoother bark or use materials to seal gaps between the trap and the bark.
7.6. Limited Effectiveness on Large Infestations
- Problem: Traps may not be sufficient to control large SLF infestations.
- Solution: Combine trapping with other management methods, such as insecticide treatments, if necessary. Focus trapping efforts on key host trees and areas with high SLF activity.
By addressing these potential issues, you can ensure that your lantern fly traps remain an effective tool in your SLF management strategy. For more expert tips and resources, visit flyermedia.net.
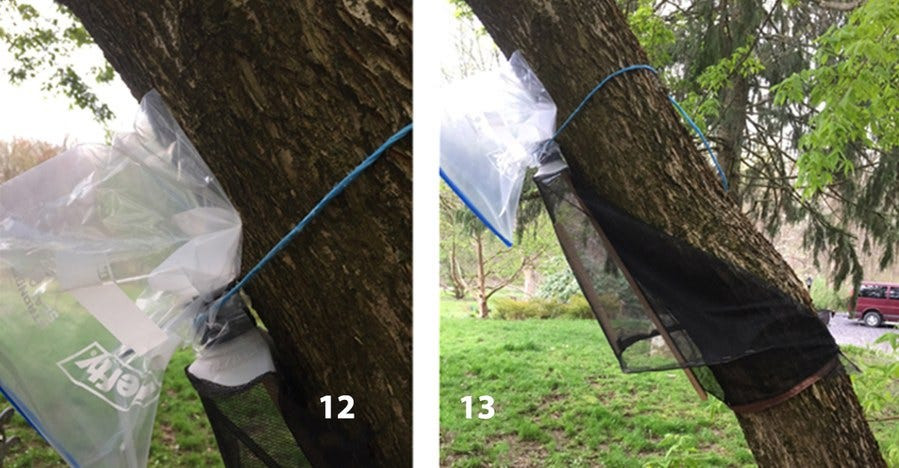 Finish install on tree (Steps 12 and 13)
Alt: Finished lantern fly trap installed on a tree, with the zip-type bag secured and the screening tight against the bark.
8. Are There Any Commercial Lantern Fly Traps Available?
While making your own lantern fly trap is a cost-effective option, there are also commercially available traps designed specifically for SLFs. These traps can offer convenience and potentially higher effectiveness.
8.1. Types of Commercial Traps
- Circle Traps: Several companies offer circle traps designed to capture SLFs as they climb tree trunks. These traps typically consist of a mesh or screen funnel that directs SLFs into a collection container.
- Sticky Sphere Traps: These traps use a sticky coating on a sphere to capture SLFs. They are often used in orchards and vineyards.
8.2. Advantages of Commercial Traps
- Convenience: Commercial traps are ready to use and require minimal assembly.
- Durability: These traps are often made from durable materials that can withstand outdoor conditions.
- Effectiveness: Some commercial traps are designed based on research and have been shown to be highly effective at capturing SLFs.
8.3. Considerations When Buying Commercial Traps
- Cost: Commercial traps can be more expensive than homemade traps.
- Non-Target Species: Check if the trap design minimizes the risk of capturing non-target species.
- Maintenance: Consider the maintenance requirements of the trap, such as cleaning and emptying.
8.4. Where to Buy Commercial Traps
Commercial lantern fly traps can be purchased from various sources, including:
- Online Retailers: Websites like Amazon and specialized pest control supply stores offer a range of SLF traps.
- Local Nurseries and Garden Centers: These stores may carry SLF traps during peak season.
- Agricultural Supply Stores: Stores that cater to farmers and growers often stock SLF traps.
When purchasing commercial traps, read reviews and compare different models to find the best option for your needs.
9. What is the Role of Professional Pest Control in Lantern Fly Management?
While DIY methods like trapping can be effective, professional pest control services play a crucial role in managing larger and more complex SLF infestations.
9.1. Expertise and Experience
Professional pest control technicians have the knowledge and experience to accurately assess SLF infestations and develop tailored management plans.
9.2. Comprehensive Treatment Options
Professionals have access to a range of treatment options, including insecticides, tree injections, and other methods that may not be available to homeowners.
9.3. Targeted Application
Professionals can apply treatments in a targeted manner, minimizing the impact on non-target species and the environment.
9.4. Monitoring and Prevention
Pest control services often include ongoing monitoring to track SLF populations and prevent future infestations.
9.5. Integrated Pest Management (IPM)
Professionals often use an IPM approach, which combines multiple strategies to manage pests in a sustainable and environmentally responsible manner.
9.6. When to Call a Professional
Consider calling a professional pest control service if:
- You have a large SLF infestation that you cannot manage on your own.
- You are concerned about the health of your trees.
- You want a comprehensive and long-term solution.
- You are not comfortable using insecticides or other chemical treatments.
By working with a professional pest control service, you can effectively manage SLF infestations and protect your property from these invasive pests.
10. How to Properly Dispose of Captured Lantern Flies?
Proper disposal of captured lantern flies is essential to prevent their escape and further spread. Here are several methods for disposing of SLFs:
10.1. Bag and Seal
- Method: Place the captured SLFs in a sealed plastic bag.
- Effectiveness: This prevents escape and contains the insects.
10.2. Freeze
- Method: Place the sealed bag in a freezer for at least 24 hours to kill the SLFs.
- Effectiveness: Freezing ensures the insects are dead before disposal.
10.3. Submerge in Soapy Water
- Method: Fill a container with soapy water and submerge the captured SLFs.
- Effectiveness: The soap breaks the surface tension of the water, causing the SLFs to drown.
10.4. Crush or Stomp
- Method: If you only have a few SLFs, you can crush or stomp on them to kill them.
- Effectiveness: Quick and effective for small numbers, but not practical for large infestations.
10.5. Dispose in Trash
- Method: After ensuring the SLFs are dead, dispose of them in a trash bag and seal it tightly.
- Effectiveness: Prevents the insects from escaping and spreading.
10.6. Report Sightings
- Action: Report any SLF sightings to your state’s Department of Agriculture or Extension office.
- Importance: Reporting helps track the spread of SLF and implement effective management strategies.
By following these disposal methods, you can help prevent the spread of spotted lanternflies and protect your local environment.
FAQ: How to Make a Lantern Fly Trap
Here are some frequently asked questions about making and using lantern fly traps to help you effectively manage these invasive pests:
1. What is the best time of year to set up lantern fly traps?
The best time to set up lantern fly traps is in the spring and early summer, when SLF nymphs are actively climbing trees to feed. This is when traps are most effective at capturing large numbers of these pests.
2. Can I use sticky traps directly on the tree trunk?
It’s not recommended to apply sticky traps directly to the tree trunk without protection, as they can trap non-target species like birds and squirrels. Always use a wire or screening guard around sticky bands to prevent accidental capture of other wildlife.
3. How often should I check and empty my lantern fly traps?
You should check and empty your lantern fly traps regularly, especially during peak SLF activity. A full trap can deter other SLFs from entering. Empty the traps at least once a week, or more frequently if they fill up quickly.
4. What trees are most attractive to spotted lanternflies?
Spotted lanternflies are particularly attracted to the tree of heaven (Ailanthus altissima), as well as walnut and willow trees. These are good candidates for trap placement.
5. Can I make a lantern fly trap from recycled materials?
Yes, you can make lantern fly traps from recycled materials like plastic milk jugs, insect screening, and wooden scraps. This is a cost-effective and environmentally friendly way to manage SLF populations.
6. Do lantern fly traps kill other insects?
Sticky traps can capture other insects, both beneficial and harmful. Circle traps are more selective and less likely to capture non-target species.
7. How high off the ground should I place my lantern fly trap?
Place your lantern fly trap at a height of 3-4 feet from the ground to target nymphs as they climb the tree trunk. Adjust the height based on the size and age of the tree.
8. Are there any attractants I can use to lure lantern flies into traps?
Consider using a lure that mimics the scent of the tree of heaven, as SLFs are highly attracted to this tree. Pheromone attractants can also be used to enhance the appeal of sticky traps.
9. What should I do with the lantern flies I capture in the trap?
Place the captured lantern flies in a sealed plastic bag and freeze for at least 24 hours to kill them. Then, dispose of them in a trash bag and seal it tightly.
10. Where can I find more information about lantern fly management?
You can find more information about lantern fly management on websites like flyermedia.net, Penn State Extension, and your state’s Department of Agriculture. These resources provide expert advice and guidance on effective SLF control strategies.
By understanding these FAQs, you can effectively implement lantern fly trapping as part of your pest management strategy and protect your trees from these invasive insects.
Visit flyermedia.net today to discover more about aviation, pest control, and other topics. Contact us at Address: 600 S Clyde Morris Blvd, Daytona Beach, FL 32114, United States. Phone: +1 (386) 226-6000, or visit our website flyermedia.net to learn more.