Making a flying bat out of paper is a fun, simple, and affordable craft project, perfect for Halloween decorations or simply adding a touch of whimsy to any space. This guide will walk you through the process, ensuring you create captivating paper bats that appear to soar. At flyermedia.net, we’re dedicated to providing engaging and creative content, and this project perfectly embodies that spirit. You can create amazing decorations while exploring aviation-themed content and more.
1. What are the Benefits of Making Paper Flying Bats?
Making paper flying bats offers numerous benefits, including affordability, creativity, and the opportunity for family involvement. These DIY decorations are inexpensive, customizable, and provide a fun activity for all ages. According to a study from the University of California, engaging in creative activities like crafting can reduce stress and enhance emotional well-being.
- Cost-Effective: Paper and basic supplies are typically inexpensive.
- Customizable: You can choose different paper colors, sizes, and designs.
- Family Fun: A great activity for parents and children to do together.
- Festive Decoration: Adds a spooky and playful touch to any space for Halloween.
- Educational: Helps develop fine motor skills and creativity in children.
2. What Materials Do I Need to Create a Paper Flying Bat?
To create a paper flying bat, you’ll need a few simple materials: paper (black construction paper or cardstock works best), scissors, a bat template (printable templates are readily available online), a pencil, and adhesive (tape or glue). Optional materials include glitter, googly eyes, and string for hanging. These materials are easily accessible and can be found at most craft stores or online retailers.
- Paper: Black construction paper or cardstock
- Scissors: For cutting out the bat shapes
- Bat Template: Printable templates in various sizes
- Pencil: For tracing the template onto the paper
- Adhesive: Tape or glue to assemble the bat
- Optional: Glitter, googly eyes, string for decoration and hanging
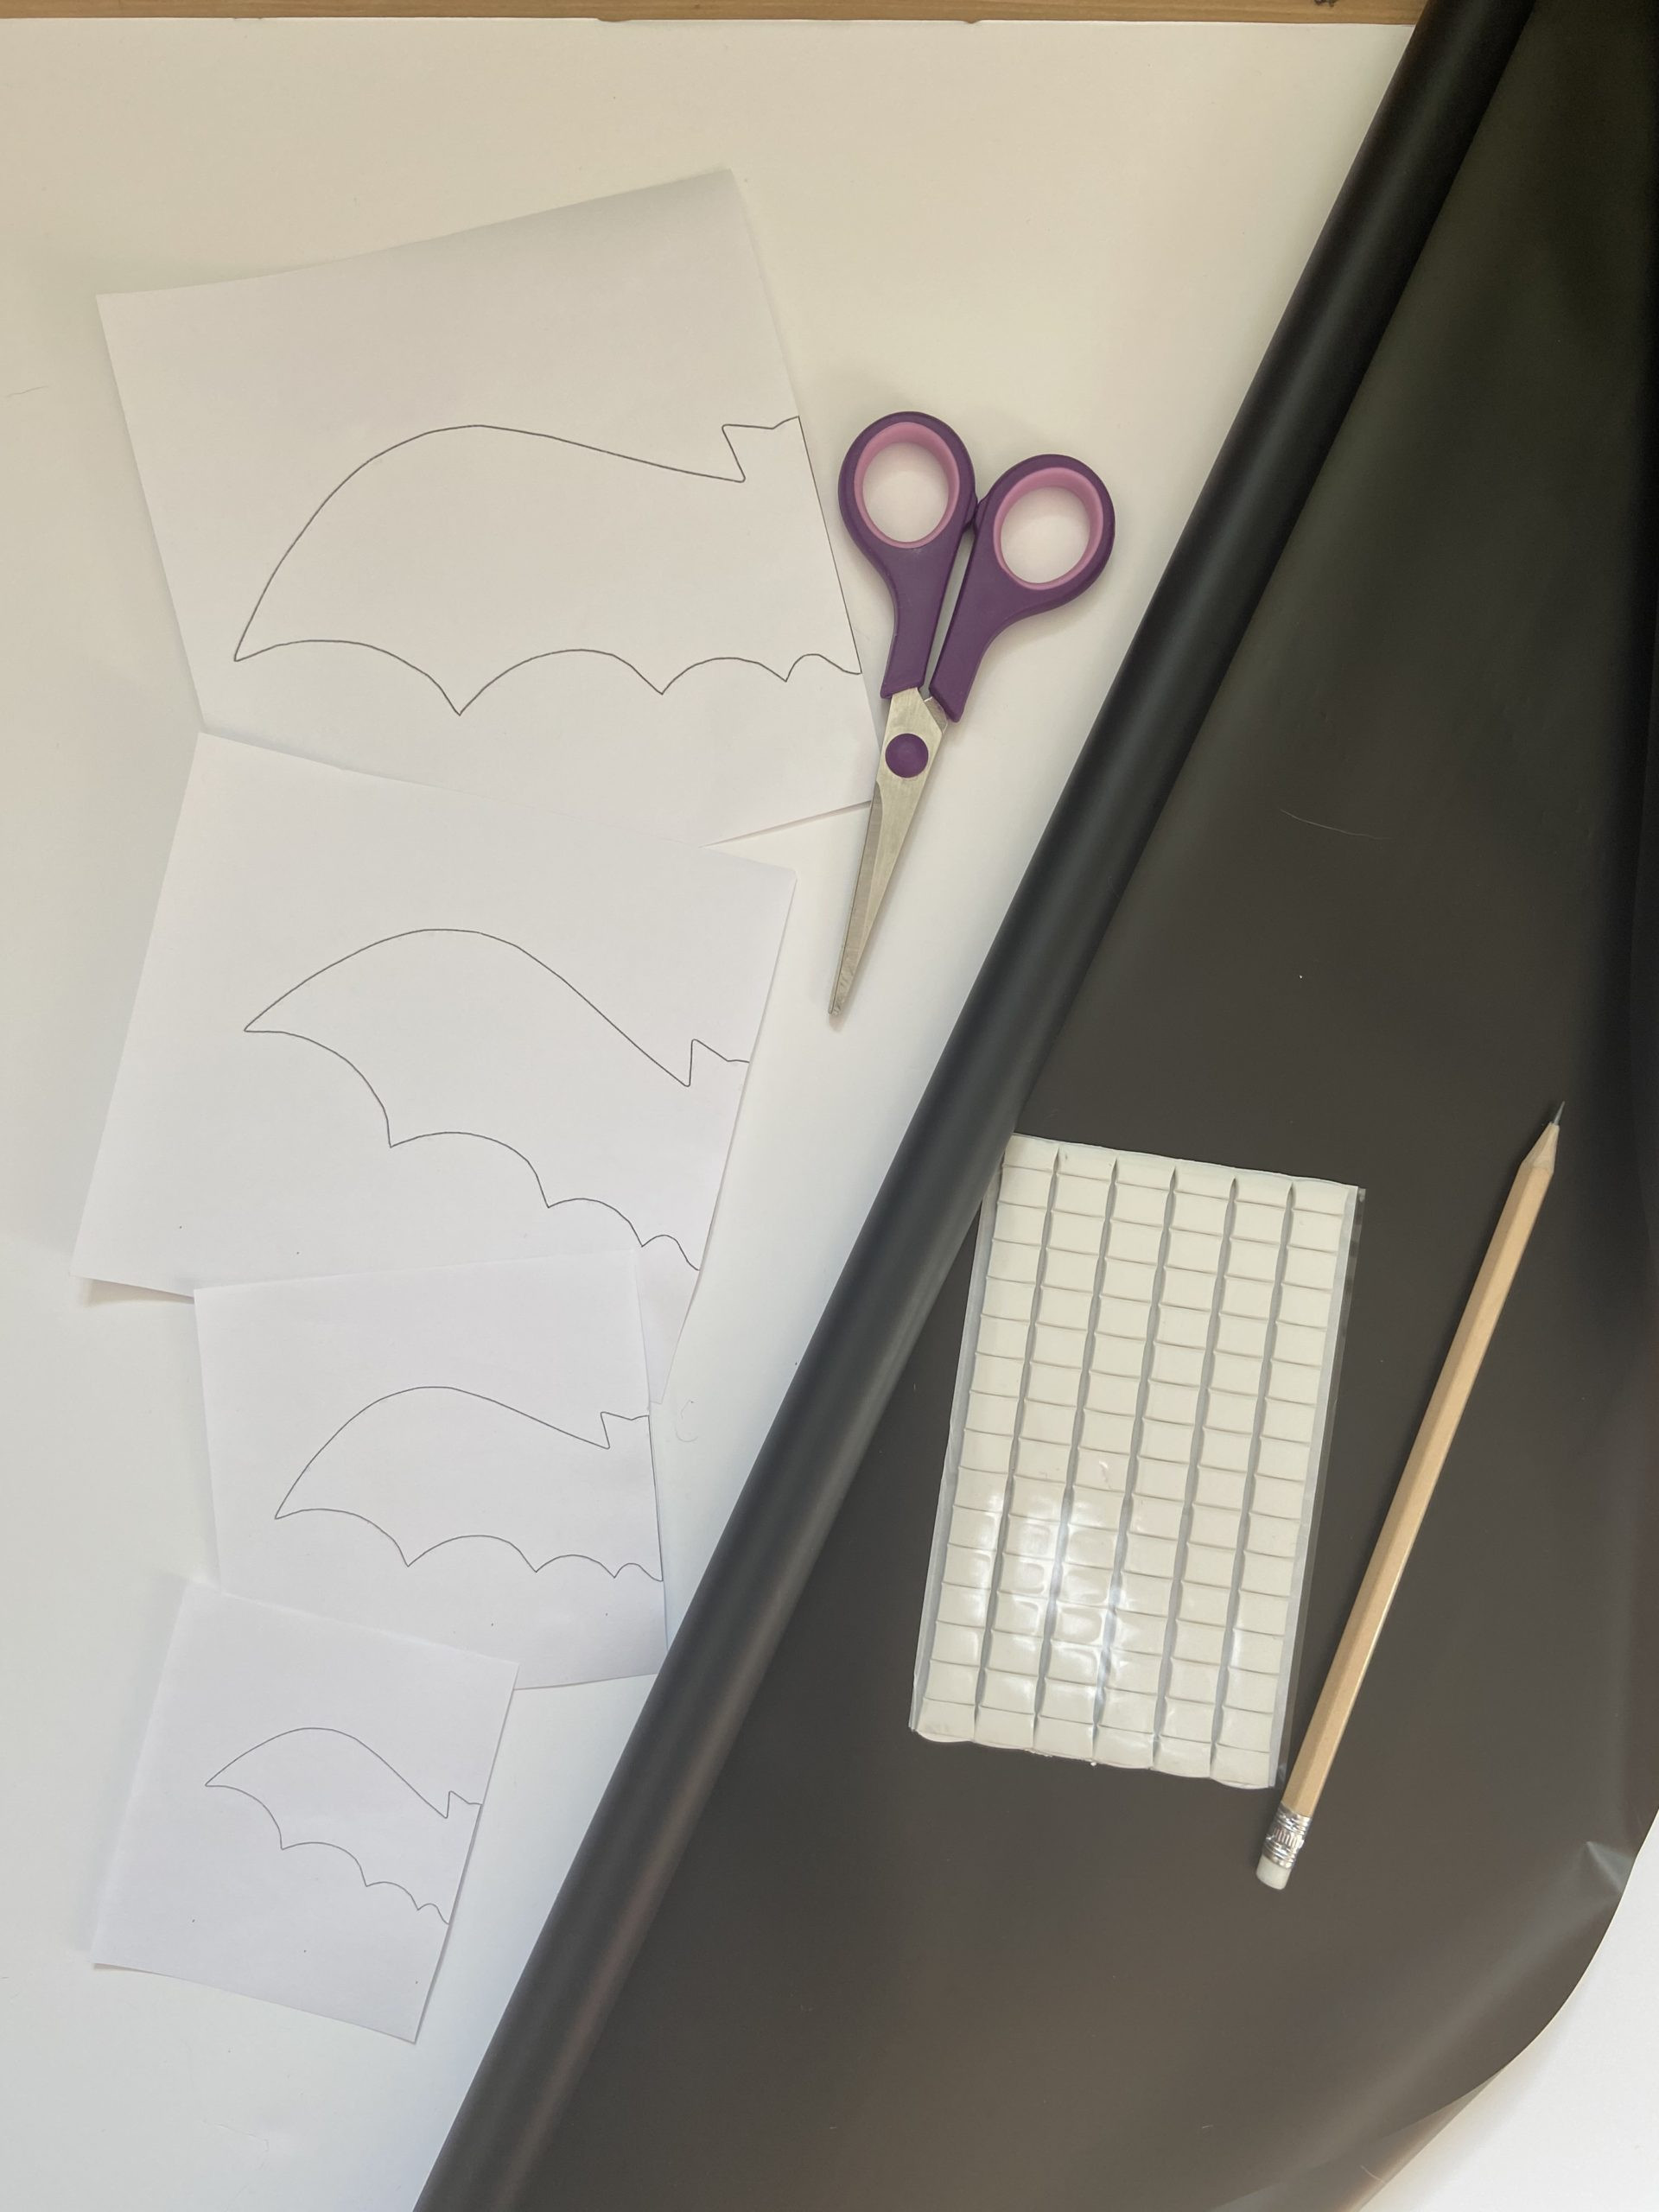 Materials Needed to Make Paper Bats
3. How Do I Create a Basic Paper Bat?
Creating a basic paper bat involves a few simple steps. First, find and print a bat template. Next, trace the template onto your chosen paper and carefully cut out the bat shape. You can then fold the wings slightly to give the bat a more three-dimensional appearance.
- Find a Template: Search online for a printable bat template.
- Trace the Template: Place the template on the black paper and trace around it with a pencil.
- Cut Out the Bat: Carefully cut along the traced lines with scissors.
- Fold the Wings: Gently fold the wings down to create a realistic flying effect.
- Add Details: Use glitter or googly eyes to add extra flair.
4. How Can I Make a Flying Effect for My Paper Bats?
To achieve a flying effect, consider attaching the paper bats to strings and hanging them from the ceiling or a light fixture. Varying the lengths of the strings will create the illusion of bats flying at different altitudes. According to interior design experts, incorporating movement into decorations can make them more dynamic and visually appealing.
- Attach Strings: Use clear tape or glue to attach thin strings to the back of the bats.
- Hang from Ceiling: Suspend the bats from the ceiling at varying heights.
- Use a Fan: Position a small fan to gently blow air and make the bats appear to fly.
- Mobile Structure: Create a bat mobile with multiple bats hanging from a central point.
- Fishing Line: Use clear fishing line for an invisible hanging effect.
5. What are Some Creative Variations for Paper Flying Bats?
Creative variations for paper flying bats include using different paper colors, adding glitter or paint, and experimenting with different bat wing shapes. You can also create bats with glowing eyes using LED lights or glow-in-the-dark paint.
- Colored Paper: Use different shades of black, gray, or even purple paper.
- Glitter and Paint: Add sparkle with glitter or paint spooky designs.
- Wing Shapes: Experiment with different wing shapes for unique bat silhouettes.
- Glowing Eyes: Use LED lights or glow-in-the-dark paint for eerie eyes.
- 3D Bats: Create three-dimensional bats by layering multiple paper cutouts.
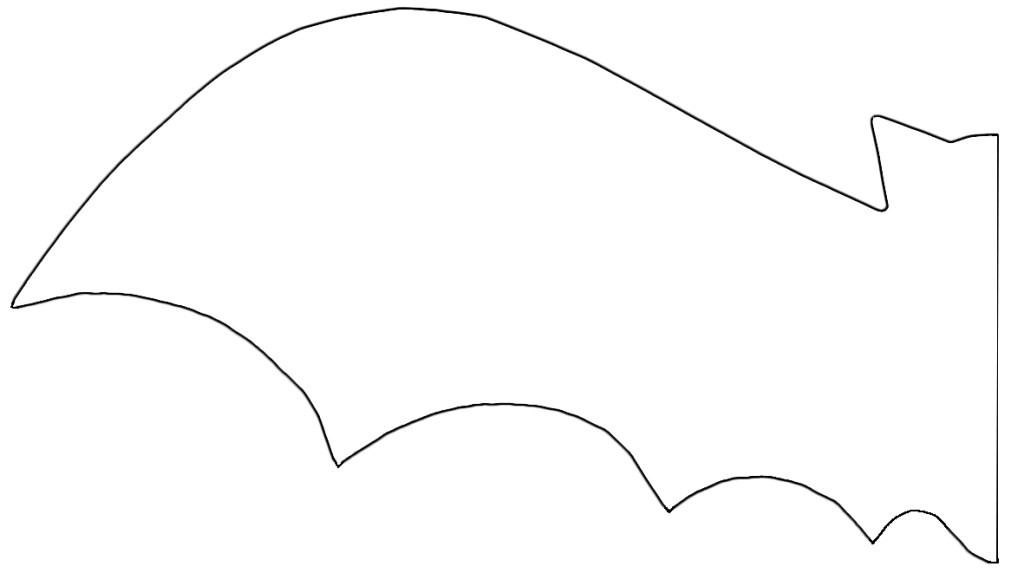 Bat Template Variety
6. How Do I Create a 3D Paper Bat?
Creating a 3D paper bat involves cutting out multiple layers of the bat shape and layering them on top of each other, adding dimension and depth. You can also fold the wings in different directions to enhance the 3D effect.
- Cut Multiple Layers: Cut out several identical bat shapes from paper.
- Layer the Shapes: Stack the bat shapes on top of each other, using glue to secure them.
- Fold the Wings: Fold the wings of each layer in different directions to create a 3D effect.
- Add Support: Insert small pieces of foam or cardboard between the layers for added volume.
- Detailing: Paint and glitter to enhance the 3D look.
7. Where Can I Find Printable Bat Templates Online?
Numerous websites offer printable bat templates for free. Some popular sources include Pinterest, Etsy, and various DIY craft blogs. These templates come in different sizes and styles, allowing you to create a diverse collection of paper bats.
- Pinterest: A vast resource for craft ideas and templates.
- Etsy: Offers both free and paid bat templates with unique designs.
- DIY Craft Blogs: Many blogs provide free printable templates.
- Google Images: Search for “free printable bat templates.”
- Thatssogemma.com: Refer to the source for additional bat template options
8. How Can I Decorate My Home with Paper Flying Bats for Halloween?
Decorating your home with paper flying bats for Halloween is a fun and creative way to add a spooky touch. You can hang the bats from the ceiling, attach them to walls, or create a bat-themed garland. Clustering the bats in strategic locations can create a dramatic and eye-catching display.
- Ceiling Display: Hang bats from the ceiling using clear fishing line.
- Wall Decor: Attach bats to walls using removable adhesive.
- Bat Garland: Create a garland by stringing bats together.
- Window Silhouettes: Place bats on windows to create spooky silhouettes.
- Doorway Entrance: Arrange bats around doorways to create a dramatic entrance.
9. What Type of Adhesive Should I Use to Hang Paper Bats?
When hanging paper bats, it’s important to use an adhesive that is strong enough to hold the bats in place but won’t damage your walls or surfaces. Removable adhesive putty, double-sided tape, or low-tack painter’s tape are all good options.
- Removable Adhesive Putty: Easy to use and doesn’t damage walls.
- Double-Sided Tape: Provides a strong hold but can sometimes damage surfaces.
- Low-Tack Painter’s Tape: Gentle on walls and easy to remove.
- Hot Glue (with caution): Use sparingly on surfaces that can handle heat.
- Command Strips: Designed for hanging items without damaging walls.
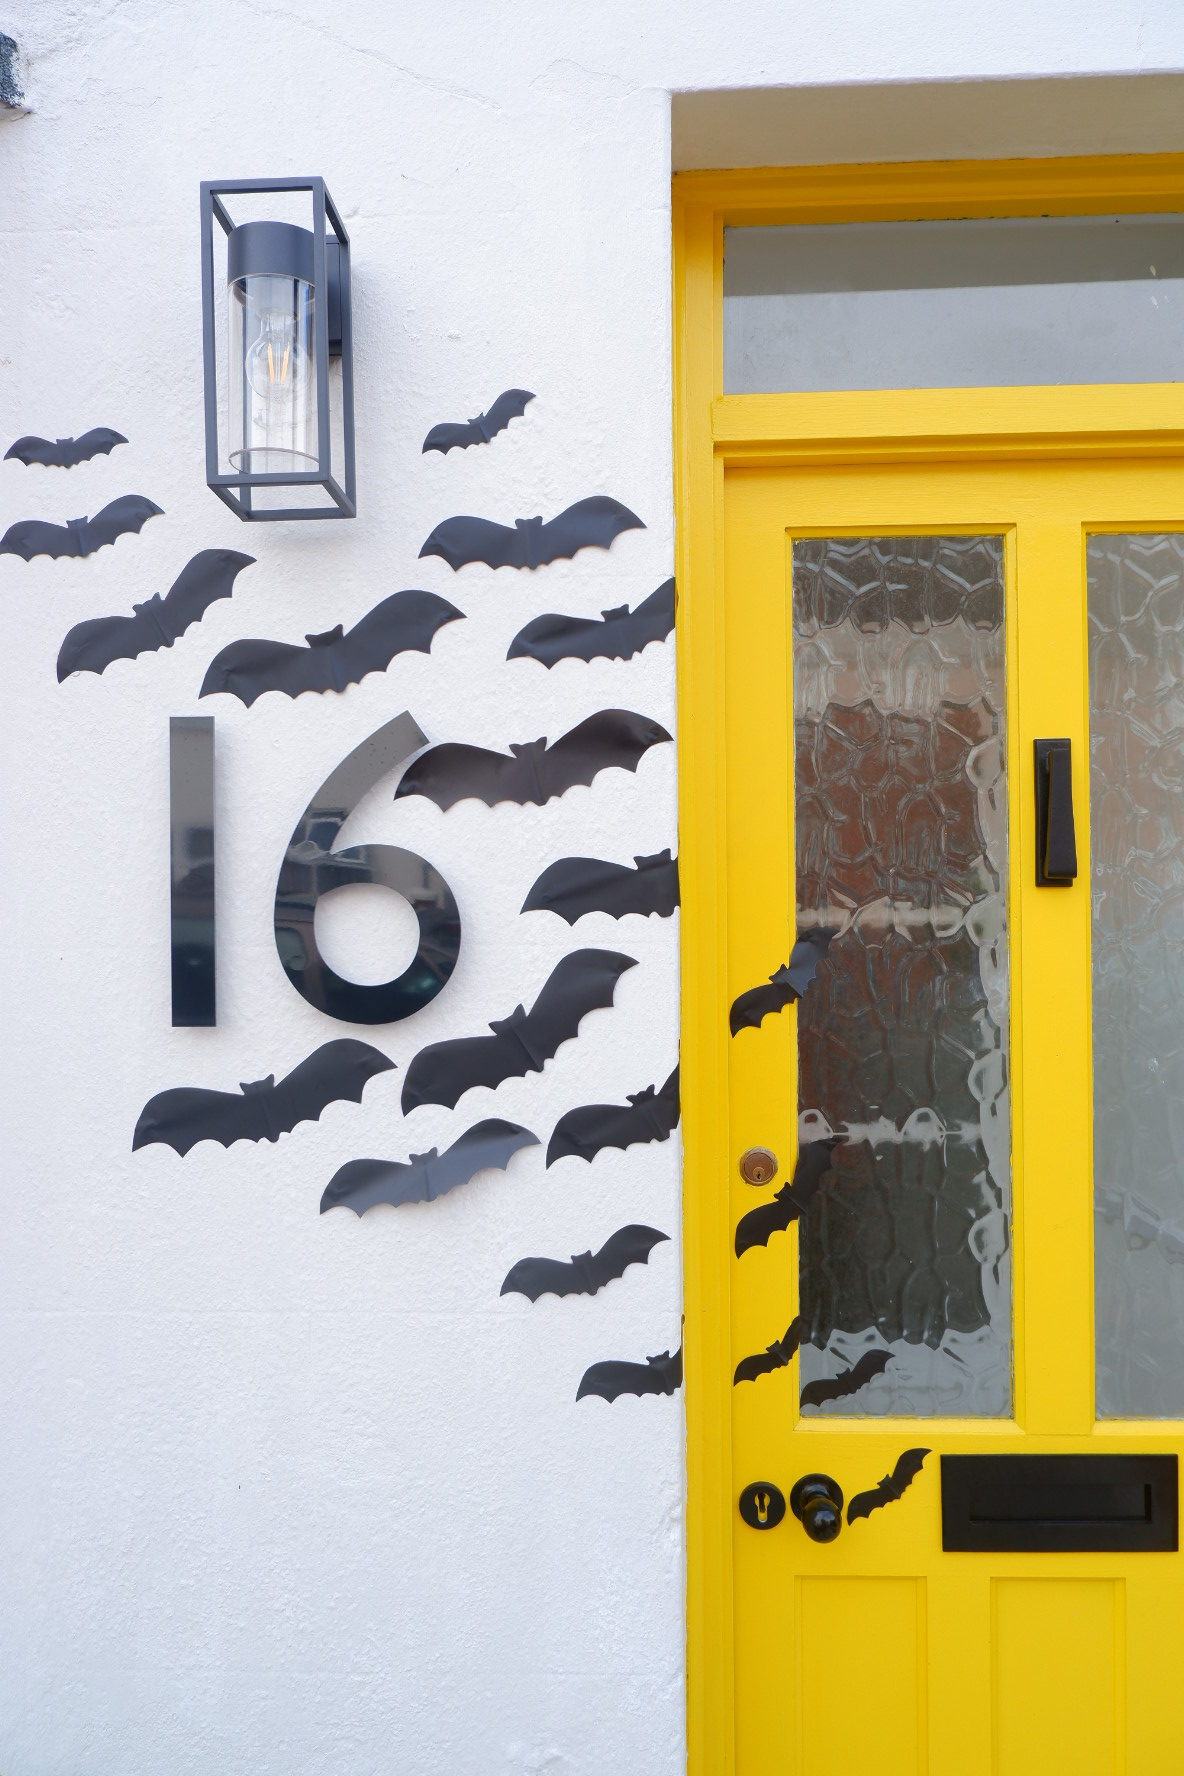 Arranging Bat Display
10. How Can I Make My Paper Bats Look More Realistic?
To make your paper bats look more realistic, pay attention to details such as wing shape, size variation, and positioning. Adding small details like veins on the wings or using textured paper can also enhance the realism.
- Vary Sizes: Use different sized templates to create a mix of bat sizes.
- Detailed Wings: Cut intricate wing patterns for a more realistic look.
- Textured Paper: Use textured paper to mimic the feel of bat wings.
- Wing Veins: Draw or paint veins on the wings for added detail.
- Natural Poses: Position the bats in natural, flying poses.
11. Can I Use Cellophane Instead of Paper for Making Bats?
Yes, cellophane can be used instead of paper to make bats, especially for outdoor displays. Cellophane is more durable and weather-resistant, making it ideal for decorations that will be exposed to the elements. However, it can be more difficult to cut and work with than paper.
- Durability: Cellophane is more durable and weather-resistant than paper.
- Outdoor Use: Ideal for outdoor decorations that will be exposed to the elements.
- Transparency: Cellophane can create a translucent effect, especially with colored cellophane.
- Cutting: Can be more difficult to cut and work with than paper.
- Securing: Requires stronger adhesive for proper attachment.
12. How Do I Create a Bat Mobile with Paper Bats?
Creating a bat mobile with paper bats involves hanging multiple bats from a central point, such as a hoop or a piece of driftwood. Varying the lengths of the strings and positioning the bats at different angles will create a dynamic and visually appealing mobile.
- Choose a Central Point: Select a hoop, branch, or other central structure.
- Attach Strings: Tie strings of varying lengths to the central point.
- Hang the Bats: Attach paper bats to the ends of the strings.
- Balance the Mobile: Adjust the strings and bat positions to balance the mobile.
- Add Embellishments: Decorate the mobile with additional spooky elements.
13. What are Some Safety Tips to Keep in Mind When Making Paper Bats?
When making paper bats, it’s important to keep safety in mind, especially when working with scissors or hot glue. Always supervise children and ensure they are using age-appropriate tools.
- Scissors Safety: Use safety scissors for children and supervise their use.
- Hot Glue: Use hot glue guns with caution and keep out of reach of children.
- Sharp Objects: Be careful when using sharp objects like knives or craft blades.
- Ventilation: Work in a well-ventilated area when using paints or adhesives.
- Eye Protection: Wear safety glasses when cutting or using materials that may cause debris.
14. How Can I Store My Paper Bat Decorations After Halloween?
To store your paper bat decorations after Halloween, carefully remove them from the walls or ceilings and place them in a storage container. Layering the bats between sheets of tissue paper can help prevent them from getting damaged or bent.
- Careful Removal: Gently remove the bats from walls or ceilings.
- Storage Container: Place the bats in a sturdy storage container.
- Tissue Paper: Layer the bats between sheets of tissue paper to prevent damage.
- Cool, Dry Place: Store the container in a cool, dry place away from direct sunlight.
- Avoid Overcrowding: Ensure the container is not overcrowded to prevent bending or crushing.
15. How Do I Make Paper Bats for a Classroom Decoration?
Making paper bats for a classroom decoration is a great way to involve students in a fun and educational activity. You can have each student create their own bat and then combine them to create a spooky classroom display.
- Provide Templates: Offer a variety of bat templates for students to choose from.
- Supervise Cutting: Assist students with cutting out the bat shapes.
- Decorating Station: Set up a decorating station with glitter, googly eyes, and paint.
- Classroom Display: Hang the bats from the ceiling or create a bulletin board display.
- Educational Component: Incorporate bat facts and information into the activity.
16. What are Some Alternative Materials for Making Bats?
Besides paper and cellophane, alternative materials for making bats include felt, fabric scraps, and even recycled materials like cardboard or plastic bottles. These materials can add texture and interest to your bat decorations.
- Felt: Soft and easy to cut, ideal for crafting with children.
- Fabric Scraps: Use leftover fabric pieces to create unique and textured bats.
- Cardboard: Sturdy and recyclable, perfect for making 3D bats.
- Plastic Bottles: Cut and shape plastic bottles to create durable and weather-resistant bats.
- Foam Sheets: Lightweight and easy to cut, available in various colors.
17. How Can I Make a Large-Scale Bat Decoration?
To create a large-scale bat decoration, consider using a large sheet of cardboard or foam board as the base. You can then cut out a giant bat shape and decorate it with paint, fabric, or other materials.
- Cardboard or Foam Board: Use a large sheet as the base.
- Giant Template: Create or find a large bat template.
- Cut Out the Shape: Carefully cut out the bat shape from the base material.
- Decorate: Paint, cover with fabric, or add other decorative elements.
- Mounting: Securely mount the large bat decoration to a wall or ceiling.
18. What are Some Additional Halloween Crafts to Complement Paper Bats?
Additional Halloween crafts to complement paper bats include making paper ghosts, spiders, and pumpkins. Combining these different crafts can create a comprehensive and spooky Halloween display.
- Paper Ghosts: Simple to make with white paper and markers.
- Paper Spiders: Use black paper and pipe cleaners to create creepy spiders.
- Paper Pumpkins: Cut out pumpkin shapes from orange paper and add details.
- Yarn Spiderwebs: Create spooky spiderwebs using white yarn.
- DIY Tombstones: Make tombstones from cardboard and paint them gray.
19. How Can I Use Paper Bats for a Party Decoration?
Using paper bats for a party decoration can add a festive and spooky touch to your event. You can hang the bats from the ceiling, create a bat-themed photo backdrop, or use them as table decorations.
- Ceiling Hangings: Suspend bats from the ceiling to create a flying effect.
- Photo Backdrop: Create a backdrop with bats for party photos.
- Table Decorations: Scatter bats on tables as part of the centerpiece.
- Party Favors: Make small bat-themed party favors for guests.
- Themed Lighting: Use colored lights to enhance the spooky atmosphere.
20. What is the History and Significance of Bats in Halloween Decorations?
Bats have been associated with Halloween for centuries, often symbolizing darkness, mystery, and the supernatural. In many cultures, bats are linked to witchcraft and are seen as creatures of the night.
- Symbol of Darkness: Bats are nocturnal animals, often associated with darkness.
- Supernatural Link: Linked to witchcraft and the supernatural in many cultures.
- Halloween Tradition: Long-standing tradition of using bats in Halloween decorations.
- Cultural Significance: Represent different meanings in various cultures.
- Spooky Atmosphere: Contribute to the overall spooky atmosphere of Halloween.
21. How to make different size paper bats?
Creating different sizes of paper bats adds dimension and realism to your Halloween decorations. Here’s how to achieve this:
- Use Varied Templates: Start with bat templates in various sizes. You can find these online or create your own by resizing an existing template.
- Adjust Template Size: If you have a single template, photocopy it at different scales (e.g., 50%, 75%, 100%, 125%) to get bats of different sizes.
- Freehand Cutting: For a more organic look, cut some bats freehand, varying the size as you go. This works best if you’re already comfortable with the basic bat shape.
- Mix and Match: Combine bats of different sizes when decorating to create a more dynamic and visually interesting display.
22. How to arrange the bat display?
Arranging your paper bat display is key to achieving a spooky and visually appealing effect. Here are some tips:
- Cluster and Scatter: Create a focal point by clustering several bats together, then scatter smaller groups or individual bats around the area.
- Vary Heights: Hang or attach bats at different heights to give the illusion of movement and depth. Use clear fishing line for hanging to make the bats appear to float.
- Consider the Space: Take into account the size and shape of the room or area you’re decorating. Arrange the bats to complement the existing décor and architecture.
- Create a Swarm Effect: Position bats to look like they are swarming out of a doorway, window, or other opening for a dramatic effect.
- Use Lighting: Experiment with lighting to enhance the spooky atmosphere. Backlighting or spotlights can create dramatic shadows and highlight the bats’ silhouettes.
23. How to involve kids in the paper bat-making process?
Involving kids in making paper bats is a fun and educational activity that encourages creativity and fine motor skills. Here’s how to make it a family affair:
- Age-Appropriate Tasks: Assign tasks based on age and skill level. Younger children can help with tracing templates and decorating, while older kids can handle cutting and assembling.
- Safety First: Supervise children closely, especially when using scissors or glue. Opt for safety scissors and non-toxic glue for younger kids.
- Creative Freedom: Encourage kids to get creative with their bats. Let them choose different colors, add glitter, or draw unique designs on the wings.
- Make it Educational: Turn the craft session into a learning opportunity by sharing fun facts about bats and their role in the ecosystem.
- Display Their Creations: Proudly display the bats made by your kids to boost their confidence and creativity.
24. How to incorporate other Halloween elements with paper bats?
To create a cohesive and spooky Halloween display, consider incorporating other Halloween elements with your paper bats. Here are some ideas:
- Spiderwebs: Drape fake spiderwebs around the bats to create a creepy and tangled effect.
- Pumpkins: Place pumpkins of various sizes around the bats to add a classic Halloween touch.
- Ghosts: Hang or display paper or fabric ghosts alongside the bats to create a haunted scene.
- Skeletons: Incorporate small skeleton figures or decorations to add a bone-chilling element.
- Spooky Lighting: Use colored lights, candles, or string lights to create a spooky and atmospheric ambiance.
25. How to use paper bats for outdoor decorations?
Using paper bats for outdoor decorations can add a spooky touch to your home’s exterior. However, paper is not weather-resistant, so here are some tips for making your outdoor bat display last:
- Protected Areas: Place paper bats in protected areas, such as under a porch, in a covered entryway, or on a sheltered wall.
- Weather-Resistant Materials: Consider using weather-resistant materials like cellophane or plastic for outdoor bats.
- Secure Attachment: Use strong adhesive or tacks to securely attach the bats to outdoor surfaces.
- Monitor the Weather: Keep an eye on the weather forecast and bring the bats indoors if rain or strong winds are expected.
- Alternative Decorations: For a more durable outdoor display, consider using metal or plastic bat silhouettes instead of paper bats.
 Paper Bat Wall Decoration
26. How do I make the paper bats glow in the dark?
Making your paper bats glow in the dark can add an extra spooky element to your Halloween decorations. Here’s how to achieve this effect:
- Glow-in-the-Dark Paint: Apply glow-in-the-dark paint to the paper bats using a brush or sponge. Be sure to follow the instructions on the paint container for best results.
- Glow-in-the-Dark Paper: Use glow-in-the-dark paper to create your bats. This paper is available at most craft stores and will glow without any additional treatment.
- UV Black Light: Shine a UV black light on the paper bats to make them glow. This works best with paper that has been treated with fluorescent paint or dye.
- Glow Sticks: Attach small pieces of glow stick to the back of the paper bats to make them glow. This is a temporary solution but can be effective for parties or events.
- LED Lights: Use small LED lights to illuminate the paper bats from behind. This can be done by attaching the lights to a string or placing them inside a paper lantern.
27. How do I keep my paper bats from curling?
Paper bats can sometimes curl, especially in humid conditions. Here are some tips to prevent this:
- Use Heavier Paper: Opt for cardstock or thicker paper, which is less likely to curl than thin paper.
- Apply a Sealant: Spray the paper bats with a clear sealant or varnish to protect them from moisture.
- Store Properly: Store the paper bats in a dry place away from direct sunlight and humidity.
- Flatten Before Hanging: Before hanging the paper bats, flatten them under a heavy book for a few hours.
- Use Double-Sided Tape: Use double-sided tape to attach the paper bats to surfaces, which will help keep them flat.
28. How do I add veins to the wings of my paper bats?
Adding veins to the wings of your paper bats can make them look more realistic and detailed. Here’s how to do it:
- Draw with a Pen: Use a fine-tipped pen or marker to draw veins on the wings of the paper bats.
- Use a Template: Create a template for the wing veins and trace it onto the paper bats.
- Cut with Scissors: Carefully cut out the wing veins with scissors to create a more textured effect.
- Emboss: Use an embossing tool to create raised veins on the wings of the paper bats.
- Paint: Use paint to create the veins, utilizing lighter or darker shades to provide depth and realism.
29. How do I attach paper bats to a wall without damaging the paint?
Attaching paper bats to a wall without damaging the paint requires using the right type of adhesive. Here are some options:
- Removable Adhesive Putty: This putty is designed to be easily removed without damaging surfaces.
- Painter’s Tape: Use painter’s tape to create a loop and attach it to the back of the paper bat. This tape is gentle on paint and easy to remove.
- Command Strips: These strips are designed for hanging items without damaging walls.
- Washi Tape: Washi tape is a decorative tape that is also gentle on surfaces and easy to remove.
- Static Cling: Create static cling by rubbing the paper bats with a balloon or cloth. This will allow them to stick to smooth surfaces like walls and windows without adhesive.
30. How can flyermedia.net help you with your aviation dreams?
At flyermedia.net, we are passionate about aviation and dedicated to providing you with the resources and information you need to pursue your aviation dreams. Whether you’re interested in becoming a pilot, learning about aircraft, or staying up-to-date on the latest aviation news, we have something for you.
- Aviation Training Information: flyermedia.net offers valuable information about flight schools, pilot certifications, and aviation career paths in the USA. Find the right flight school for you in Daytona Beach, or anywhere else in the US, and start your journey to becoming a pilot.
- Aviation News and Updates: Stay informed about the latest aviation news, trends, and technologies with our comprehensive coverage of the aviation industry.
- Aircraft Information: Learn about different types of aircraft, their specifications, and their history.
- Career Resources: Discover career opportunities in aviation and find the resources you need to succeed.
- Community: Connect with other aviation enthusiasts and share your passion for flying.
Making paper flying bats is a fun and creative way to celebrate Halloween or add a touch of whimsy to your home. With these tips and ideas, you can create a spooky and memorable display that will impress your friends and family. For more creative ideas and aviation-related content, visit flyermedia.net and explore our wide range of articles and resources.
Remember, whether you are aiming to decorate your home or delve into the world of aviation, flyermedia.net is here to guide you. Ready to take your passion for aviation to new heights? Contact us today and let us help you achieve your dreams! Explore the skies with flyermedia.net, where your aviation journey begins!
Address: 600 S Clyde Morris Blvd, Daytona Beach, FL 32114, United States.
Phone: +1 (386) 226-6000.
Website: flyermedia.net.