Want to learn how to fly the DJI Mini 3 Pro like a pro? This guide from flyermedia.net covers everything from unboxing to advanced flight modes, ensuring you’re ready to capture stunning aerial footage. Explore the best practices for drone piloting and aerial photography.
1. Getting Started with Your DJI Mini 3 Pro
So, you’ve got your hands on the DJI Mini 3 Pro. Now what? Let’s dive into the essential steps to get you airborne safely and confidently.
1.1. Unboxing Your DJI Mini 3 Pro
What’s inside the box? Understanding the contents is your first step.
- Carefully open the packaging: Use a knife to gently open the box along the designated line, taking care not to damage any components.
- Locate the accessories: Inside, you’ll find the drone itself, an inner container, and an accessory box. Combo kits include a remote controller.
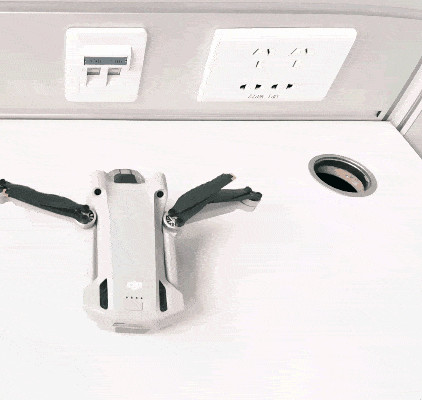
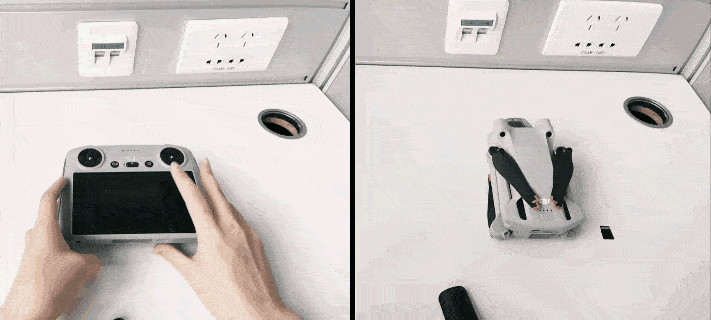
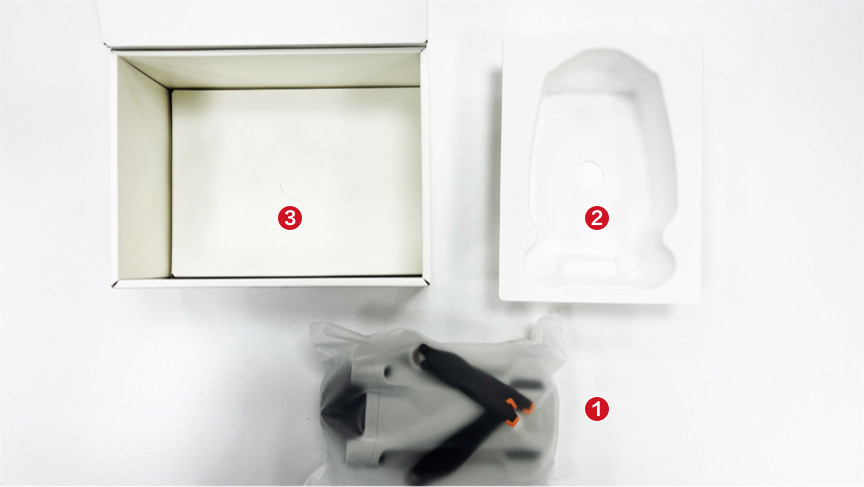 DJI Mini 3 Pro Unboxing
The DJI Mini 3 Pro unboxed, revealing its compact design and included accessories.
Here’s a breakdown of what you can expect in different DJI Mini 3 Pro combos:
DJI Mini 3 Pro (DJI RC) Combo:
| Item | Description |
|---|---|
| Gimbal Protector | Protects the camera gimbal during storage and transport. |
| DJI Mini 3 Pro | The drone itself. |
| Type-C to Type-C PD Cable | For charging the battery and remote controller. |
| Intelligent Flight Battery | Powers the drone during flight. |
| Screws | Spare screws for propeller attachment. |
| DJI RC | The remote controller with a built-in screen. |
| Spare Propellers | Additional propellers in case of damage. |
| Screwdriver | Used for attaching and removing propellers. |
DJI Mini 3 Pro (RC-N1) Combo:
| Item | Description |
|---|---|
| Gimbal Protector | Protects the camera gimbal. |
| DJI Mini 3 Pro | The drone. |
| Type-C to Type-C PD Cable | Charging cable. |
| DJI RC-N1 RC Cable | Connects the remote controller to your mobile device. |
| Intelligent Flight Battery | Powers the drone. |
| Screws | Spare screws. |
| DJI RC-N1 Remote Controller | The standard remote controller that requires a mobile device. |
| Spare Propellers | Additional propellers. |
| Screwdriver | Used for propeller maintenance. |
DJI Mini 3 Pro (No RC):
| Item | Description |
|---|---|
| Gimbal Protector | Protects the gimbal. |
| DJI Mini 3 Pro | The drone. |
| Type-C to Type-C PD Cable | Charging cable. |
| Intelligent Flight Battery | Powers the drone. |
| Screws | Spare screws. |
| Spare Propellers | Additional propellers. |
| Screwdriver | Used for attaching and removing the drone propellers. |
Important Accessories:
- RC Control Sticks: Attach these to the remote controller for precise drone movement. On the RC-N1, they’re at the bottom; on the DJI RC, they’re at the back.
- RC Cable: The DJI RC-N1 comes with a built-in RC Cable (Lightning Connector) for connecting to your mobile device.
1.2. Removing the Gimbal Protector
Why is removing the gimbal protector so important? The gimbal is a delicate piece of equipment.
- Critical step: Always remove the gimbal protector before powering on the drone.
- Gimbal self-check: The gimbal rotates during startup, and leaving the protector on can cause damage or reduce its lifespan. This could even impact flight safety.
- Storage: Attach the gimbal protector during storage or transport to protect the camera lens and gimbal arm.
How to Remove and Attach the Gimbal Protector:
- Remove: Push the lower buckle towards the camera.
- Attach: First, fit the upper buckle into the aircraft slot, then press the lower buckle into the bottom slot.
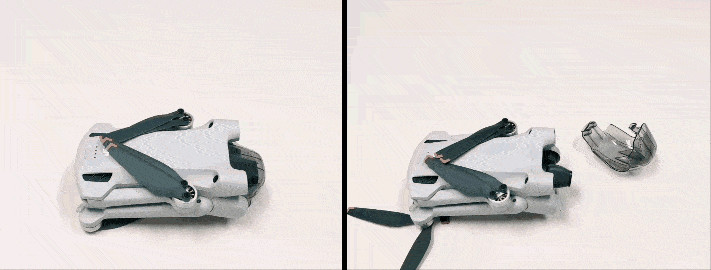 Removing the Gimbal Protector
A GIF demonstrating the correct method for removing and attaching the gimbal protector on the DJI Mini 3 Pro.
1.3. Powering On and Off
How do you turn on your drone and remote? It’s simple once you know the steps.
Powering On the Drone:
- Press, then press and hold: Press the power button once, then press and hold for 2 seconds until the battery level LEDs blink green and a tone sounds.
- Check the indicator: The aircraft status indicator will blink red, yellow, and green alternately if the drone powers on successfully.
Powering Off the Drone:
- Press, then press and hold: Press the power button once, then press and hold for 2 seconds until the aircraft status indicator and battery status LED turn off.
Powering On and Off the Remote Controller:
- Follow the same procedure as the drone: Press once, then press and hold for 2 seconds.
 Powering On the DJI Mini 3 Pro
A GIF showing the process of powering on the DJI Mini 3 Pro, highlighting the power button and indicator lights.
1.4. Understanding Status Indicators
What do the blinking lights mean? The status indicator provides crucial information about your drone’s condition.
- Color and frequency: Different colors and blinking patterns indicate various statuses.
- Refer to the manual: Consult the user manual for a detailed breakdown of each indicator.
1.5. Attaching and Removing Propellers
How do you install the propellers correctly? Proper installation is vital for safe flight.
- CW and CCW: There are two types of propellers: clockwise (CW) and counter-clockwise (CCW).
- Markings: Identify them by the markings on the propellers.
- Incorrect mounting: The drone won’t take off if propellers are improperly mounted.
Mounting the Propellers:
- Orientation: Place the drone with the camera facing forward.
- Match the propellers: Attach the propeller with a mark to the corresponding motor.
- Secure: Use the provided screwdriver to tighten the screws.
Removing the Propellers:
- Use the screwdriver to unscrew and remove the propellers.
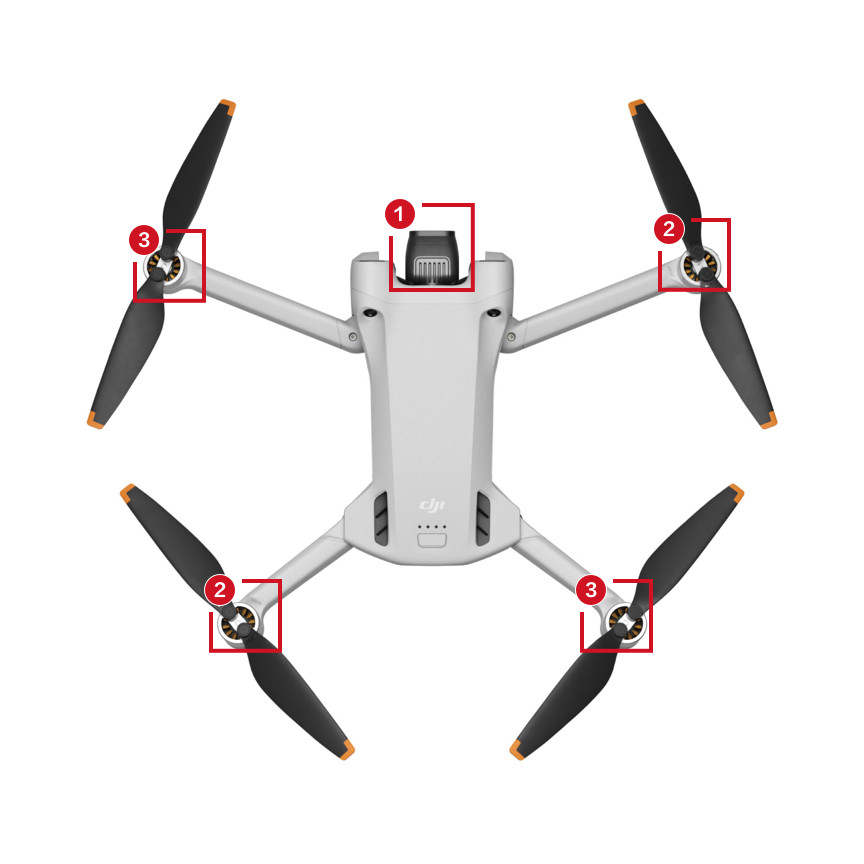 Attaching Propellers to DJI Mini 3 Pro
A diagram illustrating how to correctly attach the propellers to the DJI Mini 3 Pro, ensuring proper alignment and securement.
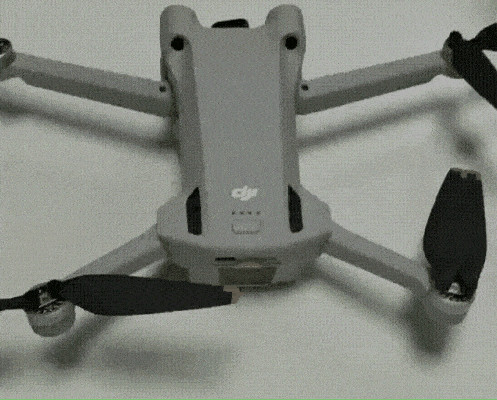
1.6. Installing and Removing the Battery
Can the battery be charged while inside the drone? Yes, but here’s how to remove it if needed.
- Refer to the visual guide for proper installation and removal.
 Battery Installation GIF
A GIF demonstrating the correct way to insert and remove the battery from the DJI Mini 3 Pro, showing the locking mechanism and alignment.
1.7. Updating the Firmware
Why is firmware important? Firmware updates improve performance and add new features.
- DJI Fly app: Power on the drone and remote, then launch the DJI Fly app.
- On-screen instructions: Follow the prompts to update the firmware when a new version is available.
- Tutorials: Check out DJI’s video tutorials for guidance.
2. Activating Your DJI Mini 3 Pro
Why do you need to activate your drone? Activation unlocks the full functionality of your DJI Mini 3 Pro.
2.1. Download the DJI Fly App
- Essential app: The DJI Fly app is necessary for activation and connection.
- Download link: Get the app from the DJI website.
2.2. Connecting the Drone to Other Devices
- Linking: New drones are usually pre-linked, but if needed, use the DJI Fly app to re-pair.
- Connect devices: Connect the aircraft, remote controller, and mobile device (not needed for DJI RC).
- Enter linking mode: In the DJI Fly app, go to the Control interface and tap “Re-pair to Aircraft (Link).”
- Power button: Press and hold the power button on the aircraft until it beeps.
- Confirmation: The aircraft will beep twice when linking is successful, and the remote controller’s battery level LEDs will blink and then become solid.
2.3. First-Time Activation
- Internet connection: Activation requires an internet connection.
- Follow prompts: Launch the DJI Fly app and follow the on-screen instructions to complete activation.
2.4. Checking Activation Information
- Activation details: Verify your device’s activation information on the DJI website.
- Warranty: Your warranty starts from the date of receipt, regardless of activation status.
2.5. Using the Remote Controller
- Comprehensive guide: Refer to DJI’s guide for a detailed overview of the remote controller buttons and functions.
2.6. Remote Controller Compatibility
Which remote controllers work with the Mini 3 Pro?
| Remote Controller Model | Applicable Products |
|---|---|
| DJI RC | DJI Mini 3, DJI Mavic 3 Classic, DJI Mini 3 Pro, DJI Mavic 3, DJI Air 2S |
| RC-N1 Remote Controller | DJI Mini 3, DJI Mavic 3 Classic, DJI Mini 3 Pro, DJI Mavic 3, DJI Air 2S, Mavic Air 2, DJI Mini 2 |
2.7. Mobile Device Compatibility
- Tested devices: DJI provides a list of tested and compatible mobile devices.
- Unsupported devices: Devices not on the list may still work, but stable performance isn’t guaranteed.
3. Charging Your DJI Mini 3 Pro
Keeping your batteries charged is crucial.
3.1. Checking Battery Level
- Power button: Press the power button briefly to check the battery level.
- LED indicators: The number of lit LEDs indicates the battery’s charge level.
3.2. Choosing a Charger
- No charger included: The DJI Mini 3 Pro doesn’t come with a charger.
- PD fast charging: It supports PD fast charging.
- Recommended charger: DJI recommends their 30W USB-C Charger.
- Alternative chargers: Common PD chargers like Apple USB-C Power Adapters or Android GaN chargers can be used.
- USB-C and USB-A: If a PD charger isn’t available, use a USB-C charger with a USB-A to USB-C cable.
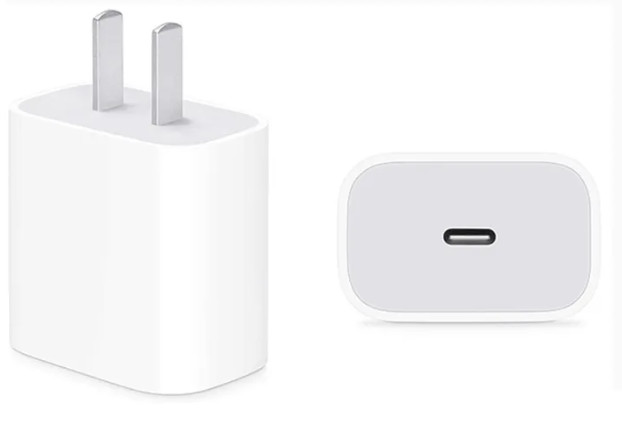 DJI Chargers
An image showcasing the DJI 30W USB-C Charger, a recommended accessory for efficiently charging the DJI Mini 3 Pro.
3.3. Charging Duration
How long does it take to charge the batteries?
Charging the Drone:
- With DJI 30W USB-C Charger: About 64 minutes for an Intelligent Flight Battery and 101 minutes for an Intelligent Flight Battery Plus.
- Battery Charging Hub: 56 minutes for an Intelligent Flight Battery and 78 minutes for an Intelligent Flight Battery Plus.
Charging the Remote Controller:
- DJI RC: About 1 hour and 30 minutes (15W max).
- RC-N1 Remote Controller: About 3 hours and 30 minutes (10W max).
3.4. Charging Method
- Connect the drone or remote to the USB-C charger using the appropriate cable.
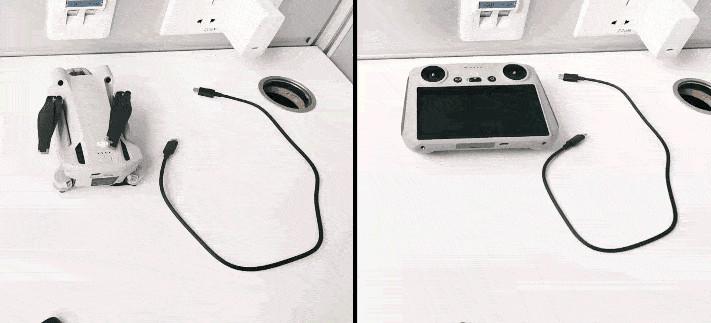 DJI Mini 3 Pro Charging
A GIF demonstrating how to charge the DJI Mini 3 Pro, showing the connection points for the USB-C cable.
3.5. Battery Maintenance
How do you keep your batteries in good condition? Proper maintenance extends their lifespan.
- Discharge: If not used for 10+ days, discharge to 40%-65%.
- Charge/discharge cycle: Charge and discharge every three months to maintain battery health.
- Storage: Store in a well-ventilated place.
- Hibernation: Depleted batteries stored for a long time may enter hibernation. Recharge to revive them.
4. Exporting Footage from Your DJI Mini 3 Pro
Getting your photos and videos off the drone is the next step.
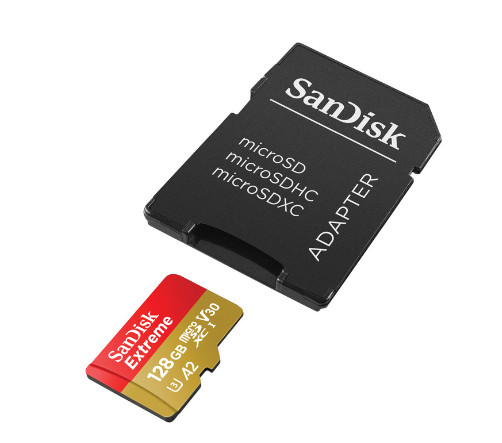
4.1. Storage
- Internal storage: The Mini 3 Pro has 1.2GB of internal storage.
- MicroSD card: A microSD card (UHS-I Speed Class 3 or above) is highly recommended.
- DJI RC: The DJI RC doesn’t have internal storage but supports microSD cards.
4.2. Installing and Removing a Memory Card
- Insert the microSD card into the drone’s card slot.
 Installing MicroSD Card
An image showing where to insert the microSD card into the DJI Mini 3 Pro, emphasizing the correct orientation.
 MicroSD Card Insertion GIF
A GIF demonstrating the action of inserting a microSD card into the DJI Mini 3 Pro.
4.3. Exporting Photos/Videos
- QuickTransfer: A wireless method for downloading footage to your smartphone.
- Connecting to remote controller and mobile device: A more traditional method for downloading files.
QuickTransfer:
- Power on: Turn on the drone and wait for self-diagnostics to complete.
- Enable Bluetooth and Wi-Fi: On your mobile device, turn on Bluetooth and Wi-Fi.
- DJI Fly prompt: Launch DJI Fly and tap the “Switch to QuickTransfer Mode” prompt.
- Connect to Wi-Fi: Connect to the aircraft’s Wi-Fi network.
- Select and download: Choose the files and download them to your mobile device.
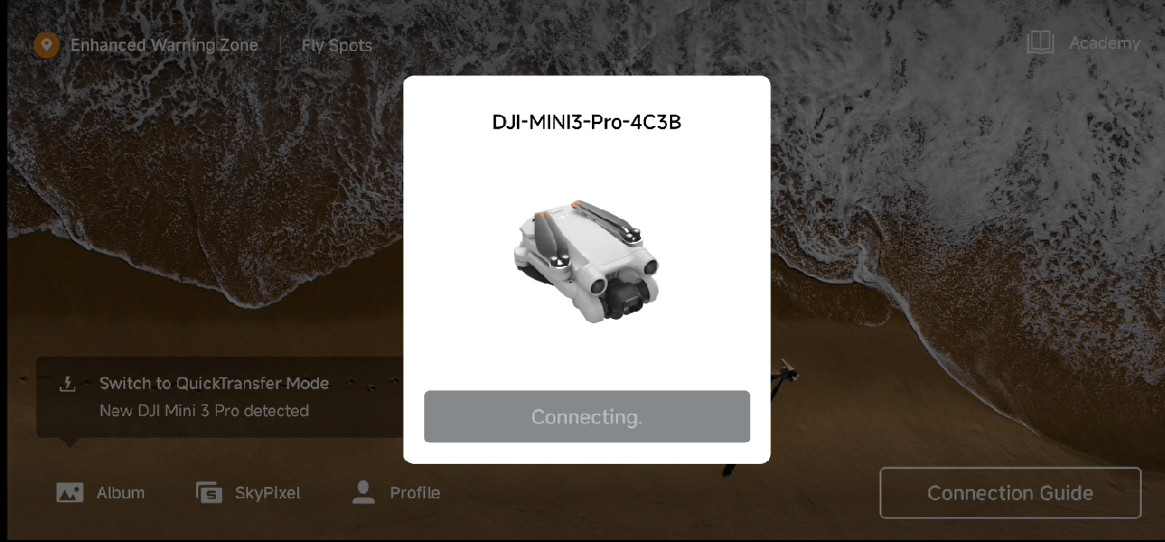 DJI Mini 3 Pro QuickTransfer
A screenshot from the DJI Fly app showing the QuickTransfer interface, highlighting the connection options and file selection process.
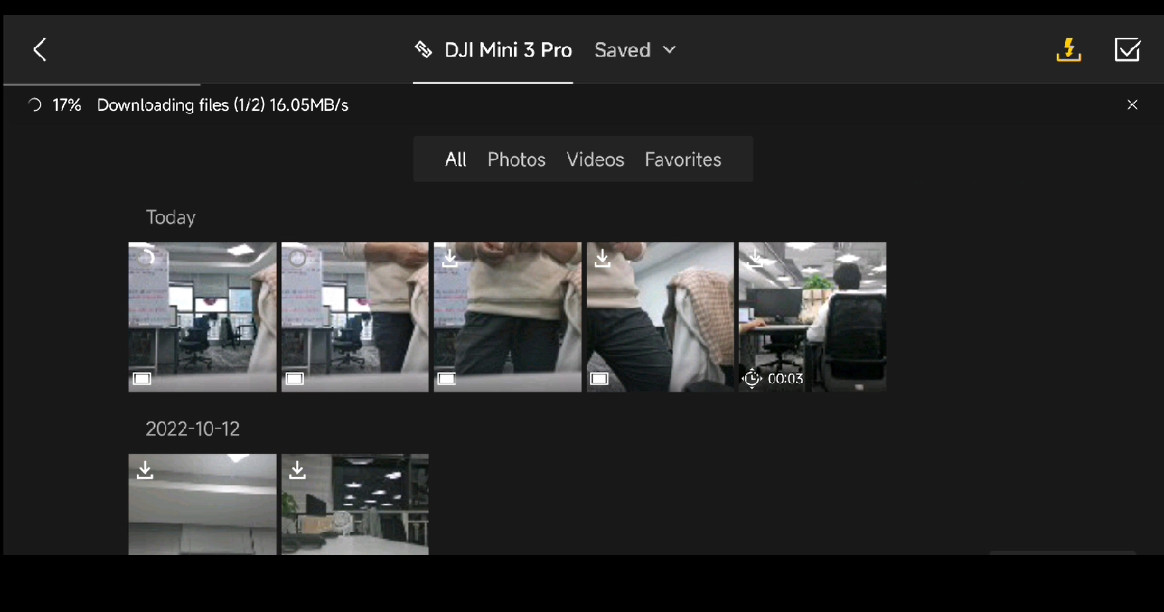 DJI Mini 3 Pro File Access
A screenshot showing how to access files on the DJI Mini 3 Pro via the DJI Fly app when connected to both the remote controller and the aircraft.
5. Safety First: Flight Policies and Environment
Safety is paramount when flying drones.
5.1. Flight Policies
- Laws and Regulations: Always check local regulations before flying.
- GEO Zones: Be aware of restricted areas. Use the DJI GEO Zone map to determine if you need to unlock an area before flying.
5.2. Flight Environment Requirements
- Open areas: Fly in open areas, maintaining a clear line of sight.
- Safe altitude: Fly at a safe altitude, avoiding buildings and obstacles.
- Maximum altitude: The maximum flight altitude can be set to 500 m above ground level.
5.3. Safety Tips
- Maintain control: Keep your hands on the control sticks during flight.
- Home Point: Take off with a strong GPS signal to set a Home Point.
- Pre-flight check: Check for damage and ensure your equipment is fully charged.
6. Intermediate Operations: Unleashing the DJI Mini 3 Pro’s Potential
Ready to take your drone skills to the next level?
6.1. Hyperlapse
- Shooting modes: Free, Circle, Course Lock, and Waypoint.
- Time compression: Hyperlapse speeds up footage to compress long periods into short videos.
6.2. FocusTrack
- Modes: Spotlight, ActiveTrack, and Point of Interest.
6.3. Portrait Mode
- Camera rotation: The Mini 3 Pro can rotate its camera to portrait orientation.
- Portrait Mode Switch: Use the switch in the app to enter Portrait Mode.
 DJI Mini 3 Pro Portrait Mode
A screenshot illustrating how to switch to Portrait Mode in the DJI Fly app, enabling vertical video capture.
6.4. Zooming
- Digital zoom: The DJI Mini 3 Pro supports digital zoom.
6.5. Live Streaming
- DJI RC-N1: When using the DJI RC-N1, you can live stream via DJI Fly.
- Platforms: Supports various livestream platforms and resolutions.
- RTMP address: Input the RTMP address correctly (RTMP address/stream key).
6.6. Panorama
- Shooting modes: Sphere, 180°, Wide Angle, and Vertical.
6.7. Smart RTH (Return to Home)
- Initiation: Activated by tapping the RTH icon or pressing and holding the RTH button on the remote.
6.8. Waypoints
- Not supported: The DJI Mini 3 Pro does not support Waypoint Flight or Mission Planning.
6.9. Point of Interest
- Supported: The DJI Mini 3 Pro supports Point of Interest mode.
7. Must-Have Accessories for Your DJI Mini 3 Pro
Enhance your flying experience with these accessories.
7.1. Popular Accessories
- DJI Mini 3 Pro Fly More Kit Plus
- DJI Mini 3 Pro Fly More Kit
- DJI Mini 3 Pro Intelligent Flight Battery Plus
- DJI Mini 3 Pro Intelligent Flight Battery
Unlock Your Drone’s Potential with flyermedia.net
Ready to take your DJI Mini 3 Pro flying skills to new heights? flyermedia.net offers a wealth of information, from in-depth training guides to the latest news and regulations in the aviation industry. Whether you’re a student pilot at Embry-Riddle Aeronautical University or a seasoned drone enthusiast, we have the resources you need to succeed.
Here’s how flyermedia.net can help:
- Pilot Training: Discover top-rated flight schools in the USA, including Daytona Beach, and learn about FAA certifications and aviation career opportunities.
- Aviation News: Stay up-to-date with the latest advancements in aviation technology, aircraft innovations, and industry trends.
- Career Opportunities: Explore various career paths in aviation, from engineering to piloting, and find the resources you need to land your dream job.
- Travel Tips: Get tips on air travel, airport navigation, and airline selection to make your journeys smoother and more enjoyable.
Ready to explore the world of aviation?
- Visit our website: flyermedia.net
- Contact us: 600 S Clyde Morris Blvd, Daytona Beach, FL 32114, United States, +1 (386) 226-6000
FAQ: Mastering Your DJI Mini 3 Pro
1. Do I need to remove the gimbal protector before every flight?
Yes, it’s crucial to remove the gimbal protector before each flight. According to DJI, leaving it on can damage the gimbal motor during the self-check process.
2. What type of charger is recommended for the DJI Mini 3 Pro?
DJI recommends using a PD (Power Delivery) fast charger, such as the DJI 30W USB-C Charger, for optimal charging speed and efficiency.
3. Can I use any microSD card with the DJI Mini 3 Pro?
While the DJI Mini 3 Pro supports various microSD cards, it’s best to use a UHS-I Speed Class 3 or above card for reliable performance when recording high-resolution video.
4. How do I check the battery level on my DJI Mini 3 Pro?
Simply press the power button on the drone or remote controller once. The battery level LEDs will illuminate, indicating the remaining charge.
5. What is QuickTransfer, and how does it work?
QuickTransfer is a feature that allows you to wirelessly download photos and videos from your DJI Mini 3 Pro to your smartphone. According to DJI, it enables a direct connection between the drone and smartphone.
6. Where can I find the latest flight regulations for drones in the USA?
Always refer to the Federal Aviation Administration (FAA) website for the most up-to-date regulations and guidelines regarding drone operation in the United States.
7. What should I do if my DJI Mini 3 Pro enters hibernation mode?
If your battery has been depleted and stored for an extended period, it may enter hibernation mode. Simply recharge the battery to bring it out of hibernation.
8. Can I fly my DJI Mini 3 Pro in controlled airspace?
Flying in controlled airspace may require authorization from the FAA. Use the FAA’s LAANC (Low Altitude Authorization and Notification Capability) system to request authorization.
9. How often should I update the firmware on my DJI Mini 3 Pro?
It’s recommended to update the firmware whenever a new version is available. DJI releases firmware updates to improve performance, add new features, and address potential issues.
10. Does the DJI Mini 3 Pro support obstacle avoidance?
According to DJI, the Mini 3 Pro is equipped with forward, backward, and downward vision sensors, enabling obstacle avoidance in various directions.