Do you want to learn How To Draw A Fly Easy with simple steps? This guide from flyermedia.net makes the process straightforward, providing a fun way to explore artistic skills and understand fly anatomy. Dive into this tutorial to create your own fly drawings and enhance your understanding of insect art, entomology illustration and easy insect drawing today.
1. Why Learn How to Draw a Fly Easy?
Learning how to draw a fly easily isn’t just about creating a picture; it’s an engaging way to understand insect anatomy and develop your artistic skills. Whether you’re an aspiring artist or simply looking for a fun activity, drawing can be both educational and relaxing. Drawing can enhance your observational skills, improve hand-eye coordination, and provide a creative outlet. Additionally, understanding basic entomology through art can spark an interest in the natural world and its intricate details. By following a step-by-step guide, anyone can learn to create their own fly drawings, making art accessible and enjoyable for all skill levels.
1.1. Benefits of Drawing
Drawing is more than just a hobby; it’s an activity with numerous cognitive and emotional benefits. Here are some key advantages of incorporating drawing into your routine:
- Enhances Creativity: Drawing allows you to express your unique ideas and perspectives, fostering creativity and imagination.
- Improves Focus: The act of drawing requires concentration and attention to detail, which can improve your focus and concentration skills.
- Reduces Stress: Engaging in artistic activities like drawing can lower stress levels by providing a calming and meditative experience.
- Boosts Confidence: Completing a drawing, no matter how simple, can give you a sense of accomplishment and boost your self-esteem.
- Develops Problem-Solving Skills: Drawing often involves figuring out proportions, perspective, and composition, which can enhance your problem-solving abilities.
1.2. Understanding Fly Anatomy Through Art
Learning to draw a fly provides a unique opportunity to study insect anatomy in a fun and engaging way. By focusing on the different parts of the fly, you gain a better understanding of its physical structure. Here’s how drawing can help you learn about fly anatomy:
- Head: Observe the shape of the head and the placement of the compound eyes.
- Thorax: Note the connection between the head and thorax, and how the legs attach to the thorax.
- Abdomen: Understand the segmented structure of the abdomen and its proportion to the rest of the body.
- Wings: Pay attention to the shape, size, and venation of the wings.
- Legs: Study the arrangement and structure of the six legs.
By drawing these elements, you not only improve your artistic skills but also develop a deeper appreciation for the complexity of insect biology.
2. Essential Art Supplies for Drawing a Fly
Before you start drawing, gathering the right art supplies can make the process smoother and more enjoyable. Here’s a list of essential materials for drawing a fly:
2.1. Pencils: From Sketching to Detailing
Pencils are the foundation of any drawing, offering versatility for both sketching and adding fine details. Here’s how to choose the right pencils for your project:
- HB Pencil: This is your primary tool for initial sketches. It offers a good balance between darkness and erasability.
- 2B Pencil: Ideal for adding darker lines and shading. Its softer lead creates richer tones.
- 4B Pencil: Perfect for deep shadows and adding depth. Its very soft lead allows for smooth blending.
- Mechanical Pencil: Great for fine details and precise lines. Use it for adding intricate patterns and textures.
Having a range of pencils ensures you can create drawings with varied tones and levels of detail.
2.2. Erasers: Correcting Mistakes and Highlighting
Erasers are essential for correcting mistakes and adding highlights to your drawings. Here are some types to consider:
- Kneaded Eraser: This pliable eraser can be shaped to lift graphite from the paper without damaging the surface. It’s perfect for creating subtle highlights and softening edges.
- Plastic Eraser: A standard eraser for removing pencil marks cleanly. Choose a high-quality plastic eraser to avoid smudging.
- Pencil Eraser: A small eraser at the end of a pencil, useful for precise corrections and small details.
Using the right eraser can significantly improve the quality and appearance of your drawings.
2.3. Paper: Choosing the Right Surface
The type of paper you use can affect the texture and overall look of your drawing. Here are some options to consider:
- Sketchbook Paper: A lightweight paper suitable for quick sketches and practice.
- Drawing Paper: A thicker, smoother paper that can handle more detailed work and shading.
- Bristol Paper: A heavy-weight paper with a very smooth surface, ideal for detailed drawings and illustrations.
Choose paper that suits your drawing style and the level of detail you want to achieve.
2.4. Additional Tools
Enhance your drawing experience with these additional tools:
- Sharpener: Keep your pencils sharp for precise lines and details.
- Blending Stumps: Use these to blend graphite and create smooth transitions.
- Ruler: Helpful for drawing straight lines and ensuring accurate proportions.
- Reference Images: Having reference images of flies can help you understand their anatomy and proportions.
3. Step-by-Step Guide: How to Draw a Fly Easy
This step-by-step guide will show you how to draw a fly easily, perfect for beginners and those looking to improve their drawing skills.
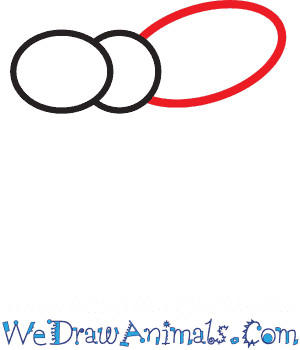
3.1. Step 1: Sketch the Basic Shapes
Start by sketching the basic shapes of the fly’s body.
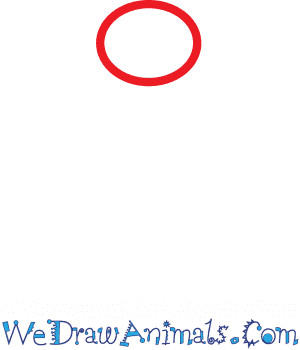
- Head: Draw a small oval for the head.
- Thorax: Add a larger oval connected to the head for the thorax.
- Abdomen: Draw a bigger, elongated oval for the abdomen, slightly overlapping the thorax.
These basic shapes will form the foundation of your fly drawing.
 Basic shapes for drawing a fly: a small oval for the head, a larger oval for the thorax, and an elongated oval for the abdomen.
3.2. Step 2: Add the Wings
Next, add the wings. Flies typically have one pair of wings, which are attached to the thorax.
- Wings: Draw two elongated ovals extending from the thorax. Make sure the wings are roughly the same size and shape.
- Placement: Position the wings slightly angled upwards for a natural look.
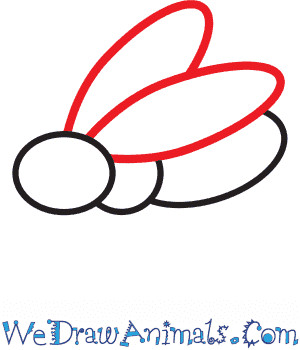 Adding wings to the fly drawing: two elongated ovals extending from the thorax, angled slightly upwards.
3.3. Step 3: Draw the Legs
Flies have six legs, attached to the thorax.
- Legs: Draw three legs on each side of the thorax. Use simple lines to represent the legs.
- Angles: Vary the angles of the legs to create a more dynamic and natural pose.
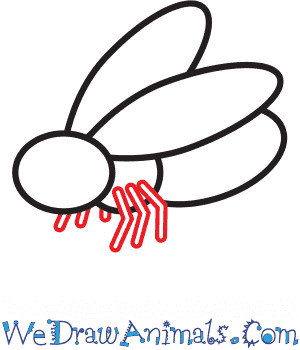 Drawing the legs of the fly: six legs attached to the thorax, with varying angles to create a dynamic pose.
3.4. Step 4: Refine the Head and Add Eyes
Now, refine the head and add the fly’s prominent eyes.
- Eyes: Draw two large, round eyes on the sides of the head. Flies have compound eyes, which are made up of many individual lenses.
- Details: Add small circles or dots within the eyes to represent the individual lenses.
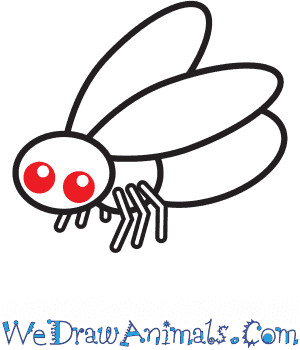 Refining the head and adding the eyes: two large, round eyes with small circles or dots to represent individual lenses.
3.5. Step 5: Add Details to the Body
Add details to the body to make your fly drawing more realistic.
- Segments: Draw subtle lines on the abdomen to indicate the segments.
- Texture: Add small lines or dots to create a textured appearance on the thorax and abdomen.
 Adding details to the body: subtle lines on the abdomen to indicate segments and small lines or dots for texture.
3.6. Step 6: Finalize the Drawing
Finalize your drawing by adding the finishing touches.
- Outline: Darken the outline of the fly to make it stand out.
- Shading: Add shading to create depth and dimension. Focus on areas where light would naturally be blocked, such as under the wings and along the sides of the body.
- Erase Guidelines: Erase any unnecessary guidelines to clean up the drawing.
 Finalizing the fly drawing: darkening the outline, adding shading for depth, and erasing unnecessary guidelines.
4. Tips and Tricks for Drawing Flies
To enhance your fly drawings, consider these tips and tricks that can elevate your artistic skills.
4.1. Understanding Proportions
Accurate proportions are crucial for creating realistic drawings. Here’s how to ensure your fly drawing is proportional:
- Head to Body Ratio: The head should be smaller than the thorax and abdomen.
- Wing Size: The wings should be large enough to cover a significant portion of the body but not so large that they look disproportionate.
- Leg Length: The legs should be long enough to support the body but not overly long.
Regularly check your proportions as you draw to ensure a balanced and realistic appearance.
4.2. Adding Realistic Details
Realistic details can bring your fly drawing to life. Here are some details to focus on:
- Wing Veins: Add fine lines to represent the veins in the wings.
- Hair-like Structures: Include small, hair-like structures on the body and legs.
- Reflections in Eyes: Add small white dots in the eyes to create the illusion of reflection.
These small details can make a big difference in the overall realism of your drawing.
4.3. Mastering Shading Techniques
Shading adds depth and dimension to your drawings. Here are some shading techniques to try:
- Hatching: Use parallel lines to create shaded areas. The closer the lines, the darker the area.
- Cross-Hatching: Overlap parallel lines at different angles to create darker tones.
- Blending: Use a blending stump or your finger to smooth out the graphite and create soft transitions.
Experiment with different shading techniques to find what works best for you.
4.4. Using References Effectively
Reference images are invaluable for creating accurate and realistic drawings. Here’s how to use them effectively:
- Study Anatomy: Use reference images to study the anatomy of flies, paying attention to the proportions and details.
- Observe Lighting: Notice how light interacts with the fly’s body, creating highlights and shadows.
- Capture Poses: Use reference images to capture different poses and angles.
Having a good reference can greatly improve the accuracy and realism of your drawing.
5. Common Mistakes to Avoid When Drawing a Fly
Even experienced artists make mistakes. Knowing common pitfalls can help you avoid them and improve your drawings.
5.1. Disproportionate Body Parts
One of the most common mistakes is drawing disproportionate body parts. To avoid this:
- Check Ratios: Regularly check the ratios of the head, thorax, and abdomen.
- Use Guidelines: Use guidelines to ensure the proportions are accurate.
- Compare to References: Compare your drawing to reference images to identify any discrepancies.
Correcting proportions early on can prevent bigger issues later in the drawing process.
5.2. Lack of Detail
Lack of detail can make your fly drawing look flat and unrealistic. To add more detail:
- Observe Closely: Pay close attention to the details in your reference images.
- Add Texture: Add texture to the body and wings to create a more realistic appearance.
- Include Fine Lines: Include fine lines to represent veins, hairs, and other small details.
Adding detail can transform a simple drawing into a stunning work of art.
5.3. Inconsistent Shading
Inconsistent shading can make your drawing look uneven and unnatural. To achieve consistent shading:
- Plan Your Light Source: Decide where your light source is coming from and shade accordingly.
- Use Consistent Pressure: Use consistent pressure when applying graphite to create even tones.
- Blend Smoothly: Blend the graphite smoothly to create seamless transitions between light and shadow.
Consistent shading can add depth and dimension to your drawing, making it look more realistic.
5.4. Ignoring Anatomy
Ignoring the anatomy of the fly can result in an inaccurate and unrealistic drawing. To avoid this:
- Study Anatomy: Study the anatomy of flies before you start drawing.
- Pay Attention to Details: Pay attention to the placement and structure of the wings, legs, and other body parts.
- Use References: Use reference images to ensure your drawing is anatomically correct.
Understanding the anatomy of flies will greatly improve the accuracy and realism of your drawings.
6. Advanced Techniques for Fly Drawings
For those looking to take their fly drawings to the next level, here are some advanced techniques to explore.
6.1. Hyperrealism
Hyperrealism involves creating drawings that are so detailed and realistic they look like photographs. To achieve hyperrealism:
- Use High-Quality References: Use high-resolution reference images with clear details.
- Focus on Details: Spend hours adding fine details, such as individual hairs, reflections, and textures.
- Use Advanced Shading Techniques: Use advanced shading techniques, such as layering and blending, to create smooth transitions and realistic tones.
Hyperrealism requires patience and precision, but the results can be stunning.
6.2. Digital Drawing
Digital drawing offers a range of tools and techniques that can enhance your fly drawings. Here are some tips for digital drawing:
- Use a Drawing Tablet: Invest in a good-quality drawing tablet with pressure sensitivity.
- Explore Digital Software: Experiment with different digital drawing software, such as Adobe Photoshop, Procreate, or Corel Painter.
- Use Layers: Use layers to separate different elements of your drawing, making it easier to edit and adjust.
Digital drawing allows for greater flexibility and control, making it a great option for creating detailed and expressive fly drawings.
6.3. Mixed Media
Mixed media involves combining different art materials to create unique and interesting effects. Here are some mixed media techniques to try:
- Watercolor and Ink: Use watercolor to create soft washes of color, and then add details with ink.
- Graphite and Colored Pencils: Use graphite for shading, and then add color with colored pencils.
- Collage and Drawing: Combine collage elements with drawing to create a textured and layered artwork.
Mixed media offers endless possibilities for experimentation and creativity.
6.4. Perspective and Composition
Understanding perspective and composition can greatly enhance the visual impact of your fly drawings. Here are some tips:
- Use Perspective: Use perspective to create the illusion of depth and distance.
- Create a Focal Point: Create a focal point to draw the viewer’s eye to the most important part of the drawing.
- Experiment with Composition: Experiment with different compositions to find the most visually appealing arrangement.
Mastering perspective and composition can elevate your fly drawings and make them more engaging and dynamic.
7. Inspiration: Famous Insect Artists and Illustrators
Drawing inspiration from other artists can help you develop your own style and techniques. Here are some famous insect artists and illustrators to explore.
7.1. Maria Sibylla Merian
Maria Sibylla Merian (1647-1717) was a pioneering naturalist and scientific illustrator who made significant contributions to the field of entomology. Her detailed illustrations of insects and plants were groundbreaking for their accuracy and artistic quality.
- Key Work: Metamorphosis insectorum Surinamensium (The Metamorphosis of the Insects of Surinam)
- Style: Detailed and accurate illustrations of insects in their natural habitats.
7.2. Ernst Haeckel
Ernst Haeckel (1834-1919) was a German biologist, philosopher, physician, professor, marine biologist, and artist who discovered, described, and named thousands of new species, mapped a genealogical tree relating all life forms, and coined many terms in biology.
- Key Work: Kunstformen der Natur (Art Forms of Nature)
- Style: Highly detailed and stylized illustrations of various life forms, including insects.
7.3. Beatrix Potter
Beatrix Potter (1866-1943) was an English writer, illustrator, natural scientist, and conservationist best known for her children’s books featuring animals.
- Key Work: The Tale of Peter Rabbit
- Style: Charming and whimsical illustrations of animals, often anthropomorphic, with a focus on natural details.
7.4. Contemporary Insect Artists
There are many contemporary artists creating stunning insect art today. Here are a few to check out:
- Christopher Marley: Known for his intricate and visually striking arrangements of insects.
- Jennifer Angus: Creates large-scale installations using preserved insects, exploring the intersection of art and science.
8. Resources for Learning More About Drawing Flies
To continue learning about drawing flies, here are some valuable resources to explore.
8.1. Online Tutorials and Courses
- YouTube: Search for “how to draw a fly” to find numerous step-by-step tutorials.
- Skillshare: Offers courses on drawing insects and other natural subjects.
- Udemy: Provides a variety of drawing courses, including specialized topics like insect illustration.
8.2. Books on Insect Illustration
- “The Art of Botanical & Wildlife Illustration” by Claire Banks: A comprehensive guide to drawing plants and animals, including insects.
- “Drawing and Painting Insects” by Andrew Tyzack: A practical guide to capturing the beauty and detail of insects through drawing and painting.
8.3. Websites and Blogs
- flyermedia.net: Provides articles, tutorials, and resources for artists and aviation enthusiasts.
- Entomological Society of America: Offers information on insects, including anatomy and behavior.
8.4. Local Art Classes and Workshops
Check local art centers and community colleges for drawing classes and workshops. These can provide valuable hands-on instruction and feedback.
9. Frequently Asked Questions (FAQs) About Drawing Flies
Here are some frequently asked questions about drawing flies, along with detailed answers to help you improve your skills.
9.1. What is the best way to start drawing a fly?
Start by sketching the basic shapes of the fly’s body: a small oval for the head, a larger oval for the thorax, and an elongated oval for the abdomen. This will provide a foundation for your drawing.
9.2. How do I make the wings look realistic?
Add fine lines to represent the veins in the wings. Make sure the wings are proportional to the body and slightly angled upwards for a natural look.
9.3. What kind of pencil should I use for drawing flies?
Use an HB pencil for initial sketches, a 2B pencil for darker lines and shading, and a 4B pencil for deep shadows. A mechanical pencil is great for fine details.
9.4. How do I add depth to my fly drawing?
Add depth by using shading techniques such as hatching, cross-hatching, and blending. Focus on areas where light would naturally be blocked, such as under the wings and along the sides of the body.
9.5. What are some common mistakes to avoid when drawing flies?
Avoid disproportionate body parts, lack of detail, inconsistent shading, and ignoring the anatomy of the fly. Regularly check your proportions and use reference images to ensure accuracy.
9.6. How can I improve my shading skills?
Plan your light source, use consistent pressure when applying graphite, and blend the graphite smoothly to create seamless transitions between light and shadow.
9.7. What is hyperrealism, and how can I achieve it?
Hyperrealism involves creating drawings that are so detailed and realistic they look like photographs. To achieve it, use high-quality references, focus on fine details, and use advanced shading techniques.
9.8. What are some good resources for learning more about drawing flies?
Explore online tutorials and courses on YouTube, Skillshare, and Udemy. Check out books on insect illustration and visit websites like flyermedia.net for articles and resources.
9.9. How can digital drawing enhance my fly drawings?
Digital drawing offers a range of tools and techniques, such as layers, brushes, and effects, that can enhance your drawings. Use a drawing tablet and experiment with different digital drawing software.
9.10. Can I use mixed media for drawing flies?
Yes, mixed media can add unique and interesting effects to your fly drawings. Try combining watercolor and ink, graphite and colored pencils, or collage elements with drawing.
10. Conclusion: Unleash Your Creativity and Draw a Fly Easy!
Learning how to draw a fly easily is a rewarding experience that combines art, science, and creativity. By following the steps and tips in this guide, you can create your own stunning fly drawings and develop your artistic skills. Remember to practice regularly, use reference images, and explore different techniques to find your own unique style. Whether you’re a beginner or an experienced artist, there’s always something new to learn and discover in the world of art.
Are you eager to delve deeper into the world of aviation and explore a variety of informative resources? Visit flyermedia.net today to discover a wealth of training programs, the latest aviation news, and exciting career opportunities in the United States. Begin your journey now and take off toward a brighter future!