The Jirutagumac Shrine in The Legend of Zelda: Tears of the Kingdom presents a unique and engaging challenge centered around aerial maneuvers and Zonai devices. Located high above the Lanayru Sky Archipelago, this shrine, aptly nicknamed a flying device shrine, requires players to master the art of flight to solve its puzzles and claim the Light of Blessing. This guide will provide a comprehensive walkthrough, ensuring you navigate the “A Flying Device” trial with ease and collect all available rewards.
Location of the Jirutagumac Shrine: Reaching the Sky Orb
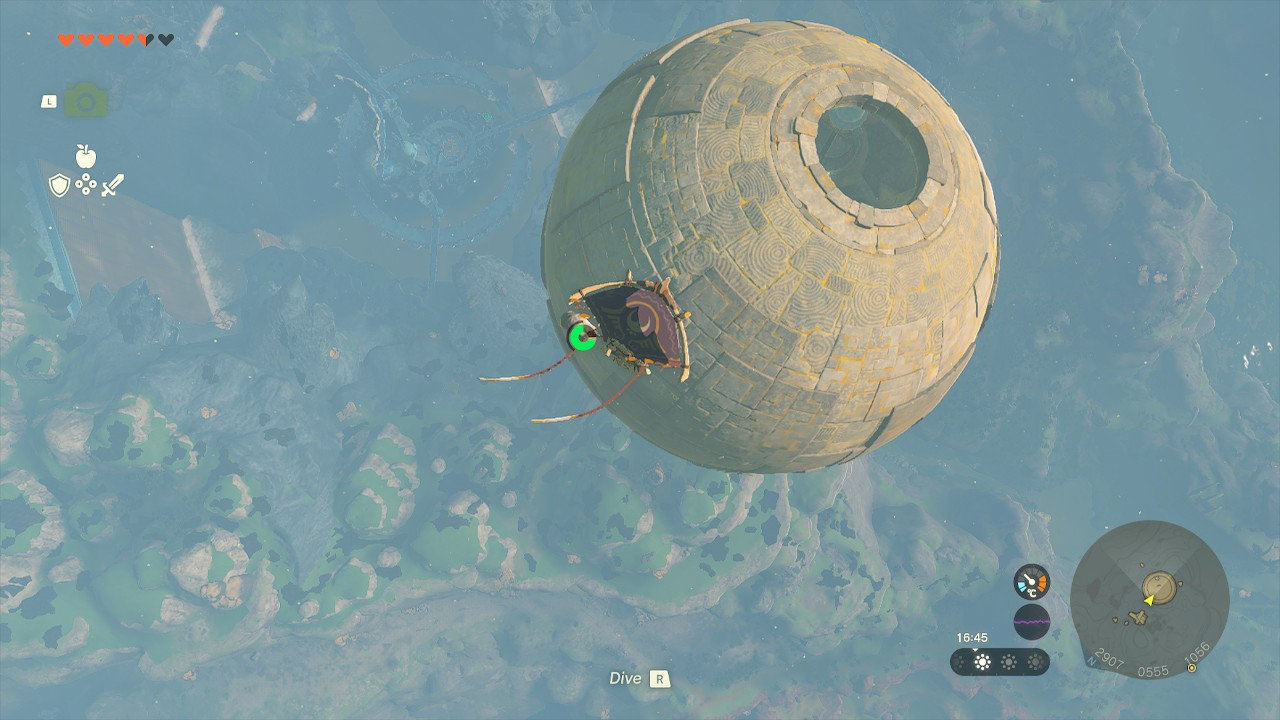
Finding the Jirutagumac Shrine is an adventure in itself. Perched above the Upland Zorana Skyview Tower, it’s situated in the Lanayru Sky Archipelago at coordinates (2916, 0533, 0951). What makes this shrine particularly distinctive is its entrance: a massive, spinning spherical structure resembling a sci-fi fortress in the sky.
To reach this flying device shrine, launch yourself from the Upland Zorana Skyview Tower. As you ascend, orient yourself southeast and look for the unmistakable giant orb. Gliding towards it, you’ll notice a hole at the sphere’s apex. Your task is to land precisely inside this opening to access the shrine. Don’t fret if your initial attempt is off; as long as you remain on top of the sphere, you can patiently wait for the hole to align and jump in. This initial aerial challenge perfectly sets the stage for the shrine’s theme: mastering flying devices.
 Link gliding towards the Jirutagumac Shrine, a spherical floating structure in Zelda Tears of the Kingdom's Lanayru Sky Archipelago, highlighting its unique entrance.
Preparing for “A Flying Device” Trial
Upon entering the Jirutagumac Shrine, you’re immediately introduced to the core mechanic of the “A Flying Device” trial. The shrine is designed around utilizing Zonai Wings and Fans to navigate across chasms and reach the final sigil. Before diving into the puzzle, it’s beneficial to familiarize yourself with the tools at your disposal. You’ll need to effectively use:
- Gliding: Essential for navigating the sky and reaching platforms.
- Ultrahand: To manipulate and combine Zonai devices.
- Ascend: To gain vertical height and access hidden areas.
With these skills in mind, let’s tackle the “A Flying Device” trial step-by-step.
Jirutagumac Shrine Walkthrough: Step-by-Step Guide
The Jirutagumac Shrine is cleverly designed to gradually introduce you to the mechanics of using flying devices. Follow these steps to solve each puzzle and progress through the shrine.
Step 1: Initial Setup with Wings
As you enter, you’ll see two wings strategically placed before a large chasm. The objective is clear: use these wings to cross the gap. In the distance, the telltale green wisps guide your path, indicating the direction of your goal. This shrine immediately emphasizes its identity as a flying device shrine.
 Link observing two wings at the start of the Jirutagumac Shrine, preparing for the flying device challenge in Zelda Tears of the Kingdom.
Step 2: Reaching the Chest (Optional Early Treasure)
Before focusing on the main path, take a moment to locate the chest. From the starting platform, you can spot it on a ledge. This chest is accessible en route to the shrine’s conclusion and contains a valuable reward, so keep its location in mind.
 Link using the scope to identify a hidden chest on a ledge within the Jirutagumac Shrine, highlighting an optional treasure in this flying device puzzle in Zelda Tears of the Kingdom.
Step 3: Launching the First Wing
Begin by using Ultrahand to grab the wing on the left. The wing on the right is a decoy. Position the left-hand wing on the slope as shown in the image below. Then, glide down after it, landing on the platform where the wing comes to rest.
 Link using Ultrahand to maneuver a wing down a slope in the Jirutagumac Shrine, initiating the first flying device challenge in Zelda Tears of the Kingdom.
Step 4: Creating the Wing-Cart
On this platform, you’ll notice spawning carts. Two will roll away immediately, but one remains stationary as it’s placed perpendicular to the slope. Take the wing you brought with you and use Ultrahand to attach it to the static cart. This transforms the wing into a makeshift aircraft, a crucial step in this flying device shrine.
 Link attaching a wing to a cart using Ultrahand in the Jirutagumac Shrine, constructing a basic flying device in Zelda Tears of the Kingdom.
Step 5: Sending the Wing-Cart Across
Once your wing-cart is assembled, push it down the slope. This will launch it across the chasm to the platform on the right side of the room. Glide after your creation to join it on the other side.
 Link chasing after a wing-cart rolling down a slope in the Jirutagumac Shrine, utilizing a basic flying device for traversal in Zelda Tears of the Kingdom.
Step 6: Building a Wing Bridge
Upon reaching the right platform, you can now collect the treasure chest. Afterward, retrieve the wing. Carefully position the wing between the two ledges to create a bridge. Precision is key here; dropping the wing means a detour back up the ladder to retrieve another one.
 Link carefully placing a wing to form a bridge between ledges in the Jirutagumac Shrine, solving a puzzle with a makeshift flying device component in Zelda Tears of the Kingdom.
Step 7: Ascending for Treasure
With your wing bridge in place, stand in the middle of it and use Ascend. This will take you directly to the chest located above, rewarding you with a piece of large Zonaite. Once you’ve collected your prize, drop back down to the platform.
Step 8: Preparing the Flying Device
Grab the wing again and position it on the runway, aligning it as shown in the image below. Ensure it’s properly placed for takeoff. Then, locate the fan situated behind you and bring it to the runway area.
 Link aligning a wing on a runway in the Jirutagumac Shrine, preparing for the next stage of the flying device challenge in Zelda Tears of the Kingdom.
Step 9: Attaching the Fan
Use Ultrahand to attach the fan to the rear of the wing, positioning it as far back as possible. This is crucial for balance, ensuring the wing’s nose stays up during flight. This step truly embodies the flying device shrine theme, requiring you to engineer a functional aircraft.
 Link attaching a fan to the back of a wing in the Jirutagumac Shrine, completing the construction of a powered flying device in Zelda Tears of the Kingdom.
Step 10: Takeoff and Flight
With your flying device ready, it’s time for takeoff! Give the fan a tap with your weapon to activate it. Prepare for an exhilarating flight across the chasm.
Step 11: Navigating the Flight
As you soar through the air on your wing-fan contraption, take a moment to appreciate the ingenuity of this flying device shrine. Use the wing to steer and adjust your flight path as needed. This part of the trial is as much about enjoyment as it is about puzzle-solving.
 Link riding a fan-powered wing across a chasm in the Jirutagumac Shrine, successfully piloting a flying device in Zelda Tears of the Kingdom.
Step 12: Claiming the Light of Blessing
Once you’re directly above the final platform, glide down to safety and interact with the sigil. This will reward you with your well-earned Light of Blessing, marking the completion of the Jirutagumac Shrine and the “A Flying Device” trial.
Conclusion: Conquering the Flying Device Shrine
The Jirutagumac Shrine is a standout example of inventive shrine design in Tears of the Kingdom, effectively challenging players to think creatively about flying devices. By mastering the use of wings and fans, you’ve not only solved the “A Flying Device” trial but also honed your skills in aerial navigation and Zonai device manipulation. With the Light of Blessing in hand, continue your adventure across Hyrule, and explore other intriguing shrines and challenges that await.