Paper airplanes are a fantastic blend of fun and basic STEM principles, proving that creativity and learning can take flight with just a simple sheet of paper. For kids and adults alike, the question often arises: how do you make a paper airplane that doesn’t just glide, but truly soars? Becoming a paper airplane expert isn’t about complex techniques; it’s about understanding the fundamentals and practicing consistently. It’s about mastering the art of paper origami planes and grasping the science that governs their flight. While numerous designs exist, from walk-along gliders to batwing marvels, the desire to create a paper airplane that flies far and boasts an excellent design remains a captivating challenge.
At Flyermedia.net, we’re passionate about making the world of paper airplanes accessible and educational for everyone. We firmly believe that the joy of aviation should be universal. Let’s embark on a journey to craft a paper airplane together, using easy-to-follow, illustrated instructions. Get ready to experience the thrill of flight, right from your fingertips!
Two minutes for noodles? Maybe. But just three minutes to create a paper airplane that defies distance! It’s that simple with Flyermedia!
Supplies You’ll Need:
- Paper: A standard A4 sheet or Foolscap paper works perfectly. Opt for a weight of 70-90 GSM for optimal folding and flight.
- Creasing Tool: A ruler or any flat, firm object will help you create sharp, clean folds, crucial for a paper airplane that flies far.
Step-by-Step Instructions to Fold a Long-Distance Paper Airplane:
Step 1: The Initial Fold
- Begin with your A4 paper in portrait orientation (vertical). Fold the paper in half lengthwise, bringing the left edge to meet the right edge precisely, as shown in Fig. 1.
- Unfold the paper immediately after creasing. This center crease will serve as your guide for the subsequent folds, ensuring symmetry and balance, vital for long-distance flight.
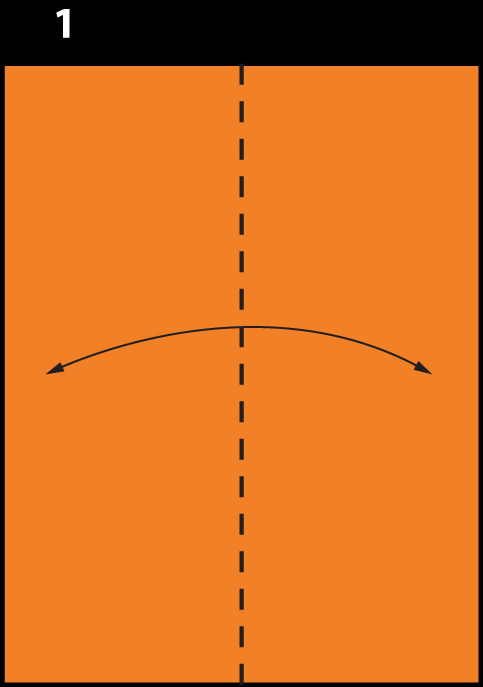 Initial vertical fold for a far-flying paper airplane
Step 2: Creating the Top Triangles
- Now, take the top left and top right corners of the paper and fold them inwards towards the center crease you just made.
- Align the edges precisely with the center crease line. It’s crucial that the points meet at the center without overlapping or crossing the midline. Accurate folds here contribute to the aerodynamic stability of your paper airplane, directly impacting how far it will fly.
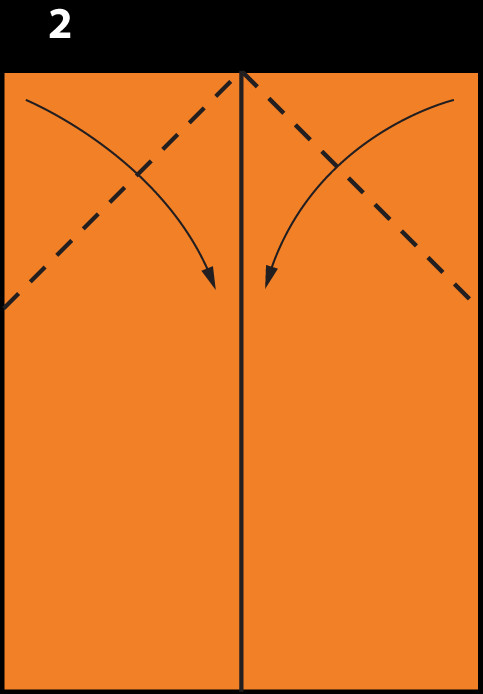 Folding top corners to the center crease for paper plane aerodynamics
Step 3: Folding the Nose Down
- Next, fold the nose (the pointed top you just created) downwards. Bring the tip of the nose down to the bottom edge of the paper.
- Align the top edge of this new fold precisely with the center crease. This fold shapes the fuselage of your paper airplane, streamlining its form for enhanced flight distance. Refer to Fig. 3 for visual guidance.
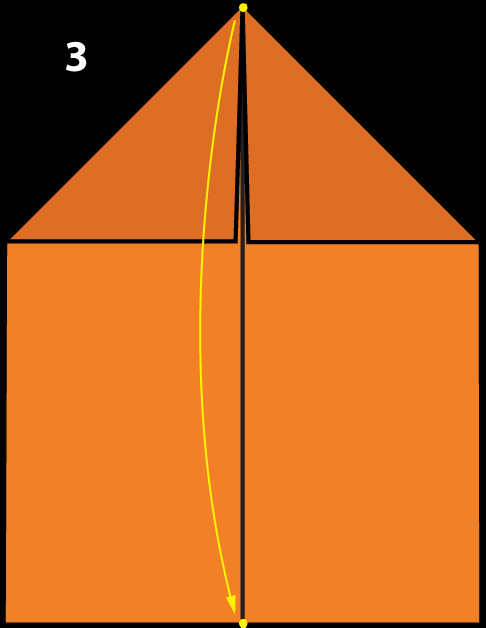 Shaping the fuselage by folding the nose down for distance
Step 4: The Inner Triangle Fold
- Fold the nose upwards again, creating a smaller triangle. This time, push the tip of the nose up so that its top edge aligns with the center crease once more, as illustrated in Fig. 4. This step adds weight to the nose, which is crucial for stability and allows the paper airplane to cut through the air more effectively, flying further.
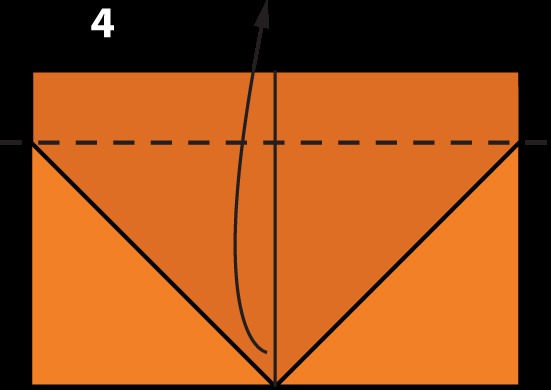 Creating nose weight with an inner triangle fold for stable flight
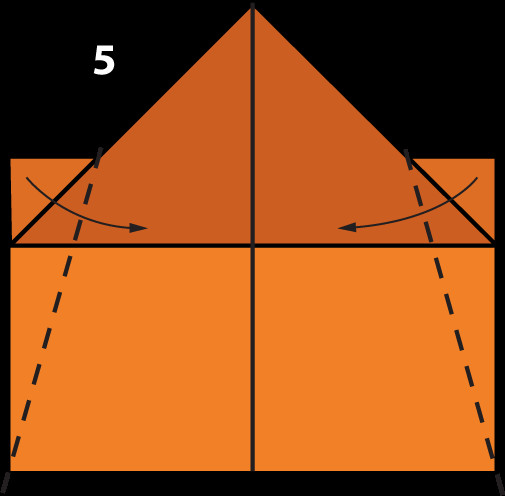
Step 5: Folding the Wing Sections
- Now, it’s time to shape the wings. Fold the right and left sides of the paper inwards to meet at the center crease.
- Imagine a line running down the center and fold along these lines, ensuring symmetry on both sides. These wing folds are critical for lift and glide, directly influencing the flight distance and stability of your paper airplane. See Fig. 5 for the fold lines.
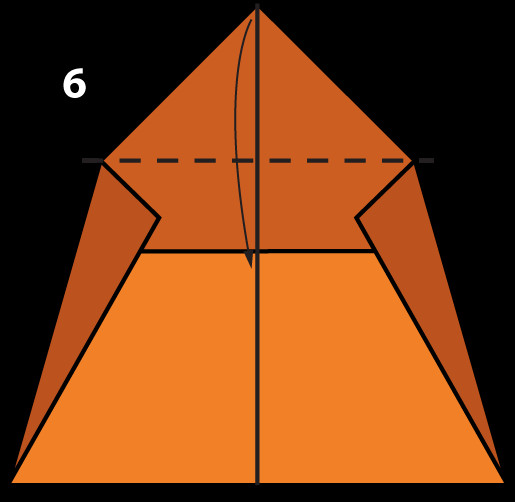
Step 6: Refining the Nose Fold
- Fold the nose down once more, using the dotted lines shown in Fig. 6 as a guide. This fold further refines the aerodynamic profile of the nose, reducing drag and improving how far your paper airplane can fly.
- Refer to Fig. 6 to ensure you’re folding along the correct lines and achieving the desired shape.
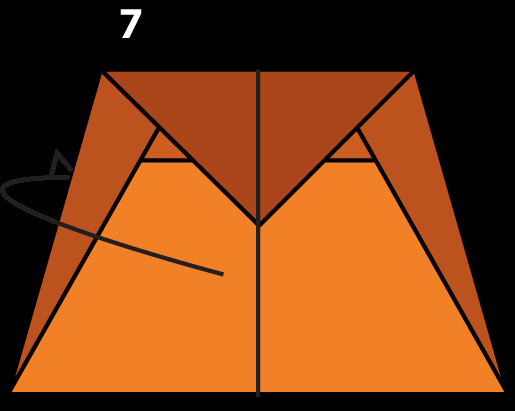
Step 7: Mountain Fold – Creating the Airplane Form
- Perform a mountain fold by folding the paper airplane in half along the original center crease, but this time, fold it backward, away from the nose.
- Carefully align the wings and the fuselage, ensuring perfect symmetry. Symmetry is key to balanced flight and achieving maximum distance. Check for any misalignments and correct them for optimal performance.
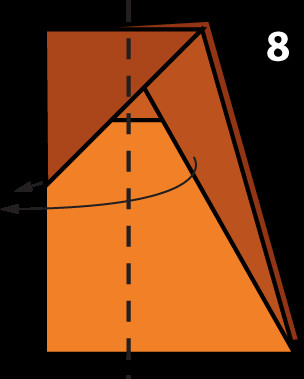
Step 8: Forming the Wings for Flight
- Create the wings by folding approximately 1 inch upwards from the bottom edge on both sides of the paper airplane. These wing folds generate lift as air flows over them, keeping your paper airplane airborne for longer distances.
- Ensure both wings are folded symmetrically for balanced flight.
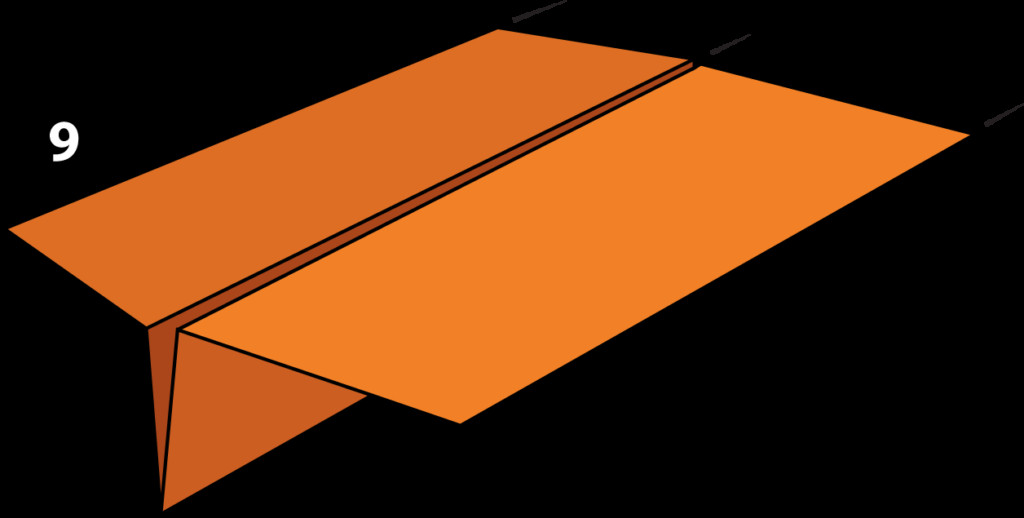
Step 9: Ready to Fly!
- Gently lift the wings so they form a slight ‘T’ shape when viewed from the front. This dihedral angle enhances stability during flight.
- Your long-distance paper airplane is now complete! The crucial step is now to find the perfect launch spot. An open field, a park, or even a spacious indoor auditorium are ideal locations. Now you know how to make a paper airplane that flies far, it’s time to test its limits!
 Ready to launch your far-flying paper airplane
Mastering the Throw: Flying Techniques for Maximum Distance
- The Grip: Hold your paper airplane gently, balancing it near its center of gravity. This point is typically around the middle of the fuselage.
- The Launch Angle: Stand with one foot slightly ahead of the other for balance. Launch the paper airplane at a 30-40 degree upward angle. This angle allows for a good balance between lift and forward momentum, crucial for distance.
- The Throwing Force: Throw the airplane with a steady, medium force. Avoid throwing too hard, which can cause it to stall, or too softly, which won’t provide enough initial velocity. Experiment with different forces to find what works best for your airplane design.
- Troubleshooting: If your paper airplane doesn’t fly as far as you’d like, or if it nosedives, make slight adjustments to the tail wings by gently bending them upwards. This can help adjust the plane’s pitch and improve its gliding ability.
- Experimentation is Key: Try launching at different angles and with varying forces. Practice is the best way to learn the nuances of flight and optimize your throwing technique. Through experimentation, you’ll truly master how to make paper airplanes fly far!
For more advanced techniques and a deeper understanding of the science behind paper airplane flight, explore resources on flight science and aerodynamics. You’ll discover a wealth of knowledge to further enhance your paper airplane skills and understanding beyond these basic instructions.
Share your flight experiences and any questions in the comments below! Happy flying!
© Flyermedia 2024. Illustrated instructions by Flyermedia.net. For content usage permissions, please contact flyermedia.net.