Drawing a bird in flight can be a rewarding artistic endeavor. If you’re struggling to capture the essence of avian motion and proportion, flyermedia.net is here to help. This guide offers a simplified method to achieve realistic and dynamic bird drawings, incorporating expert techniques and tips for aspiring artists. Let’s unlock your artistic potential and learn how to draw these majestic creatures soaring through the sky with realistic avian art, capturing the dynamic flight patterns and anatomy.
1. Why Is Learning How to Draw a Bird Flying Important?
Learning to draw a bird flying is important for several reasons:
- Capturing Freedom: A flying bird symbolizes freedom, and drawing it allows you to capture this essence on paper.
- Improving Observational Skills: Drawing requires keen observation, enhancing your ability to notice details in the natural world.
- Developing Artistic Skills: It helps develop essential drawing skills like proportion, perspective, and understanding movement.
- Expressing Creativity: Drawing allows you to express your creativity and imagination through art.
- Relaxation and Mindfulness: The act of drawing can be relaxing and meditative, providing a break from daily stress.
Drawing a bird in flight helps you grasp dynamic form, an essential skill for any artist. According to research from Embry-Riddle Aeronautical University, understanding avian aerodynamics can improve your drawing accuracy.
2. What are the Key Elements to Consider When Drawing a Bird Flying?
When drawing a bird flying, focus on these key elements:
- Proportion: Ensure the body, wings, and tail are correctly proportioned.
- Anatomy: Understand the basic skeletal and muscular structure of a bird.
- Wing Position: Pay attention to how the wings move in different stages of flight.
- Angle: Consider the angle at which you are viewing the bird.
- Movement: Convey a sense of motion and energy in your drawing.
Paying attention to these details will result in more accurate and compelling depictions of birds in flight.
3. What Materials Do I Need To Draw a Bird Flying?
To begin drawing a bird flying, gather the following materials:
- Pencils: Use a range of pencils (e.g., 2H, HB, 2B) for sketching and shading.
- Eraser: A kneaded eraser is ideal for lifting graphite without damaging the paper.
- Paper: Choose smooth drawing paper for detailed work or textured paper for a more artistic effect.
- Reference Photos: Gather images of birds in flight from various angles.
- Tracing Paper: Useful for simplifying complex shapes and proportions.
- Optional: Colored Pencils or Markers: If you want to add color to your drawing.
Having these materials will prepare you for a successful drawing session.
4. How Do I Start Drawing a Bird Flying With Basic Shapes?
Start by breaking down the bird’s form into basic shapes:
- Body: Begin with an oval for the body.
- Wings: Add long, curved shapes for the wings, noting their position and angle.
- Head: Draw a small circle or oval for the head.
- Tail: Add a triangular or fan-shaped tail.
- Connect: Use light lines to connect these shapes, forming the basic outline of the bird.
This method helps establish the overall structure and proportions before adding details.
5. What Are Some Techniques for Capturing the Sense of Movement in Flight?
To capture the sense of movement in flight, try these techniques:
- Dynamic Lines: Use curved and flowing lines to suggest motion.
- Overlapping Shapes: Show the wings overlapping the body to indicate depth and movement.
- Blurring: Lightly blur the edges of the wings to create a sense of speed.
- Angle of Attack: Emphasize the angle of the wings relative to the body.
- Feather Detail: Use quick, gestural strokes to suggest the movement of feathers.
These techniques will bring your drawing to life, conveying the dynamic energy of a bird in flight.
6. How to Simplify the Bird’s Anatomy for Drawing Purposes?
Simplify the bird’s anatomy by focusing on essential elements:
- Skeleton: Visualize the basic skeletal structure, especially the wing bones.
- Muscles: Understand how the major muscle groups influence the shape of the bird.
- Feathers: Represent feathers as simplified shapes, paying attention to their direction and overlap.
- Proportions: Maintain accurate proportions between the head, body, wings, and tail.
Simplifying the anatomy makes it easier to create a convincing drawing without getting bogged down in excessive detail.
7. What Are the Different Wing Positions in Flight and How Do I Draw Them?
Different wing positions convey different stages of flight:
- Upstroke: Wings are raised, creating lift. Draw them angled upward, with feathers spread.
- Downstroke: Wings are lowered, propelling the bird forward. Draw them angled downward, with feathers compressed.
- Gliding: Wings are extended horizontally, maintaining altitude. Draw them straight and level, with minimal feather movement.
- Hovering: Wings move rapidly up and down, allowing the bird to stay in one place. Draw them blurred and in multiple positions simultaneously.
Understanding these positions will add realism to your drawings.
8. How Can Negative Space Help Me Draw a Bird Flying Accurately?
Negative space (the space around the bird) can be a valuable tool:
- Observe: Pay attention to the shapes formed by the air around the bird.
- Compare: Use these shapes to check the accuracy of your drawing.
- Adjust: Adjust your drawing until the negative space matches the reference photo.
Using negative space helps you see the overall composition more clearly and identify areas for improvement.
9. How Do I Add Details Like Feathers and Facial Features?
Add details gradually:
- Feathers: Start with the larger flight feathers, then fill in the smaller contour feathers.
- Facial Features: Focus on the eye, beak, and any distinctive markings.
- Texture: Use hatching and cross-hatching to create texture and depth.
- Light and Shadow: Pay attention to how light falls on the bird, creating highlights and shadows.
Adding details carefully will enhance the realism and visual appeal of your drawing.
10. What Are Some Common Mistakes to Avoid When Drawing Birds in Flight?
Avoid these common mistakes:
- Incorrect Proportions: Double-check the proportions of the body, wings, and tail.
- Stiff Wing Positions: Ensure the wings look natural and dynamic.
- Ignoring Anatomy: Have a basic understanding of bird anatomy.
- Lack of Movement: Convey a sense of motion and energy in your drawing.
- Overdetailing: Don’t get bogged down in excessive detail too early in the process.
Avoiding these pitfalls will help you create more successful and convincing drawings.
11. How Can I Use Reference Photos Effectively?
Use reference photos strategically:
- Gather: Collect photos from various angles and in different lighting conditions.
- Analyze: Study the proportions, anatomy, and wing positions.
- Simplify: Break down complex shapes into basic forms.
- Adapt: Don’t copy the photo exactly; use it as a guide and adapt it to your own style.
- Practice: Draw the same bird multiple times to improve your understanding.
Effective use of reference photos will improve your accuracy and confidence.
12. How Do I Create a Sense of Depth in My Drawing?
Create depth using these techniques:
- Overlapping: Place some elements in front of others to create a sense of layering.
- Size Variation: Make objects appear smaller as they recede into the distance.
- Atmospheric Perspective: Lighten the values and soften the edges of distant objects.
- Detail: Add more detail to objects in the foreground and less detail to objects in the background.
- Value Contrast: Use a wider range of values in the foreground and a narrower range in the background.
These techniques will add dimension and realism to your drawing.
13. What Is the Importance of Line Weight in Drawing a Bird Flying?
Line weight is crucial for defining shapes and creating depth:
- Outline: Use thicker lines for the outline of the bird to make it stand out.
- Details: Use thinner lines for internal details like feathers and facial features.
- Shadows: Use thicker, darker lines to indicate shadows.
- Highlights: Use thinner, lighter lines to indicate highlights.
- Variation: Vary the line weight to create visual interest and emphasis.
Varying line weight adds depth and dimension to your drawing.
14. How to Use Shading Techniques to Enhance the Realism?
Use shading techniques to create form and realism:
- Hatching: Use parallel lines to create value.
- Cross-hatching: Use intersecting lines to create darker values.
- Stippling: Use dots to create value and texture.
- Blending: Use a blending stump or your finger to smooth out values.
- Value Range: Use a full range of values from light to dark to create depth.
These techniques will add dimension and realism to your drawing.
15. What Role Does Perspective Play in Drawing Birds?
Perspective influences how we see and draw birds:
- Foreshortening: Understand how objects appear shorter when viewed at an angle.
- Vanishing Points: Consider how lines converge towards a vanishing point in the distance.
- Eye Level: Be aware of your eye level and how it affects the appearance of the bird.
- Atmospheric Perspective: Use lighter values and softer edges for distant birds.
Understanding perspective will improve the accuracy and realism of your drawings.
16. How Do I Practice Drawing Birds Flying Regularly?
Regular practice is essential for improvement:
- Daily Sketches: Dedicate time each day to sketch birds in flight.
- Reference Photos: Use reference photos to study proportions and anatomy.
- Gesture Drawings: Practice quick gesture drawings to capture movement.
- Long Studies: Create detailed studies to improve your understanding.
- Vary Subjects: Draw different types of birds in various poses.
Consistent practice will build your skills and confidence.
17. How Can I Find Inspiration for My Bird Drawings?
Find inspiration from various sources:
- Nature: Observe birds in their natural habitat.
- Photography: Study photos of birds in flight by professional photographers.
- Art Books: Look at drawings and paintings of birds by master artists.
- Online Communities: Join online forums and groups to share your work and get feedback.
- Museums: Visit natural history museums to see bird specimens and exhibits.
Surrounding yourself with inspiration will fuel your creativity.
18. What Are Some Advanced Techniques for Drawing Birds in Flight?
Explore advanced techniques to elevate your drawings:
- Dynamic Composition: Create a sense of movement and energy through composition.
- Anatomical Accuracy: Study bird anatomy in detail to improve realism.
- Feather Detail: Render individual feathers with precision and care.
- Lighting Effects: Use advanced shading techniques to create dramatic lighting effects.
- Backgrounds: Add detailed backgrounds to create context and atmosphere.
Mastering these techniques will set your drawings apart.
19. How Can I Develop My Own Style of Drawing Birds?
Develop your unique style by:
- Experimenting: Try different techniques and approaches.
- Personal Expression: Infuse your drawings with your own personality and emotions.
- Simplification: Simplify details to create a more stylized look.
- Exaggeration: Exaggerate certain features to create a more dramatic effect.
- Inspiration: Draw inspiration from other artists but don’t copy their style.
Developing your own style will make your drawings more distinctive and personal.
20. How Do I Create a Story With My Bird Drawings?
Use your drawings to tell a story by:
- Context: Place the bird in a specific environment.
- Action: Show the bird engaged in a particular activity.
- Emotion: Convey the bird’s emotions through its expression and posture.
- Symbolism: Use the bird as a symbol to represent a larger theme or idea.
- Narrative: Create a series of drawings that tell a complete story.
Adding a narrative element will make your drawings more engaging and meaningful.
21. How To Draw a Bird Flying With Different Mediums?
Experiment with different mediums to explore various effects:
- Pencil: Ideal for detailed drawings and precise shading.
- Charcoal: Perfect for creating dramatic lighting effects and bold textures.
- Ink: Use ink for clean, crisp lines and bold contrasts.
- Watercolor: Great for creating soft, atmospheric effects and vibrant colors.
- Colored Pencils: Use colored pencils for detailed color work and realistic textures.
Exploring different mediums will expand your artistic toolkit and allow you to create a wider range of effects.
22. How Can I Critique My Own Bird Drawings Effectively?
Critique your own drawings by:
- Objectivity: Step back and view your work as if it were created by someone else.
- Strengths: Identify the strongest aspects of your drawing.
- Weaknesses: Identify areas that need improvement.
- Comparison: Compare your drawing to reference photos and other artists’ work.
- Feedback: Ask for feedback from other artists and be open to constructive criticism.
Effective self-critique will help you identify areas for improvement and track your progress.
23. What Are Some Tips for Drawing Specific Types of Birds in Flight?
Drawing different types of birds requires attention to specific details:
- Eagles: Focus on their large wingspan and powerful flight.
- Hummingbirds: Emphasize their rapid wingbeats and small size.
- Swans: Capture their elegant necks and graceful flight.
- Owls: Highlight their silent flight and distinctive facial features.
- Seagulls: Focus on their gliding flight and coastal habitat.
Paying attention to these details will make your drawings more accurate and convincing.
24. How Do I Create a Bird Flying With Digital Drawing Tools?
Digital drawing tools offer many advantages:
- Software: Use software like Adobe Photoshop, Procreate, or Corel Painter.
- Tablet: Invest in a graphics tablet with pressure sensitivity.
- Brushes: Experiment with different brushes to create various effects.
- Layers: Use layers to organize your drawing and make adjustments.
- Undo: Take advantage of the undo function to correct mistakes.
Digital drawing tools can streamline your workflow and offer greater flexibility.
25. How to Combine Different Techniques to Draw a Bird Flying?
Combining techniques can lead to unique and innovative results:
- Pencil and Watercolor: Use pencil for detailed linework and watercolor for soft washes of color.
- Ink and Charcoal: Combine ink for bold outlines and charcoal for dramatic shading.
- Digital and Traditional: Create a digital sketch and then add traditional media on top.
- Layering: Layer different techniques to create depth and texture.
Experimenting with different combinations will expand your artistic possibilities.
26. What Resources Are Available for Learning More About Drawing Birds?
Numerous resources are available to help you learn more:
- Books: “The Laws Guide to Drawing Birds” by John Muir Laws is an excellent resource.
- Online Courses: Websites like Skillshare and Udemy offer courses on bird drawing.
- YouTube: Many artists share tutorials and demonstrations on YouTube.
- Websites: Websites like flyermedia.net offer articles and tutorials on various art topics.
- Workshops: Attend workshops and classes taught by experienced artists.
Taking advantage of these resources will accelerate your learning and development.
27. How Do I Preserve and Display My Bird Drawings?
Preserve and display your drawings properly:
- Storage: Store your drawings in a protective portfolio or archival sleeves.
- Framing: Frame your drawings behind UV-protective glass to prevent fading.
- Lighting: Avoid displaying your drawings in direct sunlight or under harsh lighting.
- Archival Materials: Use archival-quality paper and drawing materials.
- Digital Copies: Create digital copies of your drawings to preserve them in case of damage.
Proper preservation will ensure that your drawings last for years to come.
28. How Can I Connect With Other Bird Artists?
Connect with other bird artists by:
- Online Communities: Join online forums and groups dedicated to bird art.
- Social Media: Follow bird artists on Instagram, Facebook, and other platforms.
- Art Shows: Attend art shows and exhibitions featuring bird art.
- Workshops: Participate in workshops and classes to meet other artists.
- Local Art Groups: Join local art groups and organizations.
Connecting with other artists will provide support, inspiration, and opportunities for collaboration.
29. What Are the Benefits of Sketching Birds in Flight Regularly?
Regularly sketching birds in flight offers numerous benefits:
- Improved Observation: Enhances your ability to observe and capture details.
- Skill Development: Sharpens your drawing skills and techniques.
- Creativity: Stimulates your creativity and imagination.
- Relaxation: Provides a relaxing and meditative activity.
- Personal Growth: Fosters personal growth and self-expression.
Consistent sketching will lead to significant improvements in your artistic abilities.
30. How To Draw a Bird Flying for Beginners: Step-by-Step Guide
For beginners, here’s a step-by-step guide to drawing a bird flying:
- Basic Shapes: Start with simple shapes like ovals and lines to outline the bird’s body, wings, and tail.
- Proportions: Ensure the proportions are accurate by comparing your drawing to a reference photo.
- Wing Position: Draw the wings in a dynamic position, either upstroke or downstroke.
- Details: Add basic details like feathers, eyes, and beak.
- Shading: Use light shading to create form and depth.
- Refine: Refine your drawing by adjusting lines and adding more details.
- Practice: Practice drawing birds in flight regularly to improve your skills.
This step-by-step guide will help you get started and build your confidence.
31. Can Understanding Avian Aerodynamics Improve My Bird Drawings?
Yes, understanding avian aerodynamics can significantly improve your bird drawings:
- Wing Movement: Understanding how birds use their wings to generate lift and thrust.
- Feather Structure: Learning about the structure of feathers and how they contribute to flight.
- Body Shape: Understanding how a bird’s body shape affects its aerodynamics.
- Flight Patterns: Studying different flight patterns and how they are influenced by aerodynamics.
Knowledge of avian aerodynamics will allow you to create more realistic and dynamic drawings.
32. How Can Studying Different Bird Species Influence My Art?
Studying different bird species can greatly enrich your art:
- Diversity: Explore the wide variety of bird species, each with unique characteristics.
- Anatomy: Learn about the anatomical differences between species.
- Plumage: Study the diverse patterns and colors of bird plumage.
- Behavior: Observe the different behaviors of various species.
- Habitat: Consider the habitats in which different birds live.
This knowledge will allow you to create more varied and interesting bird drawings.
33. What Are Some Techniques for Drawing Feathers Realistically?
Drawing feathers realistically requires attention to detail:
- Individual Feathers: Draw individual feathers with care, paying attention to their shape and texture.
- Overlapping: Show how feathers overlap each other to create depth.
- Direction: Pay attention to the direction of the feathers and how they follow the form of the bird.
- Light and Shadow: Use light and shadow to create volume and dimension.
- Details: Add small details like barbs and barbules to enhance realism.
These techniques will help you create feathers that look lifelike and convincing.
34. How Can I Use Color to Enhance My Bird Drawings?
Color can add vibrancy and realism to your drawings:
- Color Palette: Choose a color palette that is appropriate for the bird you are drawing.
- Layering: Layer colors to create depth and dimension.
- Blending: Blend colors to create smooth transitions.
- Highlights and Shadows: Use highlights and shadows to create form and volume.
- Reference: Use reference photos to accurately depict the colors of the bird’s plumage.
Careful use of color will bring your bird drawings to life.
35. How Do I Practice Drawing Birds From Memory?
Drawing from memory is a great way to test your knowledge and improve your skills:
- Study: Study reference photos carefully before attempting to draw from memory.
- Simplify: Simplify the bird’s form into basic shapes and proportions.
- Visualize: Visualize the bird in your mind before you start drawing.
- Practice: Practice drawing the same bird multiple times from memory.
- Compare: Compare your drawing to reference photos to identify areas for improvement.
Regular practice will improve your ability to draw birds from memory.
36. What Are Some Tips for Drawing Birds in Different Weather Conditions?
Drawing birds in different weather conditions can add interest and drama to your art:
- Rain: Show the bird’s feathers wet and ruffled, with water droplets clinging to them.
- Snow: Depict the bird with snow clinging to its feathers, and use a muted color palette.
- Wind: Show the bird’s feathers blowing in the wind, and emphasize the sense of movement.
- Fog: Use soft, diffused lighting to create a sense of mystery and atmosphere.
- Sunlight: Capture the bright, vibrant colors and sharp shadows of a sunny day.
Paying attention to weather conditions will add depth and realism to your drawings.
37. How Can I Use Composition to Create a Dynamic Bird Drawing?
Composition is key to creating a dynamic and engaging drawing:
- Rule of Thirds: Place the bird off-center to create a more visually interesting composition.
- Leading Lines: Use lines to guide the viewer’s eye towards the bird.
- Negative Space: Use negative space to create balance and emphasis.
- Focal Point: Make the bird the focal point of the drawing.
- Movement: Create a sense of movement and energy through composition.
Effective composition will enhance the visual impact of your drawing.
38. How Can I Find a Mentor to Help Me Improve My Bird Drawings?
Finding a mentor can greatly accelerate your artistic growth:
- Local Artists: Look for experienced bird artists in your local community.
- Online Communities: Connect with artists in online forums and groups.
- Workshops: Attend workshops and classes taught by experienced artists.
- Art Schools: Enroll in art classes or workshops at a local art school.
- Networking: Network with artists at art shows and exhibitions.
A mentor can provide valuable guidance, feedback, and support.
39. How To Draw a Bird Flying for Animation?
Drawing a bird flying for animation requires understanding movement and timing:
- Keyframes: Plan out the keyframes of the bird’s flight, such as the upstroke, downstroke, and gliding positions.
- In-Between Frames: Draw the in-between frames to create smooth transitions between the keyframes.
- Timing: Adjust the timing of the frames to create a realistic sense of movement.
- Looping: Create a looping animation by making the first and last frames match up seamlessly.
- Software: Use animation software like Adobe Animate or Toon Boom Harmony.
Creating a bird flying for animation requires patience, practice, and attention to detail.
40. Where Can I Showcase My Bird Drawings Online?
Showcase your bird drawings online to get feedback and connect with other artists:
- Instagram: Share your drawings on Instagram using relevant hashtags.
- ArtStation: Create a portfolio on ArtStation to showcase your best work.
- DeviantArt: Share your drawings on DeviantArt and connect with other artists.
- Facebook: Join art groups on Facebook and share your drawings.
- Personal Website: Create a personal website to showcase your drawings and promote your art.
Showcasing your work online can help you build an audience and advance your career.
Ready to take your avian artistry to new heights? Visit flyermedia.net for a wealth of resources, from in-depth tutorials to the latest news in aviation and art. Unleash your creative potential and explore the boundless possibilities that await. Whether you’re looking to refine your drawing skills, stay informed about the aviation industry, or discover exciting career opportunities, flyermedia.net is your go-to destination.
Don’t just dream of drawing a bird in flight, make it a reality. Visit flyermedia.net today and start your journey towards artistic mastery!
Address: 600 S Clyde Morris Blvd, Daytona Beach, FL 32114, United States
Phone: +1 (386) 226-6000
Website: flyermedia.net
FAQ: How to Draw a Bird Flying
- What’s the first step in drawing a bird in flight? Start by sketching basic shapes to outline the bird’s body and wings.
- How do I capture the bird’s movement? Use dynamic lines and show the wings in motion, either upstroke or downstroke.
- Is it important to understand bird anatomy? Yes, a basic understanding of bird anatomy helps in drawing realistic proportions.
- How can I make my bird drawing look more realistic? Add details like feathers and use shading to create depth and volume.
- What’s the best way to learn drawing techniques? Practice regularly, use reference photos, and seek feedback from other artists.
- Can I draw birds in flight using digital tools? Yes, software like Photoshop and Procreate are excellent for digital bird drawings.
- How do I create a sense of depth in my bird drawing? Use overlapping elements, size variation, and atmospheric perspective.
- What materials do I need to draw a bird in flight? Pencils, eraser, drawing paper, and reference photos are essential.
- How can negative space help me draw accurately? Use the space around the bird to check proportions and overall shape.
- Where can I find inspiration for drawing birds? Observe nature, study photos, and explore art books.
 Simplified bird outline to assess proportions, highlighting angles between body parts for accurate drawing.
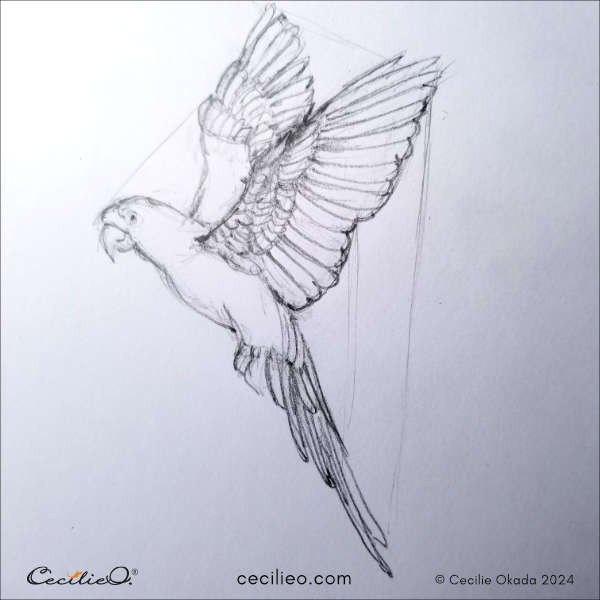 Sketch of a Macaw in flight, showcasing the artist's interpretation of avian movement and form.
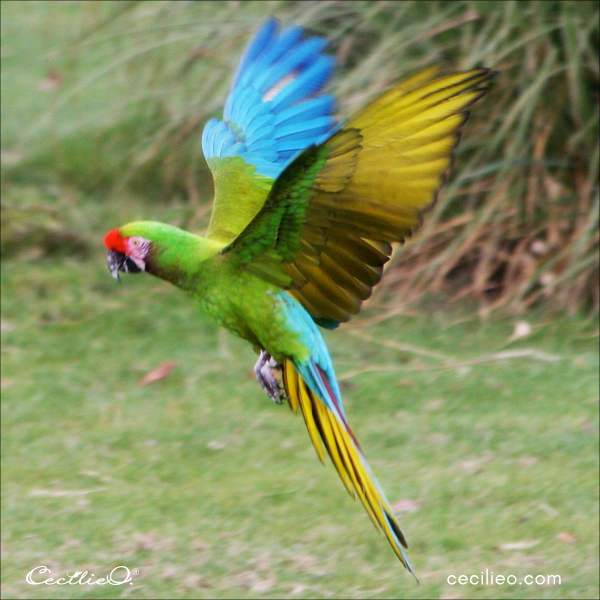 Reference photo of a flying Macaw, used to inspire and guide the artist in capturing the bird's anatomy and posture.
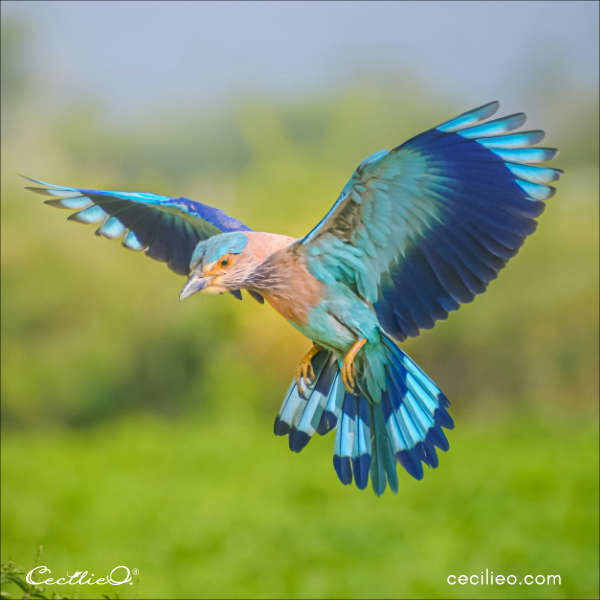 Reference image of an Indian Roller bird in flight, providing visual details for artists aiming to replicate its unique features.
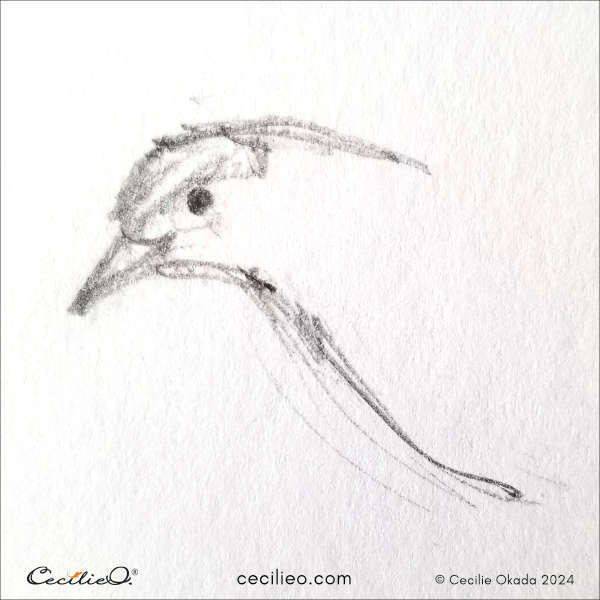 Initial sketch phase of a bird in flight, focusing on simplified lines to establish the basic form and structure.
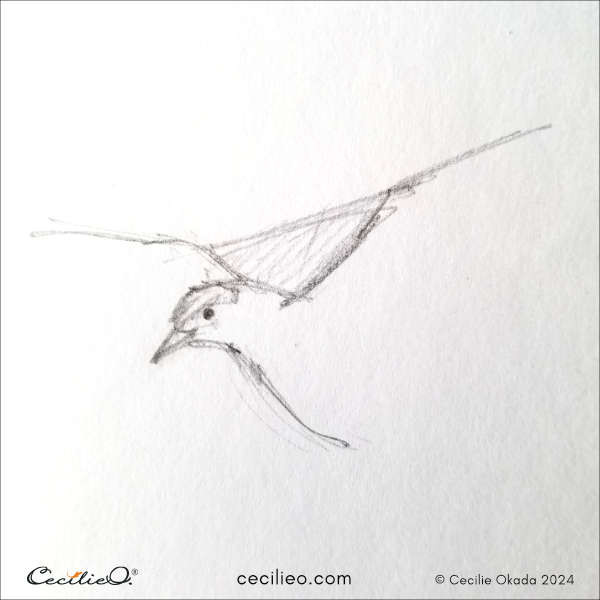 Second step in sketching a flying bird, emphasizing the importance of negative space to refine the accuracy of the drawing.
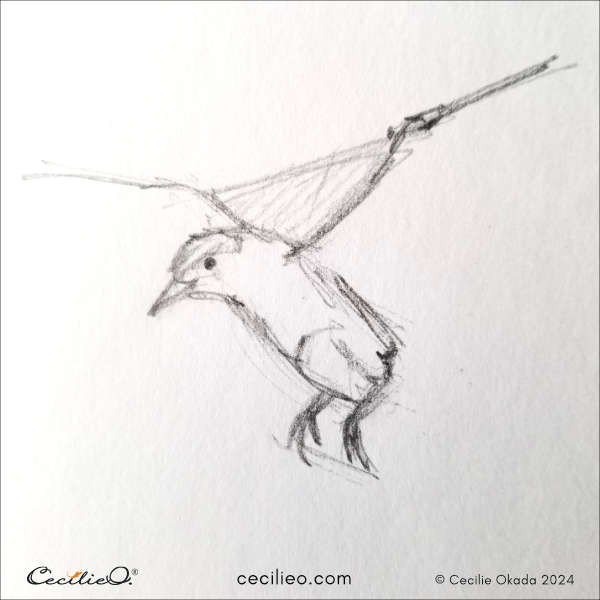 Third step in illustrating a bird mid-flight, adding more details to the body based on the established proportions and negative space.
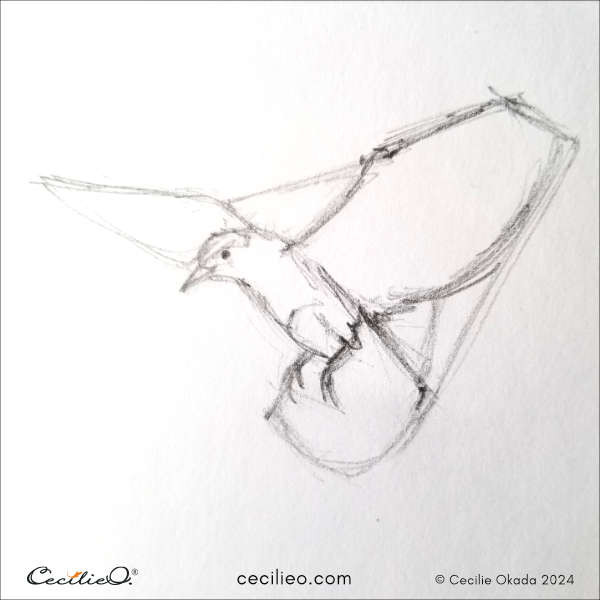 Step four in sketching a flying bird, outlining the wings and tail while assessing their angles relative to the body.
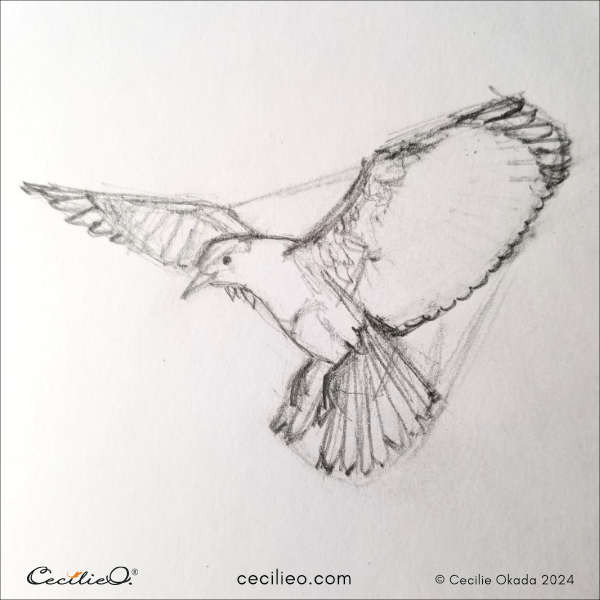 Fifth step in drawing a bird mid-flight, detailing the feathers to enhance realism and texture within the overall composition.
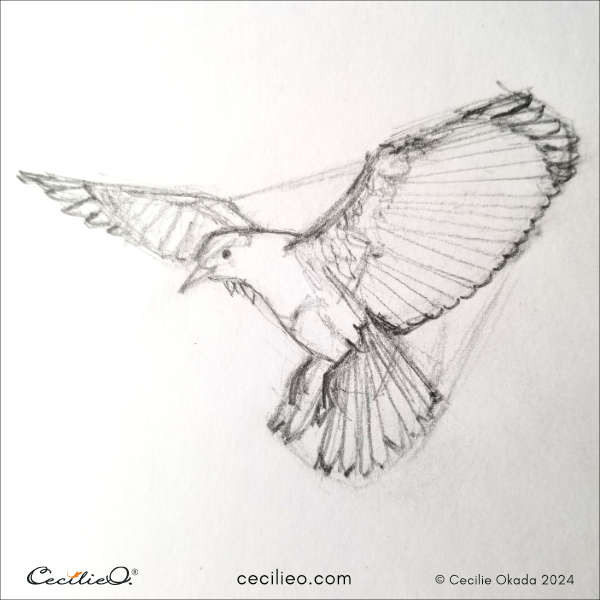 Step six in sketching a flying bird from a complex angle, illustrating the process of drawing a simple outline first.
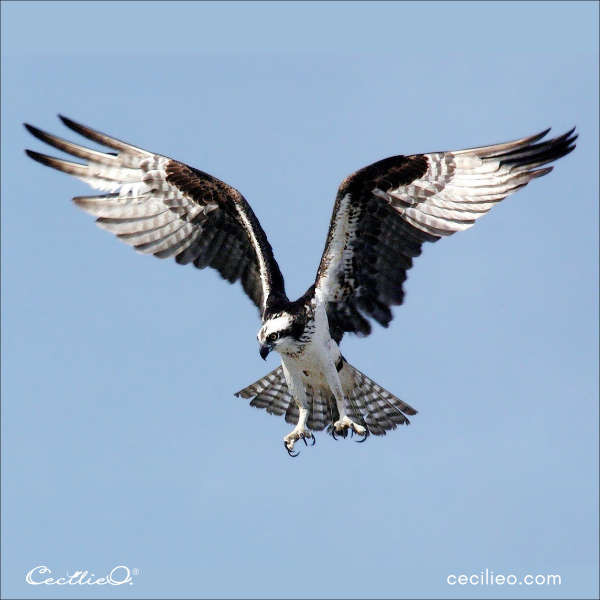 Reference photograph of an Osprey in flight, providing visual cues for artists to capture its unique form and features accurately.
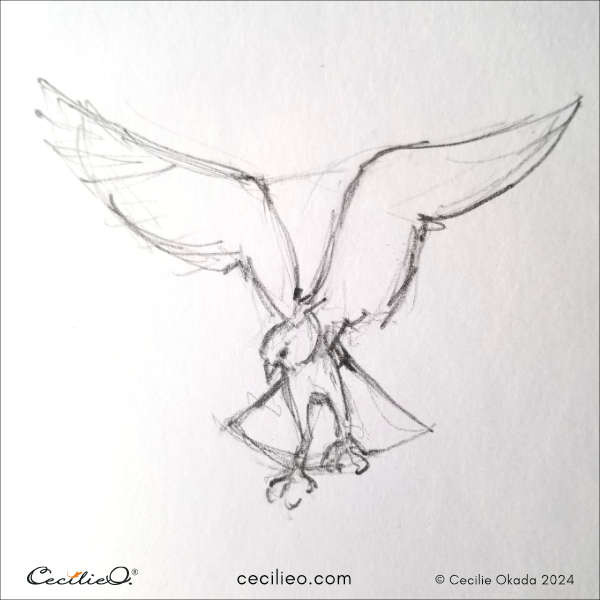 First outline drawing of an Osprey, demonstrating the initial steps in capturing the bird's proportions and dynamic pose.
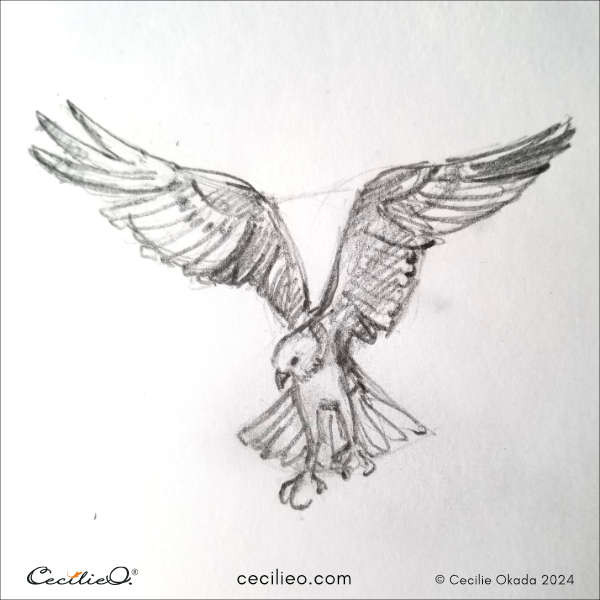 Final sketch of an Osprey bird, showcasing the completed artwork with detailed feathers and accurate anatomical features.
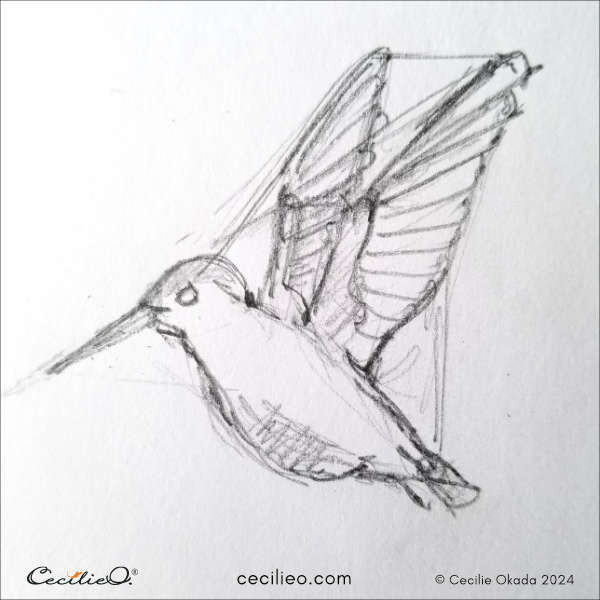 Quick hummingbird sketch, highlighting ease of drawing this species due to its side view and even proportions.
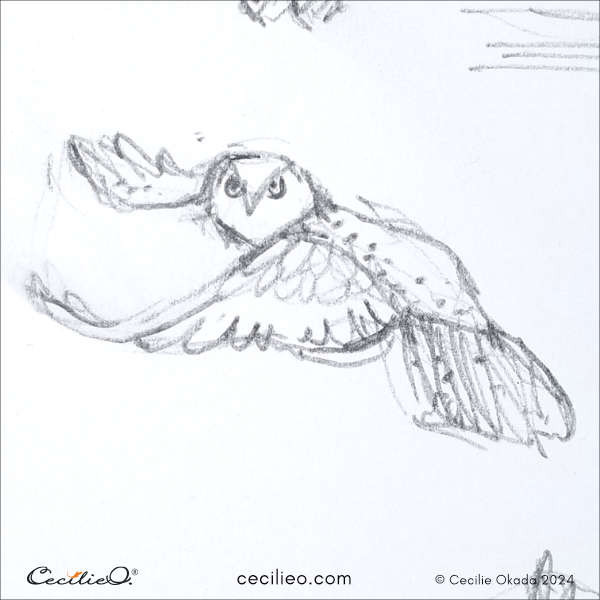 Rapid sketch of a barn owl in flight, capturing its essence with minimal detail as a warm-up exercise for artists.
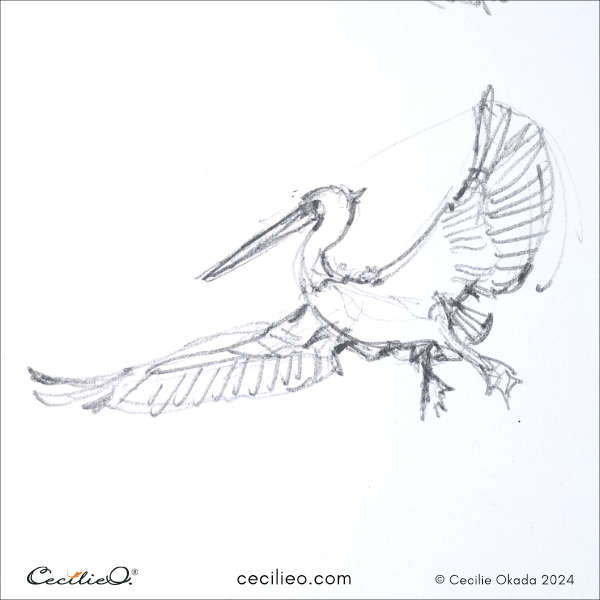 Quick drawing of a Heron in flight, exemplifying the use of fast scribbles to capture the shape and movement effectively.