How To Make A Good Flying Paper Airplane involves more than just a few simple folds; it’s an art and science. At flyermedia.net, we’re passionate about all things aviation, including the simple joy of crafting the perfect paper airplane. This guide will teach you how to construct paper airplanes that truly soar, combining aerodynamic principles with easy-to-follow instructions. Discover the best techniques and designs for creating paper airplanes that excel in distance, stability, and flight time.
1. Understanding the Aerodynamics of Paper Airplanes
1.1 What Makes a Paper Airplane Fly?
The principles of flight apply to paper airplanes just as they do to real aircraft. Four main forces are at play: lift, weight, thrust, and drag.
- Lift: This is the force that opposes gravity and keeps the airplane in the air. It’s generated by the shape of the wings, which are designed to create a pressure difference. Air flowing over the top of the wing travels faster than the air flowing underneath, creating lower pressure above and higher pressure below, resulting in lift.
- Weight: This is the force of gravity pulling the airplane down. It’s determined by the mass of the paper and the strength of the gravitational field.
- Thrust: This is the force that propels the airplane forward. In a paper airplane, thrust comes from the thrower’s arm.
- Drag: This is the force that opposes thrust and slows the airplane down. It’s caused by air resistance and depends on the airplane’s shape, size, and speed.
To make a paper airplane fly well, you need to maximize lift and thrust while minimizing weight and drag.
1.2 Key Design Elements for Optimal Flight
Several design elements can help optimize a paper airplane’s flight performance:
- Wing Shape: The shape of the wings is crucial for generating lift. Wings with a slight curve (camber) on top and a flatter surface underneath tend to produce more lift.
- Wing Size: Larger wings provide more surface area for lift, but they also increase drag. A balance needs to be struck between wing size and drag.
- Aspect Ratio: This is the ratio of the wingspan (the distance from wingtip to wingtip) to the wing chord (the distance from the leading edge to the trailing edge). High-aspect-ratio wings (long and narrow) tend to produce more lift and less drag, making them suitable for gliding.
- Dihedral Angle: This is the upward angle of the wings from the fuselage (the body of the airplane). A dihedral angle provides stability by helping the airplane right itself if it rolls to one side.
- Weight Distribution: The distribution of weight along the airplane’s length affects its stability and flight characteristics. Generally, a slightly nose-heavy airplane is more stable.
- Symmetry: Symmetry is essential for stable flight. If the wings are not symmetrical, the airplane will tend to turn to one side.
1.3 Materials Matter: Choosing the Right Paper
The type of paper you use can also affect the performance of your paper airplane.
- Weight: Lighter paper is generally better for paper airplanes, as it reduces weight and allows for longer flight times. However, very thin paper can be flimsy and difficult to fold.
- Thickness: Thicker paper is more durable and can hold its shape better, but it also adds weight.
- Texture: Smooth paper reduces drag, while rough paper increases it.
- Size: The size of the paper determines the size of the airplane. Larger paper can be used to make larger airplanes, but it also increases weight.
A standard sheet of 8.5 x 11 inch (21.6 x 27.9 cm) printer paper is a good starting point. You can also experiment with different types of paper to see how they affect your airplane’s performance.
2. Essential Tools and Materials
Before you start folding, gather these essential tools and materials:
- Paper: As mentioned above, standard printer paper is a good choice. You can also use cardstock for more durable airplanes or lightweight paper for longer flight times.
- Ruler: A ruler can help you make precise folds and measurements.
- Scissors: Scissors can be used to trim the wings or make other modifications to the airplane.
- Pencil: A pencil can be used to mark folding lines or draw designs on the airplane.
- Paper Clips: Paper clips can be used to add weight to the nose of the airplane, which can improve its stability.
- Tape: Tape can be used to reinforce folds or repair tears in the paper.
- A Flat Surface: A flat surface is essential for making accurate folds.
3. Beginner-Friendly Paper Airplane Designs
3.1 The Classic Dart
The Classic Dart is one of the simplest and most recognizable paper airplane designs. It’s easy to fold and flies well, making it a great choice for beginners.
Instructions:
- Fold the paper in half lengthwise and then unfold. This creates a center crease.
- Fold the top two corners down so that they meet at the center crease.
- Fold the top edges down again so that they meet at the center crease.
- Fold the airplane in half along the center crease, with the folds on the outside.
- Fold the wings down so that they are perpendicular to the fuselage.
- Adjust the wings and tail for optimal flight.
3.2 The Simple Glider
The Simple Glider is another easy-to-fold paper airplane that is known for its stability and long glide times.
Instructions:
- Fold the paper in half lengthwise and then unfold. This creates a center crease.
- Fold the top two corners down so that they meet at the center crease.
- Fold the top edges down again so that they meet at the center crease.
- Fold the airplane in half along the center crease, with the folds on the inside.
- Fold the wings down so that they are perpendicular to the fuselage.
- Make a small cut in the back of each wing to create flaps.
- Adjust the flaps for optimal glide.
3.3 The Bulldog Dart
As mentioned in the original article, the Bulldog Dart is a simple design that’s great for beginners. It’s easy to fold and flies well, especially at lower speeds.
Instructions:
- Fold the paper in half lengthwise and then unfold.
- Fold the top two corners down so they meet the center crease.
- Flip the plane over, and fold the corners in again to the center crease.
- Fold the top point down so that the tip meets the bottom of where the previous folds come together.
- Fold the entire plane in half, in on itself.
- Fold the wings down so that you’re making a straight line across from the top of the snub nose. Repeat on the other side.
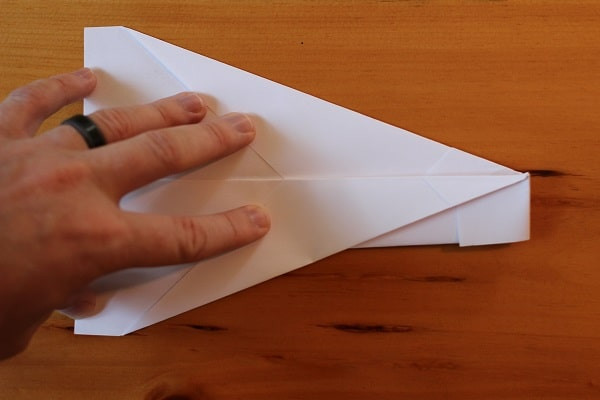 Diagram of the Bulldog Dart paper airplane design.
4. Intermediate Paper Airplane Designs
4.1 The Harrier
The Harrier is a step up in complexity from the beginner designs. It has a few more folds and flies a bit better than the Classic Dart or Simple Glider.
Instructions:
- Fold in half lengthwise and then unfold.
- Fold the top corners in so they meet at the center crease.
- Fold the entire top down so that it resembles an envelope. Make sure you leave a half inch or so at the bottom — you don’t want the top point to evenly meet the bottom edge.
- Fold the top corners in so they meet at the middle. There should be a small triangle tail hanging out beneath these folds.
- Fold that small triangle up to hold those previous folds in place.
- Fold in half, but make you sure you fold it outwards on itself, not inwards. You want the previous triangular fold to be visible on the bottom edge.
- Fold the wing down so its edge meets the bottom edge of the airplane. Repeat on the other side.
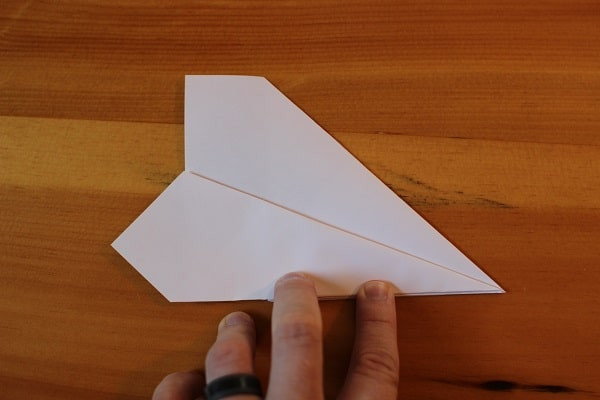 Diagram of the Harrier paper airplane design.
4.2 The Arrowhead
The Arrowhead is a sleek and aerodynamic paper airplane that is known for its speed and accuracy.
Instructions:
- Fold the paper in half lengthwise and then unfold. This creates a center crease.
- Fold the top two corners down so that they meet at the center crease.
- Fold the top edges down again so that they meet at the center crease.
- Fold the airplane in half along the center crease, with the folds on the outside.
- Fold the wings down so that they are perpendicular to the fuselage.
- Make a small cut in the back of each wing to create ailerons.
- Adjust the ailerons for optimal flight.
4.3 The Stealth Bomber
The Stealth Bomber is a more complex design that is known for its stability and long glide times.
Instructions:
- Fold the paper in half lengthwise and then unfold. This creates a center crease.
- Fold the top two corners down so that they meet at the center crease.
- Fold the top edges down again so that they meet at the center crease.
- Fold the airplane in half along the center crease, with the folds on the inside.
- Fold the wings down so that they are perpendicular to the fuselage.
- Fold the tips of the wings up to create winglets.
- Adjust the winglets for optimal flight.
5. Advanced Paper Airplane Designs
5.1 The Hammer
As highlighted in the original article, The Hammer is a complex yet accessible design that offers a great balance of complexity and performance. It flies the best and farthest of the three designs presented.
Instructions:
- Fold the top left corner all the way down so it meets the right edge of the paper. You’ll then unfold, as this will be a guiding crease.
- Repeat the same thing with the top right corner and unfold.
- Fold the top right corner down so that its edge meets the crease that goes from top left to bottom right.
- Do the same with the left corner. The top left point should exactly meet the diagonal right edge of the airplane.
- Fold the plane in half in on itself, then unfold. You’ll use that middle crease as a guide.
- After you’ve unfolded the previous step, fold the top down so that its edge meets the bottom edge.
- Fold the top corners down so that their points meet at the middle crease.
- Unfold — as with many steps in making this airplane, these creases are a guide.
- Now take what was the top edge that you previously folded down (Step 6) and fold it back up at the point where its edge meets the creases from the previous step.
- Fold the corners in yet again so that their edge meets both the edge of the top flap and the crease from Step 7.
- Fold the wings in once more, this time simply folding along the crease that you already made. After this step your plane should have straight lines down from the top to the bottom.
- Fold the top down from where it meets the top of the wing flaps you created in the previous step.
- Fold the whole thing in half outward. You want all the paper flaps on the outside of the craft. At this point, folding can become a little tricky because of the thickness of the paper, so take extra care in making good, clean folds.
- Fold the wings down so that their edge meets the bottom edge of the plane. This creates a small snub nose. Again, this can be a tough fold, so be precise and take your time if you have to.
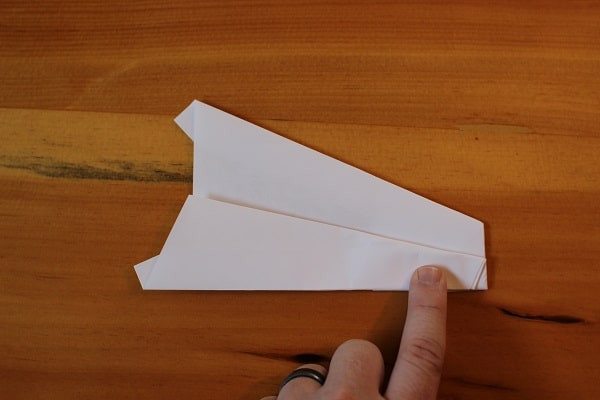 Diagram of the Hammer paper airplane design.
5.2 The Space Shuttle
The Space Shuttle is a more complex design that is inspired by the real-life Space Shuttle. It is known for its stability and unique appearance.
Instructions:
- Fold the paper in half lengthwise and then unfold. This creates a center crease.
- Fold the top two corners down so that they meet at the center crease.
- Fold the top edges down again so that they meet at the center crease.
- Fold the airplane in half along the center crease, with the folds on the inside.
- Fold the wings down so that they are perpendicular to the fuselage.
- Fold the tips of the wings up to create winglets.
- Fold the tail fins up to create a vertical stabilizer.
- Adjust the winglets and tail fins for optimal flight.
5.3 The Boomerang
The Boomerang is a unique paper airplane design that is designed to return to the thrower. It requires precise folding and a specific throwing technique to achieve the boomerang effect.
Instructions:
- Fold the paper in half lengthwise and then unfold. This creates a center crease.
- Fold the top two corners down so that they meet at the center crease.
- Fold the top edges down again so that they meet at the center crease.
- Fold the airplane in half along the center crease, with the folds on the outside.
- Fold the wings down so that they are perpendicular to the fuselage.
- Curve the wings upwards to create lift.
- Throw the airplane with a spinning motion to achieve the boomerang effect.
6. Tips for Improving Paper Airplane Flight
6.1 Adjusting the Wings
The wings are the most important part of a paper airplane, so it’s important to adjust them properly.
- Wing Angle: The angle of the wings relative to the fuselage affects lift and stability. A slight upward angle (dihedral) provides stability, while a downward angle (anhedral) makes the airplane more maneuverable.
- Wing Shape: The shape of the wings can be modified to improve performance. For example, adding winglets (small vertical fins at the tips of the wings) can reduce drag and improve stability.
- Flaps and Ailerons: Flaps and ailerons are small control surfaces that can be used to adjust the airplane’s flight path. Flaps are located on the trailing edge of the wings and are used to increase lift. Ailerons are located on the leading edge of the wings and are used to control roll.
6.2 Weight Distribution
The distribution of weight along the airplane’s length affects its stability and flight characteristics.
- Nose Weight: Adding weight to the nose of the airplane can improve its stability and make it fly straighter. This can be done by adding a paper clip or a small piece of tape to the nose.
- Tail Weight: Adding weight to the tail of the airplane can make it more maneuverable, but it can also make it less stable.
6.3 Throwing Techniques
The way you throw a paper airplane can also affect its performance.
- Launch Angle: The angle at which you launch the airplane affects its range and flight time. A higher launch angle will result in a shorter range but a longer flight time, while a lower launch angle will result in a longer range but a shorter flight time.
- Launch Speed: The speed at which you launch the airplane affects its range and stability. A faster launch speed will result in a longer range but may also make the airplane less stable.
- Spin: Adding spin to the airplane can improve its stability and make it fly straighter. This can be done by flicking your wrist as you launch the airplane.
6.4 Environmental Factors
Environmental factors such as wind and temperature can also affect paper airplane flight.
- Wind: Wind can affect the airplane’s range and direction. Flying into the wind will reduce the airplane’s range, while flying with the wind will increase it.
- Temperature: Temperature can affect the airplane’s lift and drag. Warmer air is less dense than cooler air, so an airplane will generate less lift in warmer air.
7. Advanced Techniques for Paper Airplane Enthusiasts
7.1 Designing Your Own Paper Airplanes
Once you’ve mastered the basic designs, you can start experimenting with your own designs. Here are some tips for designing your own paper airplanes:
- Start with a Simple Design: Begin with a simple design and then gradually add more complex features.
- Experiment with Different Wing Shapes: Try different wing shapes to see how they affect lift and drag.
- Adjust the Weight Distribution: Experiment with different weight distributions to see how they affect stability and maneuverability.
- Test Your Designs: Test your designs in different conditions to see how they perform.
7.2 Paper Airplane Competitions
Paper airplane competitions are a fun way to test your skills and compete against other enthusiasts. There are two main categories in paper airplane competitions:
- Distance: The goal is to throw the airplane as far as possible.
- Time Aloft: The goal is to keep the airplane in the air for as long as possible.
To prepare for a paper airplane competition, you should:
- Practice Your Folding: Practice folding your airplane designs until you can do it quickly and accurately.
- Experiment with Different Designs: Try different designs to see which ones perform best in the competition categories.
- Adjust Your Throwing Technique: Practice your throwing technique to maximize distance and time aloft.
- Study the Rules: Make sure you understand the rules of the competition.
7.3 The Science Behind Paper Airplanes: Further Exploration
Delving deeper into the science behind paper airplanes can enhance your designs and understanding of flight dynamics.
- Reynolds Number: This dimensionless number is crucial in fluid dynamics and affects how air flows around the paper airplane.
- Bernoulli’s Principle: This principle explains how the shape of the wing creates lift due to differences in air pressure.
According to research from Embry-Riddle Aeronautical University, understanding these scientific principles can significantly improve paper airplane designs and performance.
8. Paper Airplanes and Aviation: A Connection
While paper airplanes are a fun pastime, they also offer valuable insights into the principles of aviation. Many concepts used in designing real airplanes, such as lift, drag, and stability, can be explored and understood through paper airplanes.
8.1 Paper Airplanes as Educational Tools
Paper airplanes can be used as educational tools to teach children and adults about aviation concepts. They can be used to demonstrate the effects of different wing shapes, weight distributions, and control surfaces on flight performance.
8.2 The History of Paper Airplanes
The history of paper airplanes dates back centuries, with evidence of paper gliders found in ancient China. Over the years, paper airplane designs have evolved and become more sophisticated, reflecting advances in aviation technology.
8.3 Paper Airplanes in Popular Culture
Paper airplanes have appeared in numerous movies, TV shows, and books, often symbolizing freedom, creativity, and childhood innocence. They continue to be a popular symbol of aviation and imagination.
9. FAQ: Mastering the Art of Paper Airplanes
9.1 What is the best type of paper to use for paper airplanes?
Lightweight printer paper is generally the best for paper airplanes. It reduces weight and allows for longer flight times. You can find it at most office supply stores, or online retailers like Amazon.
9.2 How do I make a paper airplane fly farther?
To make a paper airplane fly farther, optimize the design for lift and minimize drag. A slightly nose-heavy airplane is more stable and will fly farther. Consider using a design like The Hammer for maximum distance.
9.3 How do I make a paper airplane fly straight?
Ensure the wings are symmetrical and the weight is evenly distributed. A small dihedral angle (upward angle of the wings) can also help with stability. If the plane veers to one side, gently adjust the wing on the opposite side.
9.4 What is the best way to throw a paper airplane?
Throw the airplane with a smooth, overhand motion. Avoid jerky movements, and aim for a consistent launch angle. Experiment with different launch angles to find what works best for your design.
9.5 How do I add weight to a paper airplane?
Add a small paper clip to the nose of the airplane to increase weight. This improves stability and helps the airplane fly straighter.
9.6 Can I use tape on my paper airplane?
Yes, tape can be used to reinforce folds or repair tears in the paper. However, use it sparingly, as too much tape can add weight and affect flight performance.
9.7 How do I make a paper airplane boomerang?
Creating a boomerang paper airplane requires a specific design and throwing technique. The wings need to be curved upwards to create lift, and the airplane needs to be thrown with a spinning motion. Designs like “The Boomerang” are specifically designed for this purpose.
9.8 Are there paper airplane competitions?
Yes, paper airplane competitions are held around the world. The two main categories are distance and time aloft. Check online resources or local aviation clubs for upcoming competitions.
9.9 How do I design my own paper airplane?
Start with a simple design and gradually add more complex features. Experiment with different wing shapes, weight distributions, and control surfaces. Test your designs in different conditions to see how they perform.
9.10 How does weather affect paper airplane flight?
Wind and temperature can affect paper airplane flight. Flying into the wind will reduce the airplane’s range, while flying with the wind will increase it. Warmer air is less dense than cooler air, so an airplane will generate less lift in warmer air.
10. Take Your Aviation Journey Further with Flyermedia.net
Whether you’re a beginner or an experienced paper airplane enthusiast, flyermedia.net is your go-to resource for all things aviation. Explore our website to discover:
- Comprehensive information on flight schools and pilot training programs in the USA.
- The latest aviation news and industry trends.
- Career opportunities in the aviation field.
Don’t just dream about flying; take the first step towards your aviation goals with flyermedia.net!
Ready to take your passion for aviation to the next level? Visit flyermedia.net today to explore flight schools, aviation news, and career opportunities in the USA. Start your journey towards the skies now Address: 600 S Clyde Morris Blvd, Daytona Beach, FL 32114, United States. Phone: +1 (386) 226-6000. Website: flyermedia.net.