Want to spookify your Halloween with an impressive, eye-catching decoration? Making a flying ghost for Halloween is a fantastic DIY project that will amaze your guests and add a unique touch to your haunted setup. At flyermedia.net, we’ll guide you through creating an Axworthy ghost, a ghostly spirit that floats silently through your graveyard or hovers mysteriously above your party, offering a delightful fright to everyone. With a little creativity and some basic materials, you can create your own ethereal specter that will be the talk of the town.
1. What is a Flying Axworthy Ghost and Why Should You Make One?
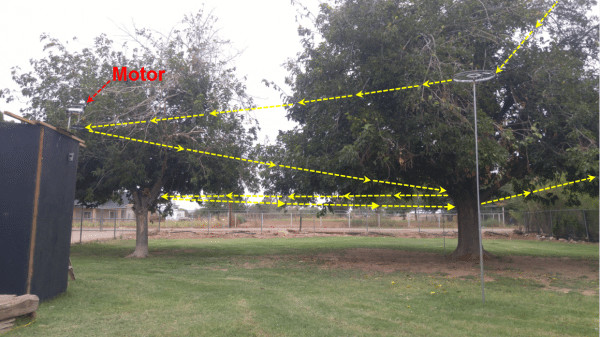
An Axworthy ghost is a Halloween decoration that appears to fly or float through the air, typically using a suspended pulley system. This creates an incredibly spooky and captivating effect, as the ghost seems to glide effortlessly, enhancing the eerie ambiance of your Halloween display.
1.1. Why Choose an Axworthy Ghost?
- Unique and Impressive: Unlike typical static decorations, a flying ghost adds a dynamic element that draws attention and sparks conversation.
- Customizable: You can tailor the ghost’s appearance and movement to fit your specific theme and space.
- DIY Satisfaction: Building your own flying ghost is a rewarding project that allows you to showcase your creativity and crafting skills.
- Cost-Effective: With some ingenuity, you can create this impressive effect using affordable and repurposed materials.
- Versatile: Suitable for both indoor and outdoor setups, a flying ghost can be the centerpiece of your Halloween decor.
1.2. User Intent
People search for “How To Make Flying Ghost For Halloween” with various intentions:
- Step-by-Step Instructions: Users want detailed, easy-to-follow instructions to build their own flying ghost.
- Cost-Effective Solutions: Searchers are looking for ways to create this effect without spending a lot of money.
- Creative Inspiration: Users seek unique design ideas and ways to customize their flying ghost.
- Troubleshooting Tips: People need solutions for common issues encountered during the construction process.
- Safety Guidelines: Users want to ensure their flying ghost is safe for display, especially around children and pets.
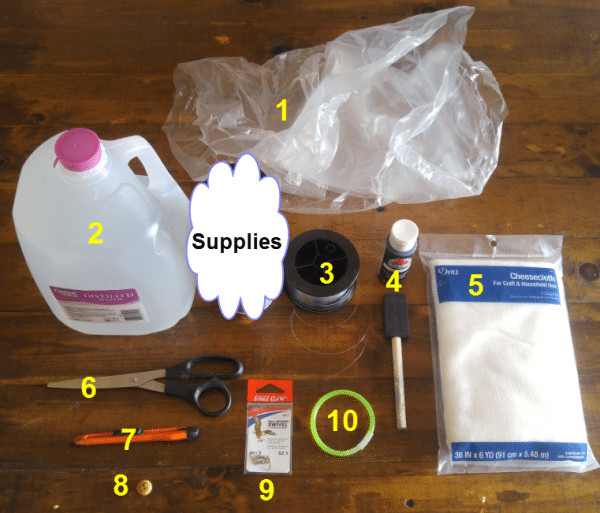
2. Gathering Your Materials: What You’ll Need
Before diving into the construction process, gather all the necessary materials. This will make the project smoother and more enjoyable. Here’s a comprehensive list of supplies for both the motor and the ghost itself:
2.1. Motor Components
- Old Hand Drill: This will serve as the motor to drive the pulley system.
- Flat Strap Metal: Approximately 6 feet of 2-inch wide flat strap for building the motor platform.
- Adult-Sized Bike Wheel: Smaller wheels can cause the ghost to whip around too quickly.
- Variable Speed Controller: To control the speed of the motor and the ghost’s movement. (Variable Speed Controller)
- Bondo Resin: For securing the wheel to the motor shaft.
- Hardener Drops: Needed to mix with the Bondo resin.
- U-Bolt: To attach the drill to the motor plate.
2.2. Pulley System Components
- Bike Wheels: For creating the pulley track. The number of wheels depends on the desired path of the ghost.
- Wing Nuts: One for each wheel (except the motor wheel).
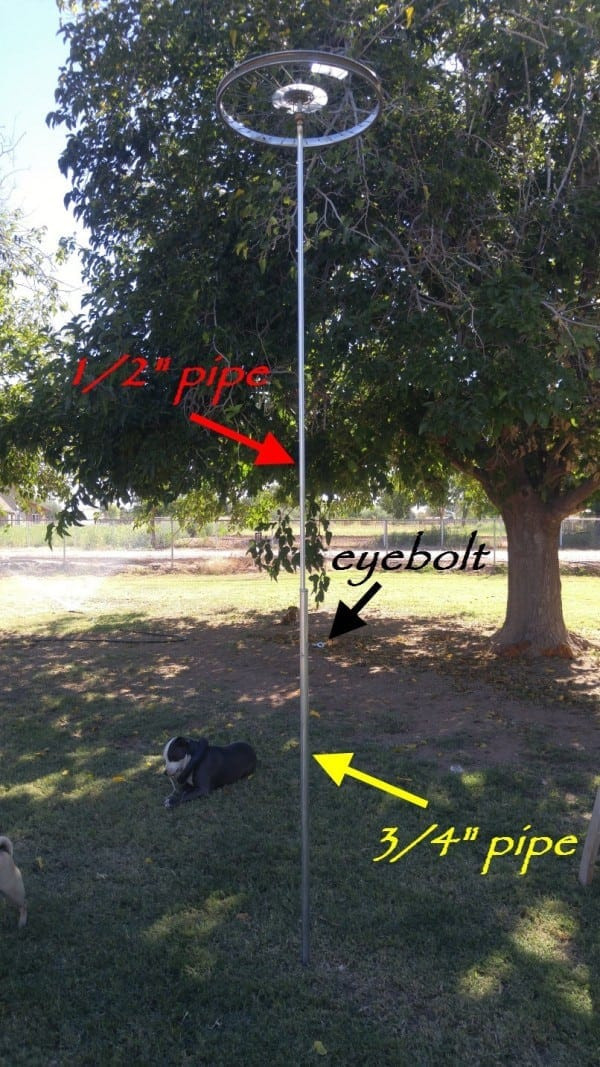
- Conduit Pipe (3/4 inch diameter): In 5-foot lengths, to be pounded into the ground.
- Conduit Pipe (1/2 inch diameter): Cut to the desired height for suspending the ghost.
- Eyebolts and Nuts: One for each wheel.
- Scrap Metal Pieces: Approximately 1 inch x 2 inches, for welding to the bottom of the 3/4-inch conduit poles.
- Black Spray Paint: To help hide the poles and wheels in the dark.
2.3. Ghost Components
- Clear Plastic Bag: To protect the glow bracelet.
- Milk Carton: For molding the skull shape.
- Heavy Grade Fishing Line: For hanging the ghost.
- Black Paint: For blacking out the eyes.
- Cheesecloth: Two pieces at 3 feet x 8 feet.
- Small Sewing Button: For securing the fishing line to the skull.
- Green Glow Bracelet: For making the ghost’s head glow.
- Ball Bearing Fishing Swivel with Interlock Snap: For easy attachment to the pulley line.
- Life-Sized Skull: For molding the milk jug. A Bucky skull works well.
2.4. Tools Required
- Welder: For constructing the motor platform and pulley system.
- Chop Saw: With a metal-cutting blade.
- Grinder: To smooth sharp edges.
- Hand Drill or Drill Press: With metal drilling bits.
- Scissors
- Box Cutter
- Hot Glue Gun
- Heat Gun
- Acetone-Free Fingernail Polish Remover
- Cotton Balls
- Sharpie Marker
- Disposable Cups and Spoons
3. Building the Motor: Step-by-Step Guide
The motor is the heart of your flying ghost system. Follow these steps to construct a reliable and adjustable motor:
3.1. Constructing the Motor Platform
- Cut the Flat Strap: Use the chop saw to cut the 2-inch wide flat strap into appropriate lengths.
- Weld the Straps: Weld the flat straps together to create a stable platform. Ensure the platform is sturdy enough to support the weight of the drill and wheel.
- Mounting Arms: Weld mounting arms to the platform for securing it to a stable structure, such as a roof edge or awning.
- Motor Plate: Create a motor plate on the opposite end of the mounting arms to hold the old hand drill.
3.2. Attaching the Drill
- Secure the Drill: Use a U-bolt to attach the old hand drill to the motor plate. Ensure the drill is firmly secured.
- Shaft Length: Ensure the drill shaft is long enough to prevent the ghost from hitting any walls during turns. If necessary, extend the shaft or build a makeshift awning.
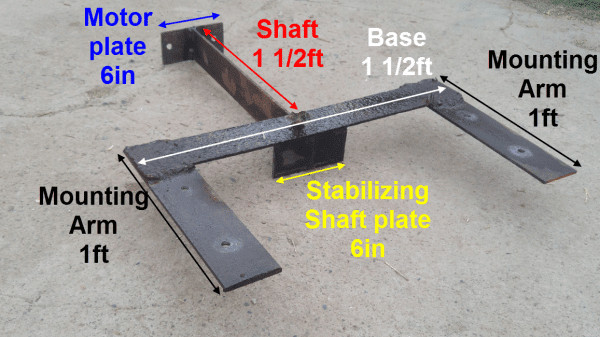 Homemade motor platform with mounting arms
3.3. Connecting the Wheel
- Insert the Axle: Insert the axle of the bike wheel into the drill chuck, where drill bits would normally go.
- Tighten the Chuck: Tighten the chuck to secure the wheel to the drill.
- Apply Bondo Resin: Pour Bondo resin into the axle insides of the wheel to prevent it from spinning independently from the drill. This ensures the wheel turns directly with the motor.
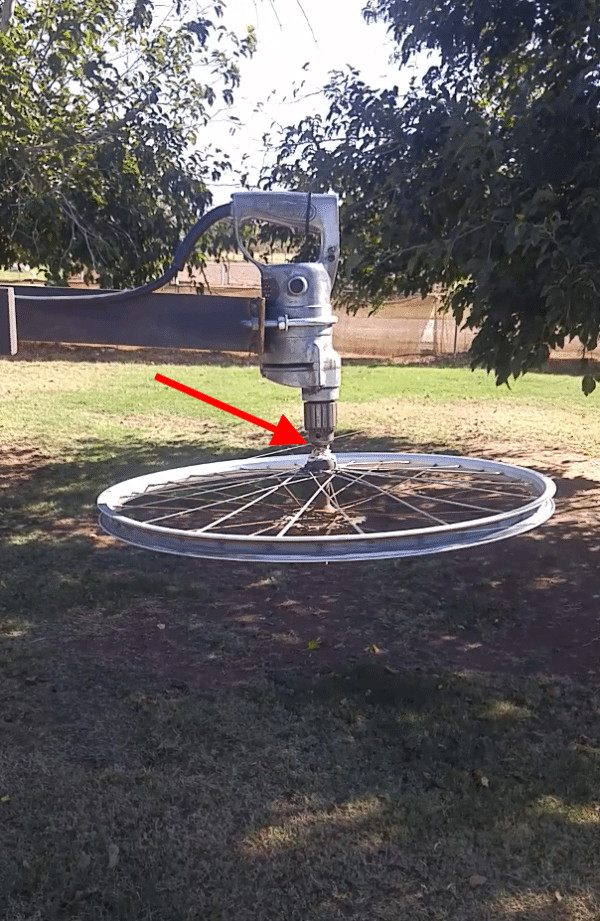 Attaching the wheel to the drill
3.4. Securing the Wheel with Resin
- Prepare the Resin: In a disposable cup, mix about 1/4 cup of Bondo resin with the hardener drops, following the instructions on the resin can. Adding about 20 drops of hardener should be sufficient.
- Mix Thoroughly: Stir the mixture with a disposable spoon until it is well combined.
- Pour the Resin: Drizzle the resin into the axle insides of the wheel.
- Harden: Allow the resin to harden completely before moving on to the next step.
 Mixing the Bondo resin
3.5. Variable Speed Controller
- Plug In: Plug the variable speed controller into the motor to control the wheel’s speed.
- Adjust Speed: Adjust the controller to achieve the desired speed for your flying ghost.
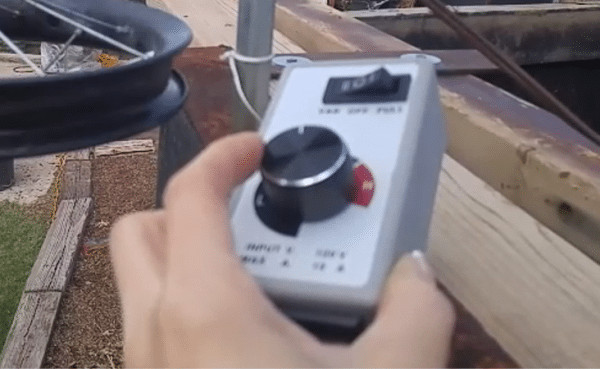 Variable speed controller connected to the motor
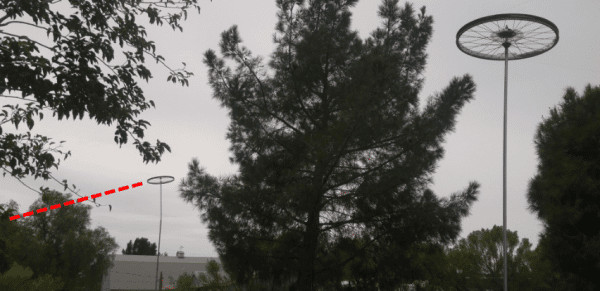
4. Constructing the Pulley System: Ensuring Smooth Flight
The pulley system is crucial for guiding your ghost’s flight path. Follow these steps to build a robust and reliable system:
4.1. Preparing the Wheels
- Wheel Selection: Choose the number of bike wheels based on the desired turns and path for your ghost.
- Axle Check: Ensure the axles on all wheels spin freely. If they are rusted or seized, they won’t work properly.
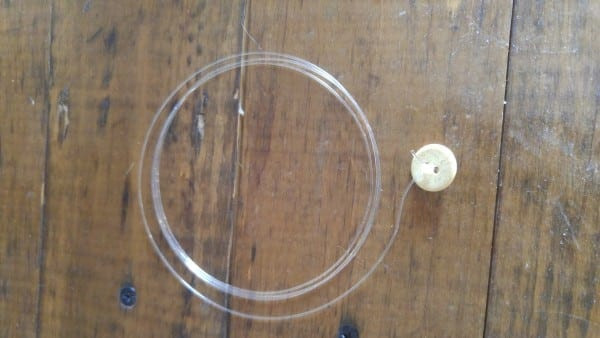
- Wing Nut Removal: Unscrew the wing nut from the axle of each wheel.
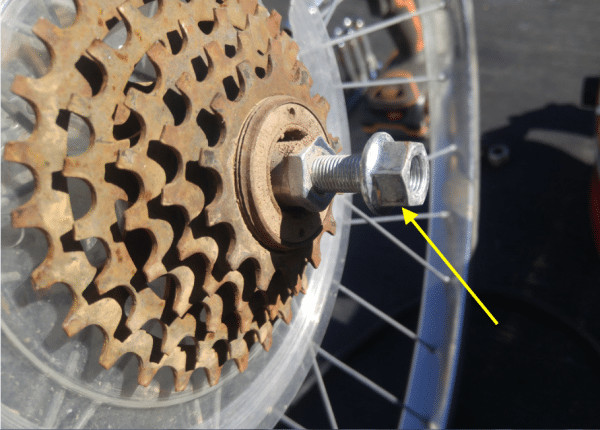 Unscrewing the wing nut from the bike wheel axle
4.2. Attaching the Wheels to Conduit Pipes
- Weld Wing Nut: Weld the wing nut into the end of a 1/2-inch round conduit pipe. The wider part of the wing nut should face outwards.
- Hold in Place: Use a screwdriver to hold the wing nut in place while welding.
- Screw Wing Nut Back On: Screw the wing nut back onto the axle. The wheel should now be attached to the 1/2-inch round conduit and spin freely.
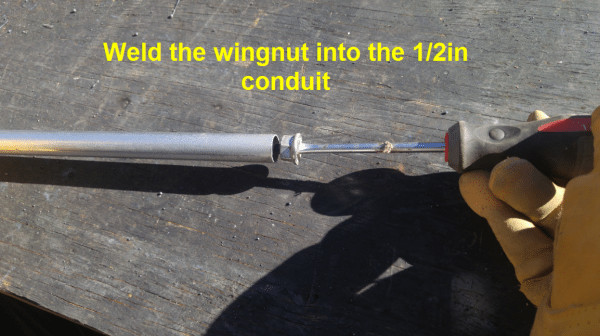 Welding the wing nut into the conduit pipe
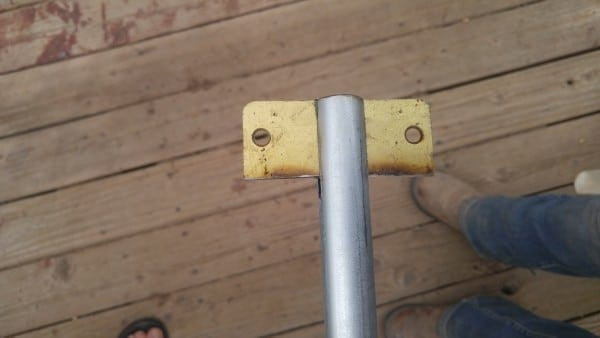
4.3. Preparing the Support Poles
- Drill Hole: With the 3/4-inch round conduit pipe, drill a hole slightly larger than the shaft of the eyebolt, about 8 to 10 inches from the end of the conduit.
- Insert Eyebolt: Place the shaft of the eyebolt into the hole, ensuring it slides in easily.
- Weld Nut: Weld the nut onto the conduit, making sure not to weld the eyebolt. The eyebolt should be able to unscrew from the nut after welding.
Drilling a hole in the 3/4-inch round conduit pipe for the eyebolt.
4.4. Stabilizing the Poles
- Weld Metal Pieces: At the bottom of the 3/4-inch round conduit pipe, weld a rectangular piece of scrap metal (approximately 1 inch x 2 inches) to create a ‘T’ shape. This prevents the poles from spinning when pounded into the ground.
 Welding a metal piece to the bottom of the conduit pipe
4.5. Installing the Poles
- Pound into Ground: Pound the 3/4-inch round conduit about 1 to 2 feet into the ground, ensuring it is sturdy.
- Use Sleeve: To avoid damaging the ends of the conduit while hammering, use a homemade metal sleeve or a tee-post driver.
- Slide and Adjust: Slide the 1/2-inch round conduit pipe (with the wheel attached) into the 3/4-inch conduit pipe. Adjust the height of the wheel and tighten the eyebolt.
 Sliding the conduit pipe with the wheel into the support pole
4.6. Painting the System
- Spray Paint: Spray paint all the wheels and pipes black to keep them hidden at night.
5. Crafting the Ghost: Bringing Your Specter to Life
Now for the most exciting part: creating the ghost itself. This section provides a detailed guide to making a lightweight and eerie ghost.
5.1. Preparing the Milk Jug Skull
- Draw Lines: With a Sharpie, draw around the handle and top of the milk carton.
- Cut Along Lines: Cut along the drawn lines with scissors or a box cutter.
- Additional Cuts: Make two more lines (about 2 to 3 inches in length) on the top sides of the milk jug and cut along these lines.
- Bottom Cut: Draw and cut one more line at the bottom of the milk jug (about 2 to 3 inches in length).
- Molding: Set up your skull on a stand.
- Heat Molding: Use a heat gun to mold the milk jug to the shape of the skull.
 Drawing lines on the milk jug
5.2. Securing the Skull
- Punch Holes: After molding, punch two small holes in the back of the milk jug skull.
- Tie Together: Tie the holes together with a piece of fishing line, leaving about 2 feet of line dangling from the back.
- Black Out Eyes: Black out the eye sockets with black paint.
- Button Attachment: Tie another piece of fishing line (2 feet in length) to your small button.
- Punch Top Hole: Punch a small hole in the top of the skull and poke the end of the fishing line through. The button will stop at the hole, allowing the skull to hang.
 Tying fishing line to a button
5.3. Preparing the Cheesecloth
- Remove Date: Use acetone-free fingernail polish remover and a cotton ball to remove any stamped dates on the milk jug.
- Starch and Iron: Gather both sheets of cheesecloth and starch and iron them to give them a crisp appearance.
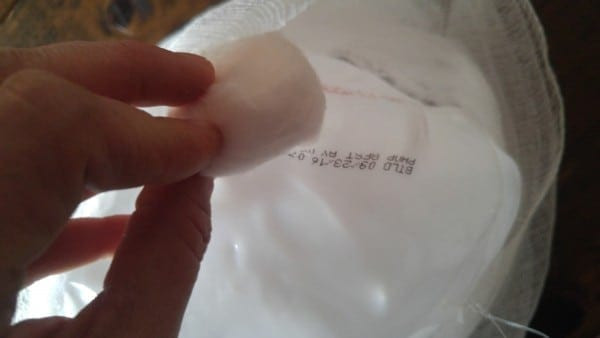 Removing the stamped date from the milk jug
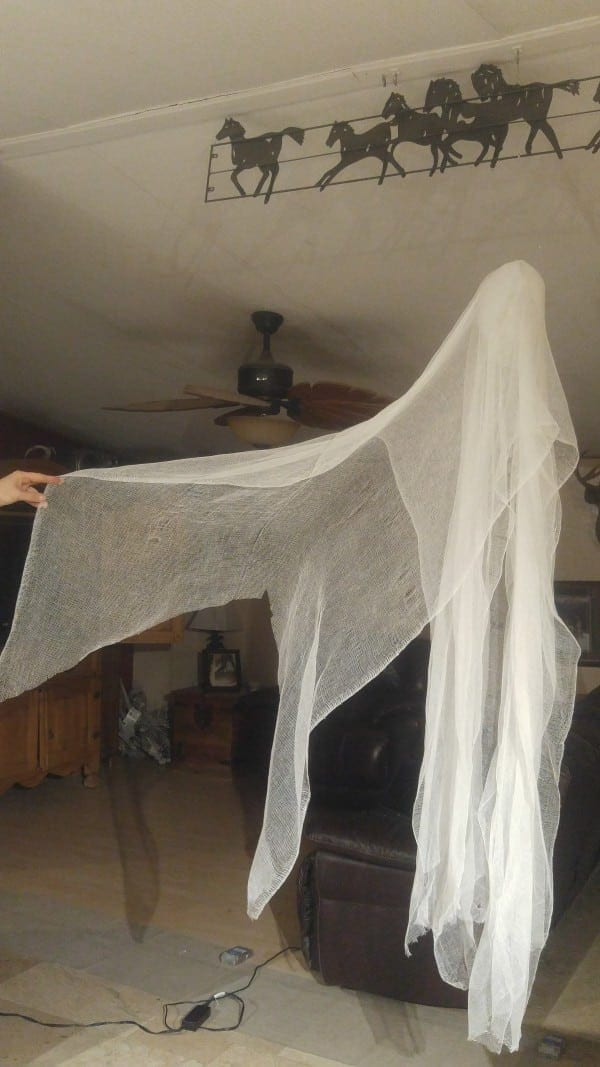
5.4. Draping the Cheesecloth
- Drape Over Skull: Drape each piece of cheesecloth over the milk jug skull.
- Fishing Line Placement: Pull the two pieces of fishing line up through the cheesecloth. The line on the top is the main hanging line, and the line in the back stabilizes the ghost.
- Swivel Attachment: Tie a ball-bearing fishing swivel to the ends of both lines, leaving the main hanging line about 6 inches long and the stabilizing line about 8 to 10 inches long.
 Draping cheesecloth over the milk jug skull
5.5. Trimming the Cheesecloth
- Trim Excess Fabric: Trim the cheesecloth to reduce weight. Cut large triangles up into the fabric for a tattered look.
 Cutting the cheesecloth
5.6. Adding the Glow
- Prepare Glow Bracelet: Use a green glow bracelet wrapped up in a clear plastic bag.
- Insert into Skull: Lift up the ghost’s skirts and stuff the bag inside the hollow head of the ghost. The bag should stay in place without needing glue, making it easy to replace the bracelet.
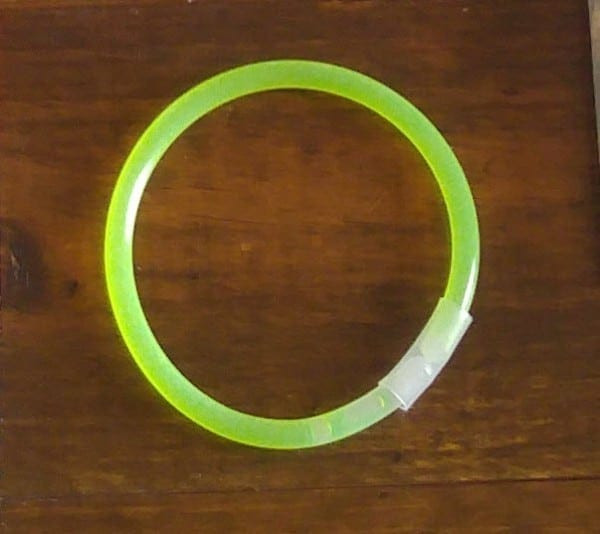 Inserting a glow bracelet into the ghost's head
6. Assembling the System: Bringing It All Together
With the motor, pulley system, and ghost prepared, it’s time to assemble the entire setup:
6.1. Hanging the Pulley Line
- Helper: Enlist a helper for this part.
- String the Line: Have your helper hold one end of the fishing line, keeping tension on the line, and string it from one pulley to the next. Use a ladder for this step.
- Secure the Ends: After stringing the line, make a strong knot in both ends of the fishing line to prevent slipping.
 Stringing the fishing line around the pulleys
6.2. Attaching the Ghost
- Hang the Ghost: Hang your ghost onto the line with the swivel hooks.
- Hot Glue Stoppers: Use small blobs of hot glue on the pulley line to act as stoppers for the swivel hooks. These stoppers will ‘grab’ the swivels, moving the ghost along the line. Without stoppers, the pulley line will slip through the swivels, and the ghost won’t move.
- Placement: Use two stoppers for each swivel hook, leaving about 4 to 6 inches between them.
7. Troubleshooting: Solving Common Issues
Even with careful construction, you might encounter some issues. Here are common problems and solutions:
7.1. Pulley Line Keeps Falling Off the Track
- Ghost Weight: The ghost may be too heavy. Ensure the main line is straight and not sagging.
- Line Tension: The line isn’t tight enough.
- Pulley Angle: Pulleys aren’t angled correctly. Adjust the angle of the conduit slightly to align the fishing line with the wheel.
 Adjusting the pulley angle
- Line Tension Too High: The line is too tight and is bending the conduit, misaligning the pulleys.
- Motor Speed: The motor is running too fast, causing the ghost to whip off the track.
- Snagging: The ghost is hitting or snagging something.
- Pole Stability: The conduit poles are rocking back and forth and need stabilization. Attach a 2×4 to stabilize the pole.
- Stopper Size: Hot glue stoppers are too big, causing the line to jump off. Make sure they are no larger than the size of a pea.
7.2. Pulley Line is Moving, But Ghost Isn’t
- Stopper Size: Hot glue stoppers on the pulley line are too small and are slipping through the swivel hooks.
8. Enhancing the Spookiness: Creative Ideas and Additional Effects
To make your flying ghost even more impressive, consider these creative ideas and additional effects:
8.1. Lighting Enhancements
- Spotlights: Use spotlights to highlight the ghost as it flies, creating dramatic shadows.
- Colored Lights: Experiment with different colored lights to change the ghost’s appearance, such as eerie green or ghostly blue.
- Strobe Lights: Add strobe lights for a flickering effect that enhances the spookiness.
8.2. Sound Effects
- Ghostly Sounds: Play ghostly moans, chains rattling, or eerie wind noises to add to the atmosphere.
- Motion-Activated Sounds: Use a motion sensor to trigger sound effects when the ghost passes by.
8.3. Costume Variations
- Tattered Fabric: Use different types of tattered fabric to create unique ghost costumes.
- Glow-in-the-Dark Paint: Add glow-in-the-dark paint to the fabric for an extra eerie effect.
- Props: Attach props like chains, lanterns, or severed limbs to the ghost for added detail.
8.4. Environmental Effects
- Fog Machine: Use a fog machine to create a misty atmosphere that enhances the ghost’s presence.
- Projected Images: Project ghostly images onto nearby surfaces to create a more immersive experience.
9. Flyermedia.net: Your Ultimate Resource for Aviation and Halloween Projects
At flyermedia.net, we are dedicated to providing you with a wide range of information, from aviation training and news to creative DIY projects like this flying ghost for Halloween. Whether you’re an aviation enthusiast, a student pilot, or simply someone who loves a good DIY challenge, flyermedia.net has something for you.
9.1. Aviation Training Information
- Flight School Directory: Find a comprehensive list of flight schools in the USA, with detailed information on programs, instructors, and facilities.
- Pilot Certification Guides: Learn about the different types of pilot certifications, requirements, and steps to achieve your dream of flying.
- Aviation Regulations: Stay up-to-date with the latest aviation regulations and safety standards.
9.2. Aviation News and Updates
- Breaking News: Get the latest news on aviation accidents, incidents, and safety investigations.
- Technology Advances: Explore the newest technologies in aircraft design, navigation systems, and air traffic control.
- Aviation Events: Find information on air shows, conferences, and aviation-related events happening near you.
9.3. Career Opportunities in Aviation
- Pilot Jobs: Discover job opportunities for pilots in various sectors, including commercial airlines, cargo carriers, and private aviation.
- Maintenance Technician Roles: Learn about the requirements and job prospects for aircraft maintenance technicians.
- Air Traffic Controller Positions: Find information on becoming an air traffic controller and the skills required for this challenging role.
9.4. Halloween and DIY Projects
- DIY Guides: Find step-by-step guides for creating unique Halloween decorations, costumes, and props.
- Creative Ideas: Get inspiration for your next DIY project, from home decor to party themes.
- Safety Tips: Learn how to create safe and enjoyable DIY projects for all ages.
10. FAQs: Your Questions Answered
10.1. What is an Axworthy Ghost?
An Axworthy ghost is a Halloween decoration that uses a pulley system to create the illusion of a flying or floating ghost.
10.2. What Materials are Needed to Make a Flying Ghost?
You’ll need an old hand drill, bike wheels, conduit pipes, cheesecloth, a milk carton, and other basic crafting supplies.
10.3. How Do I Control the Speed of the Flying Ghost?
Use a variable speed controller to adjust the motor’s speed, which in turn controls the ghost’s movement.
10.4. How Do I Prevent the Pulley Line from Falling Off?
Ensure the ghost is lightweight, the line is tight enough, and the pulleys are angled correctly.
10.5. How Do I Make the Ghost Glow?
Use a green glow bracelet wrapped in a clear plastic bag and insert it into the ghost’s head.
10.6. Can I Use This Setup Indoors?
Yes, but ensure you have enough space and secure mounting points for the motor and pulley system.
10.7. How Do I Stabilize the Conduit Poles?
Weld a rectangular piece of scrap metal to the bottom of the poles to prevent them from spinning.
10.8. What Kind of Fishing Line Should I Use?
Use heavy-grade fishing line (50-pound grade) to ensure it can support the weight of the ghost.
10.9. How Can I Customize My Flying Ghost?
Experiment with different fabrics, lighting effects, and sound effects to create a unique and spooky specter.
10.10. Is This Project Safe for Children?
Ensure the setup is secure and out of reach of children. Supervise children if they are helping with the project.
Conclusion: Create Your Spooktacular Specter Today
Making a flying ghost for Halloween is a rewarding DIY project that adds a unique and spooky touch to your decorations. By following these detailed steps and troubleshooting tips, you can create a captivating spectacle that will impress your guests and enhance your Halloween ambiance. Visit flyermedia.net for more aviation information, DIY guides, and creative ideas. Let your imagination take flight and create a Halloween to remember.
Are you ready to take your Halloween decorations to the next level? Visit flyermedia.net today to discover more inspiring DIY projects and aviation insights! Whether you’re crafting spooky decorations or pursuing your aviation dreams, we’ve got the resources and information you need. Don’t wait—explore flyermedia.net now and let your creativity soar! For any inquiries, you can reach us at: Address: 600 S Clyde Morris Blvd, Daytona Beach, FL 32114, United States. Phone: +1 (386) 226-6000. Website: flyermedia.net.